Lesson Info
13. Getting the Shot
Lessons
Class Intro
00:52 2History and Overview of National Parks
11:07 3Case Studies
14:07 4Scouting Locations From Home
10:55 5Day Scouting Locations
12:36 6Organizing Your Info
04:10 7Tools for Scouting on Location
16:06 8Preparing for Wilderness and Plant Life
08:00Lesson Info
Getting the Shot
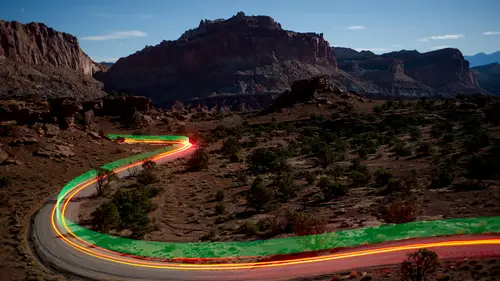
Okay, so I don't wanna light paint from this side because of the water here. It's really easy to see it right now, but it's gonna be dark later and I don't wanna have to worry about this. I don't wanna have to worry about stepping in it. So if I set the camera up over there, usually with your light painting, you wanna get it about 90 degrees. But I'm pretty sure we're gonna get some funky shadows in the windows if I do that. So, if I light paint from right here, a little more than, I'm gonna say it's about 55, 60 degrees, I can hit with a nice wide beam on the Coast flashlight. I try a couple different flashlights for light temperatures, but there's some nice plant life growing on here to give a really nice green, so I think we can go with an LED light and it'll be okay. Yeah, the other thing I'm gonna watch is I'm gonna be careful about these logs over here in the dark. Again, I'm gonna be walking, when I'm walking through here to actually shoot later, it's gonna be dark. I'm not gonn...
a be able to see any of this. So it's good just I know the lay of the land right now. So, again, we're avoiding the water. I don't wanna trip over these logs. Gonna set up the tripod right there and light paint from right here. Yeah, this should be a great shot. I'm excited to give it a try. So, here I am back at night. Scouted this location during the day, not just for the shot, but also for safety purposes. All those logs that I was walking over before, again, they can be a little sketchy at night. So just spending the time in the day made me a little more comfortable, but more than that, I was able to spot a path around the logs up the the trailhead, so coming back down here with all the gear in the dark, just took that route instead. So, again, just another way that the daytime scouting helped out. The shot's all set up. Again, here in the day, I knew exactly where I wanted to put my tripod. I was able to pre-focus my lens, so we're all set. I don't have to worry about that. And I even know where I'm gonna go to do the light painting. So it was a matter of just coming out here and executing it at this point. A few other things about my setup, for one, as I'm walking around between shots, I don't wanna use a standard flashlight because that could ruin my night vision. It can take a while to adjust from light to dark and light to dark, so instead, I got a cap light here. It's just red. This is plenty of light to shoot, I'm sorry, it's plenty of light for me to be able to see in the dark, but not so much light that it's gonna ruin my vision. Okay, so I've got another, I have a handheld one as well right here in my pocket. So, lots of resources for me to go to. I'm loaded up with my flashlights for the light painting. I'm not gonna go too much into the technique about light paining because Tim Cooper, one of my colleagues, is gonna cover that and he's just a master at the subject. What I have done already is I've determined, as I said, where I'm gonna stand, which of my flashlights I'm gonna use for the right power, and I've even decided to put a gel over it so I can get a warmer effect on the rock face. Another thing I've done is, as I'm walking around in the dark, especially if I get far away, sometimes it can be hard to find my camera again. So, what I do, I've got my GeoTracker, which happens to have a flashing light on it, I've got that attached to my bag and the bag's right next to the tripod. So wherever I go out here, when it gets dark, I always know how to walk back again. So the third point about my setup here is kind of just a point about backup equipment. As I was setting up, I connected my intervalometer and I was ready to do a test shot and it didn't work. The camera was working fine, so I assume it's something with the intervalometer. But I'm all set because I actually have three other remote triggers with me. And I attached a second one and it works fine. And, in fact, it's even a little better because it's a wireless one. So, with the intervalometer, I'm gonna have to trigger here and then go around and light paint. Now I can go to my light paining position and hit the camera remotely. But the important point is that there's some equipment that's so important in the shoot that you have to have a backup. And when you're doing a night shoot, an intervalometer definitely falls into that category. So, there we are. We're all set to shoot. Time to execute. Okay, I'm ready to shoot. I've got the remote in my hand. This is gonna be a 20 second exposure at F4 at ISO 3200. So, I'm gonna hit the shutter, then I'm gonna put the filter on my light and do six seconds of light painting, so here we go. All right, I can see the camera went. Have my filter on. Start high. I'm just counting: two, three, four, five, six. Wait for the camera to finish it's thing. All right, so let's take a look and see what I've got. Yeah! I think I've got it here. The rock is lit nicely. And I've got a little bit of glow on the horizon here, which gives it some nice separation. Some really crisp star points. And let me just check the histogram. Yeah, the histogram's perfect. You always wanna check the histogram at night because your eyes get adjusted to the dark. Just looking at the LCD will fool you. You could have a dim image, but it looks perfectly fine to you. And then you get home, see it on the computer, and you're like, "That's not bright enough at all." So, always check your histogram before you wrap up a setup just to make sure that you got the exposure correct and the way that you want it. So, again, this went pretty flawlessly. It doesn't always happen that way, but doing the daytime scouting really helped out in this situation. Not that it would have been impossible to come and do this in the dark, but it would have taken a lot more time to figure out what the composition was gonna be and where the tripod was gonna go, a safe way to root around the scene and from where to light paint from. All that would have taken a lot longer, which could have been okay, except now I have more time. I've got more time out here and I can maybe find some other stuff to shoot, which is why we're here, right? Okay, let's do it. So, thanks for joining me. I hope you were able to take a lot from this, including how to come out here in a safe way to really respect the wilderness, to learn about the environment that you're shooting in, so that you can pay attention to your well-being and pay attention to being able to do the best creative work that you can get out of yourself. They're just fantastic places to shoot, to come out and do photography, especially at night in these pristine night skies. So, I challenge you to get out here. Get out here and join me in the national parks and seize the night.
Class Materials
Bonus Materials with Purchase
Ratings and Reviews
Donna
This class was a tremendous help. It is definitely a "tool kit" class and not a "how to" class. With that said, it is worth every penny just for the amazing scouting tips, safety tips, and national park app suggestion. I downloaded one of the recommended apps from this class for a trip I'm taking next month and was thrilled with the information. There are definitely a lot of great tools discussed in this class.
Gaily Cowart
This class was incredible because I wouldn't have gottent this info anywhere else. It's basically a lesson in common and not-so-common sense while shooting at night. No, you're not going to get a whole lot of techniques for working your camera, but you will get strategies for making sure you're actually able to shoot once you're ready. With night photography, there are many unknows that can ruin your chances of getting good shots. Without this class, I never would have thought about how to make the most of daylight hours to plan and prepare a night shoot. And, I wouldn't have known much about how to be as safe and prepared while shooting in the wilderness. I found this course to be very interesting and helpful in the grand scheme of understanding how to get the best from your efforts while shooting at night-time in a park, or secluded area.
Robert Reed
If you understand the purpose of this class, you will get a great deal of benefit from it. It is NOT a photography class in the sense of teaching technique, gear, or artistic considerations. It is a class on scouting and preparing for landscape photography - particularly night photography. While the instructor works heavily in the national parks, his techniques would be valuable anywhere. I especially benefited from the section on various resources. He mentions several books and gives specific insights into apps designed for photographers. Most of which I was familiar with, but he even covers their basic use and function. Those not accustomed to spending time on trails or in the back country will also appreciate the very practical advice that he offers on safety, clothing, and general considerations. A nice concise package that covers a lot of ground.