Lessons
Introduction to Nikon D5600
10:01 2Photo Basics
07:10 3Top Deck: Mode Dial
25:46 4Top Deck: Additional Buttons and Flash
13:19 5Backside: Live View & Movie Mode
20:38 6Backside: Viewfinder Display
06:33 7Backside: Additional Buttons
11:56 8Backside: I Button Top Row
13:26Backside: I Button Bottom Row
16:10 10Left & Right Sides of Camera
10:14 11Bottom & Front of Camera
03:26 12Lens for Nikon D5600
17:45 13Menu Overview
03:54 14Playback Menu
07:05 15Shooting Menu: Reset Shoot-White Balance
15:16 16Shooting Menu: Picture Control-High ISO NR
08:31 17Shooting Menu: Vignette Control-Manual Movie Settings
13:20 18Custom Setting Menu
19:52 19Setup Menu
11:22 20Setup Menu: SnapBridge & Wireless Controls
19:05 21Retouch Menu & Recent Settings
06:41 22Camera Operations
11:53Lesson Info
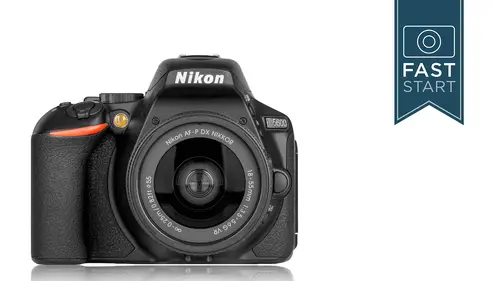
Top Deck: Additional Buttons and Flash
Alright, right next to the shutter release is the little red dot, and this is for movie record. Now to be honest with you this isn't gonna do anything right now at this point if you haven't done anything else in this, we're gonna be talking more about the movie mode as we come up. If you do want to shoot movies, you do have to have the camera in the live view mode. And so there's a live view lever that you can turn that lever, little spring loaded lever, you need to put it in live view, and then the movie record will start working. But just on its own it's not gonna do anything. And we are gonna talk more about movies coming up in this class. The plus minus button on the top of the camera was used for our manual aperture settings but it is also used for something called exposure compensation. And this is gonna allow you to make your pictures lighter or darker in certain modes. So as an example if you want to shoot a photo and you're not sure if it should be brighter or darker you just ...
want something that looks a little bit different you would press down on that button, turn the back dial as you are holding down and you can do up to five stops under or five stops over exposed. Now this is something that you'll see indicated in the viewfinder as well as on the back of the camera. If it was one stop overexposed it might say plus one or it might just indicate with that exposure indicator that you're over one full stop into the plus side. If you were on the minus side you're gonna be on the left side, the negative side of the indicator. Normally you're gonna want to leave this at zero unless you are specifically wanting to change it. Now this does not work in manual exposure, it only works in program, shutter priority, and aperture priority. And the reason it doesn't work in manual is because you are in control of shutter speeds and apertures and in these other three modes the camera is in control of one of the other, one or two of the other features. And by, and then that's the way exposure compensation works is the camera just changes whatever it has control over to get a lighter or darker photo. For instance, if you're in aperture priority and you want it a little bit brighter it just uses a slower shutter speed to give you a brighter image. So it's really good for those people using shutter priority, aperture priority, program, you take a photo of something that is kind of dark or kind of light and the camera doesn't bring it out the way it looks in the real world, you can adjust it very quickly and easily. But definitely the most important thing to know is to reset it back to zero when you're done. Because this stays locked in on all the other modes that you're on and when you turn the camera off turn it back on, you take the battery out put the battery back in, it remembers where you had your exposure compensation set. On the top of the camera you'll see a couple of little holes in there, little stereo microphone. And so it is picking up sound, recording that for the movies that you record. There is a speaker when you play back your movies if you want to listen to them that's where the speaker is, it's not real loud but it does do the job when playing the videos back. There is a little symbol right to the left of a hot shoe on the camera that indicates where the sensor is in the camera. And so this is generally, it's just a reference mark for people who would need to measure that. And it's unlikely that most photographers are going to need to measure that. If you were into very high magnification photography, macro photography, or some sort of scientific experiment you might need that. If you were using cinema lenses and you needed to measure the distance between your subject and the image plane, you might need that. But for the most part it's not real important. Next up on the top of the camera we do have a flash, and while the button is more on the left side and not really the top side it's pretty close and we should maybe talk about it a little bit right here. If you are in the auto mode, the green camera box mode, the flash pops up automatically whenever it thinks it needs it. Whenever it's dark out. But in the other modes you're gonna have the option of pressing that button to pop the flash up whenever you want it. If you don't want the flash you can just simply push it back down. But that button also controls a couple other levels of controls that we're gonna talk more about. So a little bit more on those flash modes. If you are in the auto mode you can press that lightning bolt button on the side of the camera and turn the control dial on the camera to change between auto flash, a red-eye reduction mode which will fire a series of strobes to reduce the pupil size to get less red-eye, or you can turn the flash off. Now it doesn't make a lot of sense that you would have the flash up but still wanting to turn it off there, but it is possible that you could do that if you needed to. If you're in some of the more manual modes program, shutter priority, aperture priority, you can press the lightning bolt as well as turning that main dial to control the fill flash, which is forcing the flash to fire all the time whether the camera thinks it needs it or not. Or red-eye reduction. The slow sync allows you to use slower shutter speeds with the camera which is gonna allow you to either potentially blur the background or use the ambient light behind your subject so your subject isn't just illuminated by flash only. There's a little bit of light around it so if you were in a dark theater or a dark concert hall and you want some of that ambient light to be a part of the picture, slow sync would be a good option in those cases. For fast moving subjects you might try rear curtain synchronization. This is where it synchronizes the flash firing not with the opening of the shutter but with the closing of the second shutter. And with subjects that are moving it can have a more natural and pleasing look to them so kind of a special effects mode that you may want to play around with if you do get into action photography with flash. If you are shooting in full manual you're in control of the shutter speeds and the camera has less control over some of the features and so using the same technique of pressing lightning bolt button, turning the main dial, you can change through the three different options when you're in manual. So you'll see that the camera automatically gives you different options depending on what mode you are in. Now one of the more interesting features that I highly recommend for people who do people photography is adjusting the flash exposure compensation This is the power of the flash. Now normally when the flash fires it uses a TTL metering system to give you a theoretical or a an ideal, or what the computer thinks is the proper technical amount of flash. And it often ends up being a little bit more flash than we want. And so a lot of photographers like to power down the flash so it's not too heavy handed in the look that it gets. And so many photographers will dial it down to TTL minus one, which means one stop less exposure than the full TTL flash. In some cases you might need a TTL minus two. Now to set this, it's a finger buster here. It's gonna take three fingers, you gotta press and hold the flash button then you've got to press the plus minus button and then you've got to turn the dial on the back of the camera. And tell you what, let's do a little demo right here of this one, because as I say this is a little bit tricky on this to use. So let's, I'm gonna leave my camera in the manual mode. So the first thing I need to do is I need to pop the flash up, which is right there. Now if I press the flash button and I turn the dial, you can see my different options on the back of the camera becoming available. I'm gonna leave it in fill flash, but now I'm gonna press the plus minus button on the top of the camera and you'll see something different lights up in yellow on the back of the camera. And now I have to use my third finger and if I allow any one of these fingers off, the whole system turns off. So I gotta start by pressing the flash button, the plus minus button, oh wait I pressed the wrong button because there's two buttons over there. Alright, pressed the flash button, press the plus minus button, and then turn the dial here. And so as I say, for doing people photography anywhere from minus point seven to maybe minus one point seven would be a good range depending on what you're particular taste is for flash. I don't know of any situation that I've ever wanted to have plus one, but it's there if you did need it. So I would either leave this at zero or somewhere here in the minus one range. I'm gonna leave one in the minus one right now. And if you don't need the flash you can always just push it down with your finger right there like that. So flash exposure compensation, in some cases you do need to go beyond the minus one depending on the tonality of the background and the other part of the photographs. The camera just doesn't understand skin tones versus background and other subjects. And so if you're not getting the results you like, feel free to jump in with flash exposure compensation and dial that back a little bit. The analogy that I like to use with flash, it's a little bit like spice in your food. I like a little bit of spice in there to, you know, that little pizazz in that, but you don't want too much. And so often times that flash will just give you a little bit too much and so dial it back to where you think it's most appropriate. Camera has a hot shoe where you can add on additional flash units, if the built in flash is not powerful enough. In many cases it is not the most powerful flash in the world, in fact let's take a look at the power of the built in flash versus some of the other ones. It has a guide number, which is a power rating of 12. They do have the SB-300 which all the way, gives you quite a bit more power at 59 in guide number. The, I really wouldn't recommend the SB- because you do have a fairly small flash right now built in. The SB-500 is kind of unique because it has a video light, it's a hot light which is gonna help illuminate people's faces if you're pretty close to them. It's not real powerful so you need to be pretty close. But it does have the ability to bounce and it has quite a bit more power than the built in flash. I think for most people who did a lot of flash photography, probably the best matching flash is the SB-700. With this camera here it's gonna give you quite a bit more power and a number of more features. Nikon's top of the line is the SB-5000 and that has a radio trigger, so if you're getting into remote flash photography that has some definite advantages. If you were shooting professionally and you were shooting something like a graduation where you had a student that you had to photograph every three seconds and you needed your flash to shoot a full powered flash and then fire up again real quickly, that SB-5000's gonna be the best at doing that. But I think the SB-500 and SB-700 would be a good match for anyone who really felt like the built in flash wasn't doing a good enough job. And it is limited in what it can do. It's a convenient emergency flash to have. Can you please explain the numbering lettering syste, used by Nikon? D5600 appears to be another upgrade to the D70s and the D7000 which I currently use. Okay, the D70s and the D7000 is in a level above the D5000 series here. Th series is pretty easy to figure out now, because they have the 3000 models, which they're currently at the D3400. This is the 5000, and the D3000 and the are both similar. What differentiates them between the other cameras, the one identifiable feature is that it has one control dial in the back of the camera. And so that's kind of their entry level but they've taken that entry level and they've gone basic entry, and this is the high-end entry level. The D70s, I had the D70 many years ago and then they had the D70s and then they had a D and then they had a D90, and then they went to the D7000. So now we're on the 7000 series, which is the next step up. and what's notable different about that is that it has two control dials. It has one in the back and it has one in the front. And so there was the 7000, 7100, 7200, 7300, then I think they skipped the and went straight to the 7500. Like they skipped the 5400 here. And so there's the 3000 which is the entry level but kind of stripped of features. There's the 5000 series, entry level but lots of menus and technical features, but the controls are still very basic level. The 7000 series is gonna be your intermediate level. The D500 series, which is kind of a semi-professional series, it's their top of the line with a crop frame sensor. And then they have the full frame sensors and I'm not gonna get into all those numbers and options up there. But hopefully that clarifies kind of they're line up. The three the five and the seven, those are the main three lines that they have now and probably will be seen going forward for the next several years.
Class Materials
Bonus Materials with Purchase
Ratings and Reviews
Margaret Lovell
I received my D5600 as a Christmas gift, and while I picked up a few things on my own, this class was wonderful. I learned more than I would have picked up just by reading a book about the camera. Thank you, John!
John Acklen
John is a fabulous teacher. So clear and easy to follow. I will take many of his classes as I learn photography! Thanks John!
Adrian Todd
Really great review as there was some features of my d5600 I wasn't too sure about. It's probably one of the best instructors I have come across as he's explains things in simple terms that I am able to understand.
Student Work
Related Classes
Camera Guides