Lesson Info
8. Shake the Bottle
Lessons
Introduction
01:25 2Gear Overview
07:58 3Super Basic Splash with Black Background – Part 1
10:17 4Super Basic Splash with Black Background – Part 2
13:57 5Basic White Background – Part 1
07:06 6Basic White Background – Part 2
11:25 7Chaos Theory in Action
15:00 8Shake the Bottle
17:00Lesson Info
Shake the Bottle
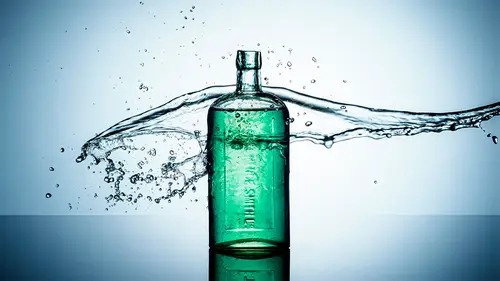
I'm gonna take that same idea that we did in the previous video and really just step it up a level because this time I'm going to get a more dynamic water drop coming out of the bottle by adding a little bit of movement. And I'm actually gonna have the entire bottle top to bottom in the frame, which sounds easier than it actually is. There will be a bit of post processing and we'll get to that in just a second. So the basic principle of this is the same, nothing is really going to change. But before I actually set the whole thing in motion, let's think about the light. So at the moment I have the light in exactly the same position as it was before and it is a little bit on the well dark side before it was fine because we were cropped right into that center bit. But now you'll notice that I'm actually using a different lens and a really good tip as you're going around with your lenses in your photography. Don't forget to clean your lens element every now and again. So I'm back to my 12 ...
to 40 millimeter, Which is the equivalent of a 24-80 mm on a full frame camera and I can see much more of a vignette than I could before. So to fix it, I'm actually gonna move the light as I move the light further away so the vignette will spread out how far I don't really know. That's one of those things that you can look at the modeling lamp if you have one. Or if you don't, you can just take a test picture and say, well that's not too bad. But I'd like a little bit more than that. So I'm probably gonna be a few feet away, which means I'm slightly out of the video, but you know, it's not much further than you can see on the edge of the video there. That distance does a couple of things. It gives space for the light to spread out, which means the size of my vignette will be much larger than it was before. But of course the downside is the further away I move the lights, the less sprite it becomes. So I'll need to adapt. My exposure were on its lowest possible power. I think when we were back there earlier, it was about 32nd power. So let's start there and see how that looks. Yeah, that looks pretty good. I like that. So, that 32nd power. I've got the nice slightly grade vignette id edges and if I go in close over the bottle, I can still see detail in the bottle texture and color. So that's really good. That feels to me about the right exposure. Remember there's no rights and no wrongs, it's what feels right that really matters. Okay, so that's everything set up. You'll notice I'm also back using my remote release cable as well because last time I just had to step around the back, this time I'm gonna be here doing something dynamic with the bottle. So let's do the bottle, let's get that ready. I'm actually gonna start by focusing the camera, the boom arm and the A clamp are gonna stay here. They're gonna help me to know where to place my bottle. So I get it in the frame and the same position for every shot. That becomes important when we get to the post processing bit. So I'm gonna manually focus on the A clamp Just to get that in focus. I'm still using f. 11, so I've still got a little bit of depth of field to play with here, so that's kind of useful. Then we're gonna put some water in the bottle now before I didn't really fill it up too much this time I'm going to fill it up pretty much to the top and there's two reasons for that. The first reason is I'm gonna hold it rather than relying on a clamp, which heavy you make it, the more chance of it falling off the a clamp you get and secondly, the more water I get in here, the longer it's gonna take for it to come out, the more photos I'm going to get. So that's pretty good. Let's pop that there, okay, right, everything is pretty much ready. I'll put the cork in here just so I can explain what's going to happen without the water going everywhere. So I'm gonna turn the bottle upside down and then I'm gonna shake it from side to side. That's going to give it some dynamic motion as the water comes out. I'm not gonna take it this way because it's gonna go all over the camera, I'm gonna shake it that way. So obviously it goes opposite the camera and hopefully it doesn't get too wet and looks better in the photos. The a clamp and the boom arm are there to guide me so I know roughly where to put my arm so I can get this the same every single time and I'm gonna try and get my fingers so they're not too far down the bottle as well. Okay that's the idea. Another little useful tip is to spin your screen round. If you have an articulating screen now is the time where it comes in Very very handy indeed. Okay so let's just slide that out the way and I'll put my hand where it was roughly in the middle, It's about there, we'll take a shot like that. Okay, so when I take that picture you can see it all works except my hand is in the shot, we've got a silhouette where my hand is, we're gonna get to that in a minute. Don't worry about that, we will fix those before we're done. So let's pull the cork out the bottle and start giving it a shake and off we go. And the this is getting nice and messy. Okay, there we are. So, I've got my pictures that looks about right, I'm happy with that. We've got some dynamic water coming out some great shapes there, we're going to repeat this a second time. So a second time just to give us some extra pitches because you can never have too many. So let's get some water in here. Wonderful every time gives you different results. So it's always worth doing more than once. Okay. And we'll try and maybe it just takes a little less. Get my fingers away from the edge, marvelous. Okay, so different shakes different results. But I'm more or less in the same position. That's kind of important for this because we've got one more set of pictures to take. So I photographed the water coming out but I've got my fingers over the end of the bottle. Now I'm going to rotate the bottle the other way up and hold it by the end of the bottle here. And well photograph the opposite end. So it needs to go around about here somewhere. Okay. And I'm also going to change the angle and the height because I need a selection of these because what we're gonna do in Photoshop is choose one that is the closest match to my favorite picture so we can actually Photoshop them in. Let's just see, let's go this way a little bit. Okay. Yeah, so I thought it'd be fun to try this with a different bottles. So I've got this really tiny little bottle and we're gonna put some colored water in here as well and it's so small my funnel doesn't fit, so I'm just gonna pour it in carefully. There we go, that's lovely. So same technique. Not gonna change anything really. I've pre focused on the a clamp, I can see where that is and slide that out the way. And I'm gonna try and see where I am in my viewfinder. Roundabout there. Get my fingers away from the the the top as I can. Are we ready? Here we go. Okay, we'll give it a bit of a shake. I didn't last long at all. That was really quick, definitely have to do another one of those. Um Let's see how that worked. Oh yeah that's okay. That worked right okay we'll fill the bottle up again and we'll go a second time I guess. That's the downside of a smaller bottle. It takes a lot less time to empty. Okay and going upside down. Okay and again. Oh yeah that blue looks terrific in the photos. I maybe just a little bit low. I reckon I can go slightly higher and the closer you are a little harder it is just to get this in the frame and I do get a little carried away as I start. So we'll probably the middle turn it up the other way. Yeah. Yeah. There we go. Happy with that. Okay so we've had three goes at that. So all I need to do now is just a photograph, the end of this. So try different positions with this. It was really nice and of course in theory, if you don't want to do the Photoshop bit, you could just skip that whole bit and just crop in tighter. Should be it. Okay, so with all those photos taken, let's jump into Photoshop and join the two pictures together. So this is the image that I want to work with. I love the curve of the water coming out here. I love the detail of the bubbles inside there. That looks really good. And this was the closest one that I could find that's in more or less the same position and you'll see. I had a pretty good job there. That's that's not bad. The only bit I'm really interested in of course, is this area at the base. I'm not worried about my fingers or that lovely little bubble. I really like that. But that's not staying either because I just have to cover this area here where my fingers are and obviously my big arm that's sticking out there as well. So those bits are going to disappear using a few of this images areas. But whatever I do to this picture, I need to do to this picture, they need to marry up, they need to have the same processing. So here we go, here's how we're going to do it. I'm gonna hold the shift key and click on the second picture. Now you'll notice along the top here. It now says two of two selected. If I hadn't done that, it would say one of two selected. Two of two selected. So that indicates that both of these images are selected and they are effectively linked together as well. Which means if I do something daft, like take the exposure down, you can see that both images have exactly the same results. Okay, so they are now linked together. Anything I do to one image is repeated on the other image as well. Right, okay. With that in mind. Let's work our way down here. So white balance. Well, I think this definitely wants that slightly bluish treatment because of course, Well it's blue, isn't it? That kind of makes sense. So we'll add a little bit of blue in there. I think we probably want to add a little bit more contrast. Just a little bit in here. Bring the the blacks down a tiny bit as well, definitely. Probably wanna put a bit of D. Hayes and clarity and a bit of texture in. And we're gonna do all of those things and and some some color. There we go. We're gonna do all those things I have to put in noise reduction, that's essential. So popular around about 25. Your camera mileage may vary. We can also have a look at the cropping as well because as always with a micro four thirds camera I get bonus bits at the edges. So as you can see I lost a little bit there but I can bring that back in. We can just reset the crops on these. We may not end up using but they're there if I need them which is kind of nice. Okay I think that's pretty much everything I want to do. I could spend ages fine tuning this but you want to get to the bit where we join them together. So let's do that. Okay, now, before I do very very important double double check. It still says two of two selected both of these images still need to be selected because if you click on open and you only get one. Yeah, that isn't such a good way to finish. So let me open up. This image will come from camera roar into full blown Photoshop. Let's see how we're gonna do this then. So I'm gonna select everything. So let's get the move tool just to clear the screen and I will go to select and all edit and copy. I can close that image down. It's done its job. I don't need to save it and we can choose edit and paste so that pastes it in its now in and we can now see how accurate that was. I mean I love to tell you there was some special skill or secret planning that I didn't show you in the video. That's not true, that's just blind luck. But is it accurate enough? Because it has to be not just close, it has to be exact, so I'm gonna take my opacity and drop this down to somewhere around about 50% and they're not that close at all really, so it might as well be a million miles away, but it's it's fairly close so I can move this around and what I'm looking for is a join. Now you got to remember, I only need the bottom of the glass, so I only need from sort of here across. So if I line up one bit you can see it lines up pretty well there. That's not bad, I'm now going to go and get the free transform. Okay, now when I choose free transform, I get this little cross hair which is the center of the image, but it's also something else, it's also the center of rotation, so if I move that to wear it now lines up, it will rotate around that point. It should just make the next bit just a tiny bit easier because if I come to the edge of my transform, you can see I get a curvy arrow to indicate I'm going to rotate, and when I rotate it, it rotates around that pivot points, I've just moved, see how that works. That's so clever. That's so useful. So we're gonna try and go in as close as I can and still be able to see the edge and rotate this around and it needs to be reasonably accurate. You know, something like that looks pretty good. I'm I think happy with that. So once you're happy with it, commit to it by either pressing enter or clicking the tick and there we go. Okay, so now we have the two glasses lined up as accurately as I reasonably can get them. What I'm gonna do now is just to mask this away. So let's go to layer. I'll come down to layer mask, I'll choose to hide everything. Now we haven't seen layer masks before. You will notice that I now have this black rectangle next to the layer. This is a layer mask. It has little white edges indicating that this is the active area that I'm going to work on. Black hides white reveals. So with that in mind let's get a paintbrush. Let's make sure that my foreground color is set to white and the hardness of the brushes around about 50%. That will be absolutely fine. And when I paint, in fact I'm gonna go for a slightly smaller brush just to do this a little more slowly. When I paint, I'll paint in around here like that, you can see it wasn't exactly accurate, but it's close enough. I can lose my hand. There we go, that's fine. And painting the highlight that's coming through the base there, that was completely covered by my fingers. There we go. We have to start chasing the edges a little bit here. So there we go. That looks about right. I'm happy with that. There is always going to be an element of artistic license into this. It's not going to be precise, it's not gonna be exact, but it's going to look right at the end and if it looks right, it is right, okay, there we go. This is also my finger. This is where it gets a little bit awkward because there isn't any liquid there to reveal. So I'm gonna have to just do this by I and just hope that it kind of looks about right, okay. I think we may have got away with that one go. That looks fine. We'll bring the rest of the bottle across as well. It makes a little smaller again. We'll just chase the edge of the bottle up and in and hope that at some point it starts to line up. Yeah, okay, we're gonna get in there and I think I'd like to put a bit back. So don't worry if you go wrong, just switch to black, switch the opposite color and you can magically paint everything back in again. There we do something like that. That's actually real. Okay, good. So that looks pretty good. I'm happy with that, yep. That's exactly as it was as well. Right, okay, so all I need to do now is paint away the rest of my fingers. So we'll make the brush bigger, Make sure that white, because white hides is my active color and just paint this away and you'll notice it. It doesn't quite line up because we've had to rotate this around. The the edges are absolutely perfect. Now, the good news is this image needs cropping. So that's not a particular problem. Obviously, if it was, you may want to think about that when you were doing the photography, but for me, not a problem right now, so we can come and crop this. So there's a couple of ways I could do this. I guess I could make this a perfect square. I mean that kind of works quite nicely. Do I need all the bits that the edges? Not really sure we can make this into an upright, something like that, But I think it looks better as a square. So let's go back and we'll make this a one x one formatted square. We'll just go something like this. Leave a little bit of breathing space around the outside, there's a tiny little spot of water. I want to keep that bit. I want that bit in my picture. Yeah, that looks about right. Let's commit to that and there you go. There is my final picture completed.
Class Materials
Bonus Materials with Purchase
Ratings and Reviews
Paul
Rachel
J
Student Work
Related Classes
Commercial