Lessons
Class Introduction
13:35 2The Inverse Square Law
06:24 3Shoot: One Light, Single Subject
20:44 4Shoot: Group Photo
14:48 5Shoot: Group with Diffusion
29:06 6Lighting Diagrams
14:48 7Strobox Demo with Chris Coe
05:25 8Softbox Set Up #1: Overhead Drama
13:33Softbox Set Up #2: Beauty Box
09:37 10Softbox Set Up #3: Backlight
07:40 11Softbox Set Up #4: Backlit Silhouette
10:00 12Creating a One Light Playbook
13:02 13Shoot: Bare Beauty Dish
14:47 14Shoot: Stripbank
07:12 15Shoot: Magnum Reflector
11:18 16Shoot: Grids
11:21 17Shoot: Beauty Dish with Sock
08:50 18Introducing Multiple Lights
10:47 19Shoot: Clamshell
17:10 20Shoot: Softbox & Beauty Dish - Main/Fill Lights
27:02 21Shoot: Softbox, Edge Lights/Striplights, and V Flats
30:45Lesson Info
Lighting Diagrams
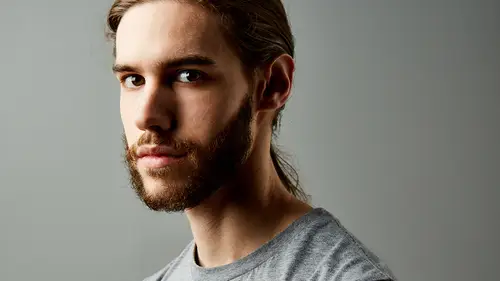
I get intrigued by pictures like this. I don't know, you know. When I first walked into a photo studio and I saw that stuff, it felt like Frankenstein's laboratory to me or something, I was just like, what's going on here, what's happening? And I was also very intimidated and freaked out by this stuff, you know. Like I could never do that, I don't understand that, it seems so out of reach. So it's curious to me, and I think that it's, lots of places online, like we study very differently now. In my life, I've watched teaching change a great deal. Even this platform, it's pretty radical. Teaching to more people probably today than I have in ten years of teaching. You know, in a single day, right. It's probably, I was doing the math, I think I've taught maybe 4,000 or 5,000 people in my, you know, and today there's probably that many watching us over the course of three days. So, there's lots of this stuff to see, you know, and I'm intrigued by it and I think to study it. When we look at...
this, it's all these things are doing a couple things, they're either making light bigger or making light softer, right, it's making light softer. This is subtracting light. Black cards subtracting light. As freaky as it is, I think a lot of these things will be made clearer, you know, why is he wearing white shoes? (laughs) These hospital shoes, right, cuz he's walking on a white cyc, he doesn't want to get it dirty. So we're gonna make lighting diagrams and start to cook this stuff up. I'm gonna reveal to you my secrets. I don't know if there's lighting secrets, I don't believe in secrets. When I studied people, it was a little bit harder to learn about light, you had to work for somebody to learn about light. Now there's all these great resources including this today. So I'll show you real world examples and tell you how about my light, if you have questions about how something was lit I'll help talk to you about it. We're gonna begin developing this lighting playbook. We're gonna demystify modifiers and talk about when you'd wanna use whatever modifiers. So this is a very simple lighting diagram. One light diagram, you know. Soft box, kind of a smaller one, we looked at this huge one today, but this is a much smaller one. Main light was a medium soft box, so probably about this big and it's two feet away so very close to Jay-Z, why? Because I want that modeled light, like I like that modeled light, that's how I like my light to work. And this is, we're gonna look at a number of ways to make lighting modifiers today. Same sort of light, you know. Different skin tone but same sort of light. Just a medium soft box. I'm gonna start with this one here and we're gonna talk about why things are important. The big thing we've been talking about is light distance and how that really helps sort of change the quality of light. Change the feel and the shape of the light, we looked at that a little bit. This is just a very dramatic people, I find that when I teach photography people get very excited about sort of spotlight or this sort of contrast-y, small light source. Think it's a great place to start, so. This is just a chicken scratch drawing of mine. Black backdrop, this is just the seamless here, this is my little friend Tim Williams. Right, one small five degree grid spot, focused on his face. And what do I have there? It's 12 inches from the subject, so it's wicked close, right. And that stuff becomes very important, because if I were gonna go shoot this again, maybe, and I would have the light four feet away, the lights, we saw that, it's gonna look different. We'll look at it again probably too. I write down my ISO, F stops, millimeter lens. That stuff's helpful. So sometimes these top-down drawings which we looked at in the first one, we looked at this top-down drawing, right. This is like an aerial view. It doesn't give me all the information. This gives me the information a little bit differently. Now I'm standing sort of where the photographer is looking at the set, you know, so it's a different angle of it. Me and Chris today, are gonna lay it out for you a couple different ways, so you really have it at the end of this, 100%, including, a lot of people take pictures of their set, anybody do that? It's good practice, you just take pictures where the light's at. That's cool, but when you start to use more than one light, not so cool, because you don't know, this ones at F8, this one's at sixteen, you don't really know the ratios of them, so that's the practice I'd like to get into. And we're just gonna start with that five degree shot. So, let me see those other grids there too. And the tight one. So we've been talking about this, all these things make the light bigger, smaller, harder, softer, broader, more narrow, right? So we have a number of different grids. You see some are really narrow, and some are wider. This is the five degree grid, 10 and 20. You guys are see that there, right? So this is gonna be the most narrow spot, that's what I used in this one, it's a very focused, pointy source. All these things are just taking that broad modifier and bringing it down into a narrow source. As it it gets straighter, the light gets straighter, it's gonna get harder. You can throw that in there, Chris. We have a, we need an arm on that. Yeah. (sounds of light equipment) Yep, just throw in an arm on that, cause it's boomed, if we go back to the, you got that Chris, I just want to go back to the lighting diagram. See how it's boomed straight up right over his head so it's on the arm, that's where a Boom stand becomes key, that light, that stand would be in my shot if it weren't boomed. I need a model, anybody wanna volunteer? I think, I'm gonna ask you to come be forboding. And I've forgotten your name. Oh, you've got it. Ordin. Oren. Oren. Thanks. It's okay if you don't get it right. I'll get it right, or you can call me Clyde all day, okay, alright? Yep, let's just, and it's really important when we use this Boom stand, even though we have a dirtbag on it here, right, sandbag, you see how it wants to fall right now, because it's not over the big leg. You see that Oren? Yeah. Now the big leg's right there and it's completely locked and steady, so, you know, you don't want to drop a light on anybody's head, or hit, I think I almost hit Chris in the head with the light before. You did, man. (laughs) Right. Alright. So I said it was about twelve inches. That's probably sixteen but we're gonna rough it up to there, you got my light needle Chris? Mhm. (beeps) How's that feel? Great. (crowd laughs) Yeah, uh-huh. And I'm just gonna look and see, just take that away, just gonna focus this a little bit, flood it a little bit, look at it on his face, you notice it's changing his face a little bit there? It's changing how it's spotted and fit on his face. That's very spotted in the center of his head, I'm gonna see if that works for me. Okay, test. Do it again. Eleven. Eleven even? Eleven six. Okay, let me come down. What did that say I was at, just so I can be consistent? Five six and a half? Alright, just trying to duplicate something, so. Eleven two. Eleven two. (beeps) Wait, dumping, okay. Five, six, nine. What'd I say, five six and half? Yeah, I said five six even, okay. Five six eight. Just dialing it down slowly here. Five six five. Five six two. Two tenths, tiny little tenths of a stop. Five six. Five six flat, right. Fix six flat, people have asked me, why this F stop, why that stop. When I shoot tight portraits, sometimes I like when the ears go a little bit soft. Like when the eyes sharp, and the ears go a little bit soft, just it's an aesthetic thing, you know. I think focus can bring you more into the face. I think this is probably gonna be a little bit too focused and spotty on his face but we'll look and see. How we doing, Oren? Good. Yeah? Okay, great. (camera clicks) Perfect. Alright, see how it's a little bit too center focused on his face, there's kind of that hotspot? So I'm gonna feather that off and deal with that. Great. And, can I see him again? Great. Yep. The exposure needs a little bit of tweaking too. So I'm all about the sort of badass portraits, so you gotta give me the badass look, the ice sort of grill, yeah. You can cross your arms if it helps you psychologically. Let's read it again since I changed the flood of it a little bit, alright. Five six. Five six even, okay, alright, that's great. (camera clicks) Sweet. Right on. Does that seem a little bit? There you go. That's looking good. Alright, give me some contrast, give me a little bit of clarity, give me a little bit of attitude there, I don't know the raw files look so flat, so I like to massage them a little bit, give them a little bit more attitude and look to them. And that's feeling a little bit like my, of course he doesn't have the sort of warrior face paint that my model has, can we go back to the key note quick? Right, but it's the same sort of light. Can we just go back, forth? Yeah, my light's a little bit higher, too. Can you hold this for a minute Chris? Yep, alright, we got some more height to it. 'Cause I'm looking at the nose shadow in my key image, and the, sort of, so this is gonna give a little bit more shape to his face, and you were saying something, you were pointing? The contour, the cheeks, yep, mhm. Alright. (sighs) (camera clicks) Right on. And of course cause of that inverse square law, give me a little bit more exposure out of that. Yeah. Cool, yeah. It's feeling the same. Let's go back to the original. Yeah, totally different shape face. Let's even go a little bit higher with the face, some of what you know, you just don't have the same shape face as our model, but we'll go a little bit more higher with the light, a little bit more down. Sure. Uh-huh. Right on. Cool. Yes, alright. That's looking right. So, I know these are little things and this is just a one-light setup, but the background is going dark, we're getting that shape texture to the light, it's kind of just hard, spotty, falling off. If I were to move that light, like we did before, if I were to move that light really far away from him, it would just fall off very differently on his face, it would change the whole shape of his face. So let's just see where we're going now. Were you gonna do a one light, Yeah it would be nice. A Strobox setup? Okay cool, you can have a seat for a second, Chris is just gonna show us something online using Strobox. Sure, do you wanna grab a wide photo of the set? Sure. Alright. Cool, I'm gonna need that wide lens. Mhm. So actually, could you come back for just two seconds Oren? Yep. Wait, yeah. We're gonna make, to really three-dimentionalize these lighting diagrams, we're gonna do it a couple different ways. We're gonna definitely shoot an available light, so, I'm turning off my strobe right now and I'm just gonna set my camera to, are we tethered and good? Mhm. Gonna take an available light picture of my set, just so we see the position of the light and we're kinda here where we are. Then he's gonna draw it on a top-over diagram. So it's gonna be a number of things. It's gonna be sort of the digital app thing it's called Strobox, where it's this sort of overhead drawing of it, picture of the set, and then maybe a drawing as well. We good? Mhm. Right on. So, just gonna hand-hold this in, and get a picture of the set. Cool I'm little bit hot there. (laughs) (camera clicks) That's probably hot too, it's my metering system. Yep, sorry about that. Let me do it this way. (camera clicks) Is that still hot? No, it looks pretty good. Is that good? Okay cool, just looks hot on the screen? Right on, cool. Yeah. So, I know it might seem rhetorical and simple but this is helpful, you can have a seat right, this is helpful in just establishing the point of view, the angle of light, where it looks, how it's operating here.
Class Materials
Bonus Materials with Purchase
Ratings and Reviews
KIS Photography
WOW! I was getting ready to go to bed, when I saw this class last night as I was perusing the classes available. Got the notification that it was playing, so I thought I'd check it out for a minute or two. Well, once I turned it on, I couldn't turn it off! As someone who has shot musicians on stage since I was 16, I've recently been interested in shooting portraits of them, so Clay instantly intrigued me! The more I watched, the more I couldn't shut it off, and I stayed up til 5:30 in the morning to finish the course (financial issues, so I can't afford the class right now) This class is amazing! I love Clay's teaching style, his willingness to step outside the box and play by his own rules, and his lighting is awesome! As soon as it is possible, I WILL be purchasing this class! Loved it! Thanks again CreativeLive for introducing me to yet another outstanding photographer to learn from!
Jason Darr
I absolutely loved this. Great instruction, great content and very inspiring demonstrations. I'd highly recommend this course
Gene Tolan
Awesome intro to lighting. I love Clay's teaching style and his personality infused presentation was a pleasure. I highly recommend this course.
Student Work
Related Classes
Portrait Photography