Building a 3D Environment in Dimension
Lesson 4 from: Building Photo Realistic Environments in Adobe Dimension CCJesús Ramirez
Building a 3D Environment in Dimension
Lesson 4 from: Building Photo Realistic Environments in Adobe Dimension CCJesús Ramirez
Lesson Info
4. Building a 3D Environment in Dimension
Lessons
Class Introduction to Building Photo Realistic Environments in Adobe Dimension CC : Importing 3D Models to Dimension
01:06 2Dimension Tools and Interface
10:30 3Adding Materials and Decals to 3D Models in Dimension
04:09 4Building a 3D Environment in Dimension
23:55 5Rendering your 3D Scene in Dimension
04:19 6Enhancing Your Final Render in Photoshop
08:07Lesson Info
Building a 3D Environment in Dimension
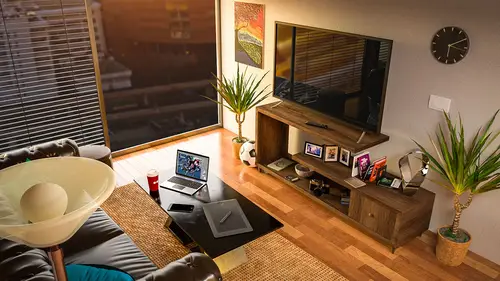
So, what I wanna do now is just build a quick environment so that you can see what the power of dimension really is. I just went over the tools and the different things that you can do with materials and 3D objects, but I just wanna start showing you some of that real power that Adobe Dimension has. So, the first thing that I'll do is use a graphic for my background. So, I'm going to click on this image icon and Dimension comes with four backgrounds that you can use and in this case I guess I'll use table, and I'm just gonna click and drag that table graphic into the working document, just to start with a graphic. So, this is where we're gonna build our environment. So, if I were to just bring in a 3D model, now. Let me just click on the 3D model tab and maybe we can just bring in this coffee cup. I'm gonna click and drag and drop it here. You'll notice right away that that's gonna look very realistic, right? And the reason it doesn't look very realistic is because the perspective of t...
he scene does not match the perspective of the background, which is really important in compositing and photoshop and painting and all kinds of things. So the perspective needs to match so that it looks realistic. Also the scene in the real world, if this cup were sitting on there it will be catching the light from the scene, the environment light. And that's obviously not happening. Also the shadow should be matching the light of the scene. So wherever the light is coming from in the scene, the shadow on the 3D object should match. So how do we do that? How do we do that in Dimension? How do we match all those things to the 3D environment so that it looks realistic. And it's actually very, very easy. All you need to do is click on the Environment label here, under Scene and just click on this button that reads Match Image. When you do that, Dimension will analyze the image, and you have all these different things that you can match. Sunlight, Perspective, Environment Light, and if you want to resize the canvas to match the image, you can as well. And when you press Okay, all those things will match and now it looks as if that cup is sitting on that table. It's got the right perspective, it's catching the right atmosphere light. And the shadows match the scene. Very, very simple. So then once you have that, once you have this, all you need to do is to start dragging and dropping 3D models and elements in your scene and just start building a world out of that. So that's basically what I did with that room. I just matched the perspective of that background and I just started adding a whole bunch of things that took about, I don't know, 20 hours worth of work, but it was basically doing this over and over. Again, just dragging 3D models into the scene, and applying the right materials for the look that I was going for. So one thing I wanna show you now is once you start working with a 3D environment, there's this icon right here, right in the corner and something I should have mentioned earlier is that when you hover on any menu on Adobe Dimension, you can see a label that tells you the name of that tool or option, keyboard shortcut, and what it does. So if you forget, just hover and click, and just read what it says. Also in some cases, like for example I'm gonna click on the coffee cup, if I click on the coffee cup, this is my 3D element and underneath that you can see how it's made up. It's got the cup and the lid. And if I double click on these, I get more properties for that particular material. In all these different properties here, if I hover over a specific property, notice that I get a preview animation of what that property does, what it's called, and a description. So again, it's a sign for you to just be able to like, click and drag and work with the 3D scene and if you don't know what something does, just hover over the label and watch the animation. Very, very easy. But what I was gonna mention, this button here, this icon here, when I click on it, it brings up a tiny little window and that's like a render preview, so you can get a render preview. This is gonna be a closer representation of what the final render would look like. You can expand it if you want to by clicking on this icon, and that's what it looks like. So it starts looking a little more realistic. Something that you can't tell because of the material that we're using, this is not a reflective material, is that this is actually catching the reflection of the background. So let me change the material to make it more reflective and so that you can see how it's catching the reflections in the background. So I'm gonna click and drag on this metal material, drop it in the cup, and I'll do the render once again, and you can see how the cup is catching the reflections of the scene. Really, really cool stuff, right? You guys enjoying that? You guys have any questions? (chuckles) All good? All right, so let me just show you a couple more things here. If you wanted to duplicate a 3D object, for example, maybe you wanted another silver cup in this scene, all you need to do is hold the Alt key on Windows, which is the command option key on the Mac. And click and drag to duplicate. The same thing in Photoshop, same keyboard shortcut. So in Photoshop when you have the Move Tools selected, if you hold Alt and click on a layer in photo shopping, you drag, you'll duplicate that layer. Same thing here. So now we have two 3D objects, and what I like to do is actually, I like to just click on 3D object on the render button, excuse me, so that I can get a render preview and make sure that things are looking properly. I know that the image on the, not the image, the project that I showed in the beginning of the class shows an actual room, and you might be wondering how did I build a room if all I could really do is just put an image in the background and bring things in? So something that a lot of people don't realize is that you can just build a room from very basic objects. And that's what I'm gonna show you next. Let me just use a different image, and I'll just use this image here and then that'll be the, we're gonna build a room around that image. So what I'm gonna do is I'm just gonna click on Match Image so that Dimension now matches the properties of this image. So we're gonna match the environment light, which is what creates that ambient light in the reflection on reflective models. We're gonna match the sunlight, so that the light, so the sun's coming from this side so that the lighting in the scene matches the lighting of the background and we get the appropriate shadows and the perspective so that everything is aligned and things don't seem like they're floating. So I just press Okay, and notice that as soon as I press Okay, one of the first things that aligns is the ground plane. Notice how that's aligned to the ground of the image. So what I'm gonna do now, is simply select my 3D objects. Once again, the 3D objects or models, 3D models are here, So I click on that icon, and I have a whole bunch of 3D models. And one of the 3D models that you can use for building floors, walls, and ceilings, is just a plane, just a very simple plane. So I can click and drag on a plane, and a plane is just that, it's just a plane, just like a piece of, you know, like a piece of paper basically. And I can just hold the Shift key and I've selected the Scale tool, and I can scale that into proportion so that's my floor. All right, so what material are we gonna use for our floor? Let me just see what we have here, we can use any kind of material. Maybe a wooden floor? I think that's what I had on that scene. I don't think it was that particular wooden floor, but here's a wooden floor. If, once you drag a material onto your scene, you're gonna see that on the right hand side you have a whole bunch of properties. One of the properties that's really useful is the Offset and Repeat because it allows you to scale the material. So you can get the appropriate scaling of your material. You can offset it, which means you can move it. So you see how it's moving on the XY coordinates? And I can rotate it as well. So maybe in this case, I'll just type 90 degrees. You can type or click and drag on the label, just like in Photoshop. In Photoshop you can hover over a label, click and drag to adjust it. You can do the same thing in Dimension. So I can now click on this plane, click on the move tool, and then we'll use exactly that same keyboard shortcut we used earlier. If I hold Alt, which is Option on the Mac, I can click and drag and move that up. And now I have a ceiling. So now I can still look for a material that, you know, looks like something that will be a ceiling. So I don't know, I'm just gonna click and drag this one and see what that looks like. And now, I mean, that's a crack- (chuckles) it looks like, what is that? Cement? I can't really tell what that is, but I mean, obviously you can play around with different materials or create your own in Photoshop. So now I have a ceiling and I have a floor. And what I'll do now is I can just duplicate this one here, and maybe I can rotate it. Not in the X axis I think it is, not in the X axis, in the Z axis, see? Like sometimes I have to click and drag on these to figure out which axis I have to rotate it in, but I can just rotate it 90 degrees there, and now I have my wall. And I can give it a different material. Let me see what I have here. I don't know, we'll just give it this crazy material. Anything. There we go, and I can maybe change the repeat so smaller, bigger, there we go. We got that wallpaper effect on that wall. And then I can click on this particular, oh, one thing I should have mentioned, sorry for that, so right now we have the camera set to this particular view and this is where I'm building my scene but remember earlier I talked about these tools that allow you to rotate around the scene? When you rotate around the scene, it's gonna be virtually impossible for you to get back to a certain point, so Dimension created something called Camera Bookmarks, right here. This icon here next to Render button. I'm just gonna create a Camera Bookmark and I'll just call it final. And the reason I want that is because if I decide to move my camera, just to see what I've got, It'll be really difficult to get back to where I was. So I can just come into this Camera Bookmark, click on final, and it just brings it right back. So that's really important. That's one of the first things that you should do, is once you decide that that's gonna be your scene, your look, you need to create a Camera Bookmark so that you can always get back to it, otherwise it would be really, really difficult to get back to it. So like right now, I'm clicking on this object and I can't really see it. So if you press on the F key, it zooms out so you should be able to see it. So I selected that object but I wasn't able to see the controls so if you click on something. So let me zoom in so that you know what I'm talking about. Again, so I'll zoom in here and if I click on the wall, not as the wall selected but I can see those 3D handles to control it, all you need to do is just press on the F key and it zooms out and you should be able to see it. And then I'm just gonna hold the Alt key, click and drag, and place that right about there and then I'll come back into my final view, and there you go, that's the wall and ceilings and the floor. And I can do a quick little render just to see how things are looking. So I'm gonna click on render and there you go. You can see how now I'm starting to build this particular environment just by simply clicking and dragging on these 3D elements. And if you wanted to change the light in this scene, right now the lighting is being created by the image and it's following the perspective of the image. Sometimes that may be what you want, in this cases we have a wall, it might not necessarily be the best position, so we can actually adjust it, we can increase the intensity or we could rotate it. So in the properties panel, you can see with the environment selected, that I can increase the intensity of the light which brightens up the room, and I can rotate the light as well. Notice, look at the wall. You can kind of see how the light is changing on the wall. So you can rotate it, and then do a render and see how the change affects the rendering. You can keep making any adjustments that you like. And obviously you can play around with this all day long and we don't necessarily want to do that. I'm gonna go back into the 3D models and I'm just gonna bring in a 3D model in here, let me see what find to bring in. I can bring in this table. So I'm gonna click and drag and drop the table in there. Notice that the table is huge. If you bring something in and you don't see the 3D element, remember you can press on the F key and it zooms out. In this case I could see it, but a lot of times you can't. So all I need to do is hold the Shift key, click and drag to scale down, and once, I'm having trouble getting it smaller than that, so I'll release, and then click and drag again. So I'll go back into my Bookmark, go back into the final view, and I have my table. And obviously I can start rotating the table, placing it anywhere I want in my scene. And I'll scale it down maybe, just a bit. So this time I'm not holding the Shift key, so notice I'm making it, just maybe like a step stool, like coffee table, or you know, like a bar table. So it depends on what you want to do. So you can scale it with each axis, independently. And do all these cool things. And I can just maybe rotate it, and that might be too big for this, for this room, so I'll make it smaller, holding the Shift key and it just takes a lot of fine-tuning, that's probably the most difficult thing in Dimension, just the time that you're gonna spend fine-tuning things because as you can see it's really easy to drag and drop an element and just apply a material but the fine-tuning is probably what will take you the longer. So I'm just gonna add, just let me see, I'm trying to see what would be good for this scene. I mean it's probably not very realistic but I'm just gonna add maybe this marble material to that table. And I'll do a render. And that's what our scene is looking like now. So that's basically what you saw me do in that other composite that I made on this one here. Just basically what we just saw and by the way, I'm not gonna go through it in this session just because it's too repetitive and I don't think it's necessary but for example, the blinds and all of that, those are just basic shapes, like I just extruded those planes. As you can see this is just the plane, these are just planes, all these little lines are just planes. It just takes a little bit of time getting it in there, so, and then full disclosure, the wooden floor is not a free material that comes with Dimension, that is a material that I downloaded from Adobe Stock, and if you want to find that exactly what material I used for those on the Behance page. On behance.net/jrfromptc, you can find this project and if you scroll down to the bottom of the page, you can see all the objects and materials that I used. So the one for that, I think was wooden panel. If I'm not mistaken, and yep, that's the one I used. So that's one of the ones that I downloaded from Adobe Stock to get that floor on there. So if you wanted to, you could make if from scratch but it just might take a long time. It might be easier for you to just download it from Adobe Stock. I'll quickly show you how to edit a material. I'll save this for now. Actually I should have saved it as, with a different name. Now I'm overwriting the cup, but it's okay. So what I'll do is I'll just create a new document. And I'll show you how to edit a material in Photoshop. So let me just open up, let me close this, and I'll bring in a, I guess we can do, let me see, something that's already got a material that's free so everybody could do it. We can try maybe this coffee, okay, I think we'll do this food can. We're gonna do this food can, and just so that we can have a background to work with, I'll use that same table background, and I'll match the image so that we match the perspective lighting and environment light, and there's our can. So if you're ever working with a 3D object that already has a material applied to it, like in this case we have the food can, and it's got two materials, the can and the label. And if you wanted to make an edit to one of the materials, what you need to do is go into the material itself, double click on it, and it brings up the properties, and notice this here, base color. You can click on that and some 3D elements will have an image as the base color and others will have just simply a color. Just like a regular color applied to it. If you have a regular color applied to it, you could also add an image if you want to just by using these icons here. If the 3D model already has an image, notice this icon here, it's that little pencil. If you click on the little pencil, it'll bring up an image in Photoshop and we can edit this in Photoshop, obviously, and just so you can see really quickly how that works, I'm just gonna paint, right? So I painted that in a new layer. If I save it, it's already here in the 3D element. Oh actually, I did in in the wrong part, I should have done it on the top part. If I paint here, you should see it. And there you go, you can see that I painted that in. And all I'm doing is pressing Ctrl + S, Cmd + S to save in Photoshop. So you can imagine that if you want to create like a really cool label, you can design it in Illustrator, you can design it in Photoshop, and just open it up in that little pencil, drag and drop it from a library, or place it as a embedded document in Photoshop, just File, Place, Embed, and that would work. I'll show you what it looks like with a photo. So I'm gonna go into my Libraries panel and I should be able to bring in an image if this loads, and I am connected to the internet, so I'm not sure why it's not loading but if it doesn't load and I think I have an image that I can just use from my computer. And I think that's what I'll do since it's not loading my library. So what I'll do is I'm just gonna into File, Place Embedded, and I'll just find an image that I have here in my computer. Let me just quickly find something. So I have these images of the Louvre Museum, the image is not important, I'm just showing you how you can bring in an image and just place it on there. So I'm just gonna place this image of the museum there. This could be anything, really. And I can press Ctrl + S, Cmd + S to save, go back into Dimension, and now that graphic is on there. So I could start rendering the scene and you can see how the photograph that I brought in got applied to that can. So that's what I did in that room, in that environment, I just got materials that matched the look that I was going for. Obviously when you place something in there, it might not be the right size, it might not be facing the right way, in this case, obviously, I can click on the 3D model and I can rotate the 3D model just to see, like, a particular side but if for whatever reason, you cannot rotate the 3D model, you already set the scene and rotating the 3D model would just break the scene for whatever reason, a lot of times you just can't move things because they're, you know, if they're placed a certain way, and that's the way they gotta be, you can rotate the material by clicking on it and once again you can go into the rotation or the offset. So if I wanted to see the pyramid, I can bring it down in the Y axis and then rotate it here. See that? Very, very easy. I think you're liking that one, aren't you? And again you may not want to build an entire room like I did in my composite. If you're a photographer, you may just want to place one element, you may want to place just a cup in a scene, a car, there's no cars that come built in for free in Dimension but I'll share a resource with you and actually now that Photoshop is open, I'll show you the easy way to get to that resource. So Photoshop has a 3D menu. If you click on the 3D menu you can then go into get more content and this is gonna open up a page that has downloadable content for Photoshop 3D. Photoshop can also open up 3D models and materials and all that stuff. But there's a website that I really, really like and it's called TurboSquid and it's right there. So if I click on it, you will see that the TurboSquid website has a whole bunch of stuff that you can download. Some of it, you know, can be quite expensive, you know, $700 or whatever for a 3D model but if you're just starting out and you just wanna try it out on Dimension or even Photoshop, I would change the price to zero and zero, hit apply, and then you can see all the free 3D models. So you can maybe download this car and place it in your scene. So if you took a photo and you wanted a nice car, you can drag that into Dimension and then work with that in your scene, or place a dinosaur in your scene. Whatever you may like. So all that stuff is here. And I should mention that if you do download one of these 3D objects, the file format that you want to use is an OBJ file. Because a lot of these 3D models, as you can see here at the bottom, they have different file formats. The one you want to use is OBJ.
Ratings and Reviews
JennMercille
This class blew my mind! Before watching, I probably wouldn't have even attempted incorporating 3D into my composite work. Now, it is WAY less intimidating. I can't wait to try it out!