Lesson Info
11. Building Lost Texture in Damaged Images
Lessons
Introduction to Class
02:44 2Simple Color Restoration
02:29 3Getting Rid of Spots in Old Photos
06:46 4Removing Stains From Photos
02:55 5Adding Contrast to Your Black & White Images
05:24 6Using the Dodge & Burn Tool
01:35 7Techniques to Cleanup Image Backgrounds
13:01 8Fixing a Torn Image
03:08Lesson Info
Building Lost Texture in Damaged Images
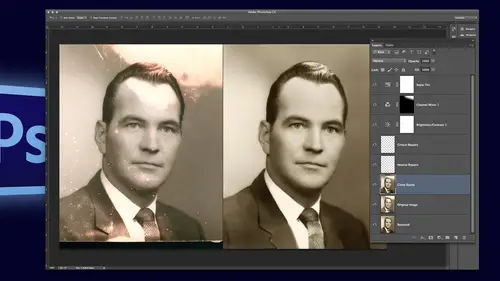
Okay so here is a cool image so this one was pretty damaged and um it was pretty tough to build up this area really tough because of the textures I want to give you a tip on how to do that because there's a lot of building up of lost areas whenever you doing restoration I did do that oops dustin scratches to get rid of all the spots at least all the little ones and then I did clone tool or healing brush for the rest of the bigger spots and then I built up the bottom here so let's see we added the texture let me zoom in a little bit so this was just a mess now I cloned from here to extend it and I kind of built this up a little bit was just cut off just some creative cloning there but there's just no way to get this texture back in any of this so I made my own texture that looks like his jacket and then I copied it and tilted it and put a little piece right there and then I copied it and tilted it and put a little piece right there so it actually shows the texture of the jacket building...
the one little piece wasn't that difficult once I figured out which texture it wass so then I was able to build that up so this right here is how I did it so let me just remind myself of what which texture it was I think it is bark okay so let's say we want to build this up I'm gonna go eye for eye dropper and select that color and I'm gonna make a blank layer and b for brush at a hundred percent and make a big blob of just solid color and now I need added texture to it so I'm gonna double click on and I'm gonna go teo pattern overlay and um if I remember right it was bark so literally I put this in instead of the thumbnails I put it in list storm so that I can click on one and use my air okay this girls girls girls, girls girls yep there it was that one burke was bark so then I can choose the one I want I can change the scale teo about what I think would sort of match really technical here you just like I've always really so that's probably about right now it lost my color so I'm going to change this to probably overlay may be soft light yeah soft like one so that gives me the texture that I want but it's still too sharp so I'm gonna give it a little bit of a blur and soften it so that's that's the texture that I want and what I'm going to do is make this permanent right now it's a pattern overlay I can change it but my pattern is not going to shift or anything because it's a style someone a right click and go to rest arise laywer style so now it's permanent that blob is now permanently textured and I'm also going to darken it just a little bit control em okay, so there is my texture but it's a little bit too sharp so I'm gonna go teo filter blur and blur it just a teeny bit toe where it sort of matches okay, so there is my little patch so then I'm just going to move this down to where I want it and now the pattern of his jacket wouldn't be so perfectly straight right there it would be kind of wiggly, right? So what? I'll usually dio actual duplicated right now oops control of command j my extra piece I'm going to use other places but this one I'm going teo modify it and I'm gonna mask it now so I'll use b for brush we go so I've kind of masked it away but I need it to be like the pattern teo moved so I'm going to go controller command tea and go up here to a warp so the word allows me to get it to shift so I can get it to curve like it would be on his chest like that right there and I can do whatever it takes to get it to be just right so literally I'll take that in pieces and mask it I'll duplicate it and do it another piece hoops so I'll just turn those off and I'll show you the original ones that I just did right there and there and there sorry there so that's how I rebuilt that up now that's just one way to do it there's a million different things million different textures but you get an idea of how to do that kind of thing now it's really light needs to be dark and down so I did a dodge and burn layer and that is the blank layer in soft light sixty nine percent painting black and white now up here this is a real challenge so what I did there is I just made a blank layer and I picked the color that it should be turn that off and then painted it all in here well not that color all collect to give you to get a paintbrush the paint color there we go now this is darker so I'm going to do darker here well I want that to be a nice graduated blend so I can go back and forth but I don't take the time to blend it so I'll usually take that and by the way I'll paint more on his head to make it bigger than I need angle filter blur and just blur the daylights out of it and that makes a nice radiant so I can take a background and blob different colors to match, blurred all together and make it really nice. And then I can use the eraser or the mask, and I'd probably use a mask. Tio, take it away from the head just to save time to not have to show you the meticulous part of getting it right around his head to make it blend in. If you look up close, this is textured. This is smooth, so again I used my pattern overlay and guess what won it, wass the wash line on what color I think. Yep, the top line right there and I just changed it. Tio match the background so ultimately it's kind of a variety of colors. This is kind of greenest. This is kind of yellow pink. This is orange on his hair, so I did a black and way adjustment layer, and then I tinted it all with this beige color in color mode, as opposed to soft light. Soft light seems to work better when you have a white background like the baby on white. But if it's all gray tones, color works better.
Class Materials
bonus material with purchase
Ratings and Reviews
Audrey Agin
I have really learned a lot from Suzette’s instruction. Photo restoration requires a lot of skill sets in Photoshop. This class is not for a beginner- the title says "Advanced." Watch Ben Willmore courses first, when you understand his retouching, then watch Suzette's course. Most videos of YouTube, teaches the same basics, over and over again. It is hard to find advanced photo retouching classes that are spot on. Suzette gave instruction on how to fix things that I have come across in my family photos and business. True she did not work a complete photo, but she showed how to fix hard or unique problems in photo restoration. I loved the Dust and scratches fix on Grandmother-WOW!. This can be used on most old photos. Yes, I had to do some more research to get the hang of it, but now I have made my own action for it. Wish I had known about this years ago. Plus she showed how to fix other problems in the Grandmother photo. I watched the Action classes of Ben Willmore and Dave Cross. There are Actions in the classes of Blake and Kristna, I recommend Actions for everyone. Actions are easier to learn than some other things in PS, Just need to watch a course on it. Each instructor teaches different Actions, so you should find something that will help you. – Now back to Suzette. If Suzette had fixed a complete picture, I would not have learned as much. I was needing everything she taught & better techniques. I hope CreativeLive has her do another advanced photo restoration class of things that were not covered in this class. Her skills in Photoshop & restoration, should motivate people to learn more about Photoshop through other classes here at CreativeLive. Then come back and watch her class again. If you do not understand the technique she is demonstrating, you need more foundation work in that area. …Example- her demonstrating “Dust and Scratches removal” motivated me to learning Actions- now I am using some type of Action in most photos I work on. Thank you. Thank you.
Doug Currie
This is a great course for someone interested in offering a photo restoration service, perhaps as a business opportunity. However, it does require an above average skill level in using Photoshop. I would strongly recommend Ben Willmore's course also offered here on CreativeLive first as a prerequisite before taking this course. Also, in the course, Suzette recommends a free color guide for faces, that can be obtained from her website, but I have tried and cannot find it at all. It would have been great if it was provided as course material for subscribers to this course! Anyone knowing where we can download the file she quotes: "ColorGuideFaces.jpg", please let us know.
Kristin K Hand
Amazing! Suzette shows you techniques that are SO much simpler than you have used in the past to remove spots, cracks, and tears. Faster, more effective, and BETTER end results! The technique to colorize an old B&W photo was fabulous! I used to do handpainting black & whites by hand. With the skills Suzette shows you, you can now do this beautifully and easily in Photoshop. She uses restoration examples in this class, but the skills could be used with any new photos, as well. Thank you, Suzette!