Using the Clone Tool to Enhance a Faded Image
Lesson 9 from: Advanced Photo RestorationSuzette Allen
Using the Clone Tool to Enhance a Faded Image
Lesson 9 from: Advanced Photo RestorationSuzette Allen
Lesson Info
9. Using the Clone Tool to Enhance a Faded Image
Lessons
Introduction to Class
02:44 2Simple Color Restoration
02:29 3Getting Rid of Spots in Old Photos
06:46 4Removing Stains From Photos
02:55 5Adding Contrast to Your Black & White Images
05:24 6Using the Dodge & Burn Tool
01:35 7Techniques to Cleanup Image Backgrounds
13:01 8Fixing a Torn Image
03:08Lesson Info
Using the Clone Tool to Enhance a Faded Image
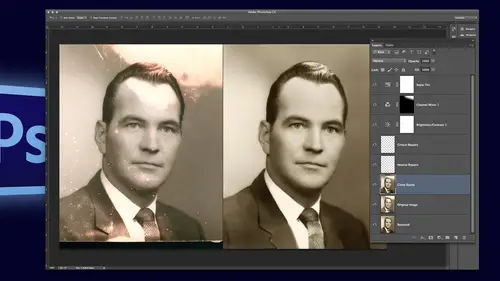
This is a cool shot but wow is it faded and this is the new image so I'm still working on this I have a little bit of repeating stuff going on here from all the area that needed to be built up so usually when there's nothing to clone from you end up with repeating stuff so you have to smooth it out later but what I did first is I duplicated well, first thing I did is I added an adjustment layer so I had some contrast here and I did use the curves with the white and black point so let's just show you that curves and I've already sat my auto point of my auto colors right auto options and I saved it as defaults so what I'm just going to do is do the white of the little babies jumper and then the black right down here here we go so now I've got a nice contrast and I'm not super concerned about making it perfect right now it's an invisible layer I could modify it later and I can also mask it and alter certain areas if I need to so I do that first so I can like see what I'm doing and then I'...
m going to make a retouch layer so if I forgot to do my f twelve setup where a duplicate a layer I can do it now even though I've already done an adjustment layer so I would go to my background and I would just hit you have to select the background layer could have twelve so you have your retouch and I would do all my retouching on that now I want this to end up being an eight by ten ratio it's far from that so typically I will go to my clone or my crop tool and two sixteen by twenty ratio and then put it wherever I want and then bring in guides um so I put it right about where where I wanted to be and then show my ruler's controller command are and then I pull in a guide to all four sides and then I had escaped I don't really want to crop it I never want to crop it because I want all of those excess edges so that I have every bit of original image to use because I might need it and uh just to preserve the original also so I've got my edges there and these blue lines or where I'm going to crop it so I know I don't have to care about all this stuff but I've got room to work out from so um this is the image where I retouched it so let me show you a couple tricks on here okay? So here's the trick with the building going on here we need to extend this out and a lot of people aren't real real good at cloning because they don't understand the line they have to go with the line of what's going on so you don't have the repeating chicken tracks so down here it's just kind of mushing at all kinds of different air or directions but here we need to go on the line so s for stamp rubber stamp zero for one hundred percent I'm gonna bracket down to a smaller brush and I'm looking at the the barn would we've got stripes here and here's the repeating point from this point to that point so I'm gonna put my ex and this is life with the x in the middle of the brush so I can use it for alignment I'm going to put the x right here at this intersection in all click to set my point then I go to the next he's a wood where that would be and I click so there's my ex and my oh so now I can just clone out from there and it's all going to match now it's only going to go as far as but what goes and then there's no more so I let go of my mouth ls and it takes a new look but it's still set in that perfect alignment with the distance between the boards so it's looking now at more so now I can just start drawing again and it's going to keep going and I only have to go out to that blue line I know anything beyond the blue line is going to cut off any way but I've got room to go now obviously there's serious repeating going on there's no way to avoid that but after I get this the structure, the boards and all that then I can go in and randomize so I'm also going to do this I'm going to take this and get the floor going here there the the dirt, whatever and get that copied over and later on I'll come in here and I'll just use a clone one hundred percent and smaller and I'll just go yeah let's get rid of that one which looks identical to that one and that one and that one and randomised that one bringing this up and get rid of that one and chop off the bottom of this one and basically just randomize it so it doesn't look like repeat, repeat, repeat that's all easy stuff but the main structure of all the boards matching it's all about alignment now the floor or the dirt we don't want that to be the same. We want to randomize that so rather than using a small brush and like all to click and move click see how close the external is you know you'll do this and then you'll do it and then you get total repeating patterns I call that chicken tracks it's horrible and it's so obvious so instead of doing that floor on area like this, you're going to use a bigger brush old clique and see how it's doing this big area just go till I get in trouble and go this direction and do a big patch and then here go this direction until I get a big patch here and randomize it and use big areas so the x and ro are farther apart and you're not getting repeating repeating areas so we're goingto clone all this stuff out here now this is really close this one's tricky because there's just a little bit to copy, so sometimes I'll just take it just get that line going a little bit farther, give myself a little bit more to clone from and then make my brush bigger and then cloned from there there we go on dh then I can take this board and go, you know would be nice to have another board right about there, so I'll do that so I'm copying that board over to where I want it and I'm choosing a spot that's parallel that I could do a long piece there we go and of course I got a little bit of her head again and then I can also clone from over here and using whole pieces and I know it's a little bit lighter over there but I don't have a repeating stuff because I chose a spot over on the right that would be a big piece over there and it's okay, that it's lighter I'm going to end up darkening it in groups and why for history and put that back oh, I guess my original didn't go that far, so as for stamp hundred percent and clone that end okay, so you guys got the idea? Whenever you're cloning this stuff, you want to make it bigger chunks and randomize it and then you're going to rebuild and get rid of your repeating stuff. Now, what about this? Now this image is starting to fall apart and there's no wheel over here there's no shoe or anything we can actually replace that wheel, I mean, make another wheel and put it on the other side on dh, then you can also extend this thing it's not that I'm rebuilding it completely. I'm just like extending it over there and letting it gracefully disappear into the edge on dh it's just a matter of copying and putting him over there. But here's, the trick with this, this is a curve, a bar, so I will usually take a lasso and copy a chunk I would get rid of that white line first, though, because I don't want to have to fix it twice, right dae so get rid of that there we go then I'm going to do last cell and I would take this curved bar control j to make a duplicate or command jay and I could move it down here to where I wanted to be but it's not the right arkwright so you just go to warp and you can curve it to the loops not that one curve it to the shape that you want make it rounder straighter whatever you need to dio so warp is really handy you could modify stuff where you can't clone it around the corner or whatever you duplicate it and move it over and hit enter and you can also use control teo warp it so the area that goes around the corner and you can duplicate the wheel and put it over there so let me just do that really quick controller command j on the right layer and then move it over here and then of course we just need thio enter and adam asked be for brush percent in black and you're going to use your short cuts a lot you should be very used to your shortcuts and there we go that looks believable you might have to change the size or whatever and I masked it so in this case I think I put it behind that layer or it could mask it so it looks believable okay, um, I don't know if I want to build up the top, just cause you can't does kind of have the idea of what's going on here, and I could work on this for a while. Oh, by the way, it is really distracting to have all that excess stuff you feel like you need to do more. A lot of times I'll do a blank layer and all the still all those edges with white, so they're still there. They're under there, but it hides them, so I'm not distracted by oh, I'm not finished yet. I can see I'm almost finished, I just need the top. They're so that is really helpful right there. I d'oh custom white. Now they're not custom my bounds, the dutch in bern, I will do that a lot. Tio start building up the texture and the shadow and stuff, so I used the dodger burn a lot, especially with restorations. Here you go.
Class Materials
bonus material with purchase
Ratings and Reviews
Audrey Agin
I have really learned a lot from Suzette’s instruction. Photo restoration requires a lot of skill sets in Photoshop. This class is not for a beginner- the title says "Advanced." Watch Ben Willmore courses first, when you understand his retouching, then watch Suzette's course. Most videos of YouTube, teaches the same basics, over and over again. It is hard to find advanced photo retouching classes that are spot on. Suzette gave instruction on how to fix things that I have come across in my family photos and business. True she did not work a complete photo, but she showed how to fix hard or unique problems in photo restoration. I loved the Dust and scratches fix on Grandmother-WOW!. This can be used on most old photos. Yes, I had to do some more research to get the hang of it, but now I have made my own action for it. Wish I had known about this years ago. Plus she showed how to fix other problems in the Grandmother photo. I watched the Action classes of Ben Willmore and Dave Cross. There are Actions in the classes of Blake and Kristna, I recommend Actions for everyone. Actions are easier to learn than some other things in PS, Just need to watch a course on it. Each instructor teaches different Actions, so you should find something that will help you. – Now back to Suzette. If Suzette had fixed a complete picture, I would not have learned as much. I was needing everything she taught & better techniques. I hope CreativeLive has her do another advanced photo restoration class of things that were not covered in this class. Her skills in Photoshop & restoration, should motivate people to learn more about Photoshop through other classes here at CreativeLive. Then come back and watch her class again. If you do not understand the technique she is demonstrating, you need more foundation work in that area. …Example- her demonstrating “Dust and Scratches removal” motivated me to learning Actions- now I am using some type of Action in most photos I work on. Thank you. Thank you.
Doug Currie
This is a great course for someone interested in offering a photo restoration service, perhaps as a business opportunity. However, it does require an above average skill level in using Photoshop. I would strongly recommend Ben Willmore's course also offered here on CreativeLive first as a prerequisite before taking this course. Also, in the course, Suzette recommends a free color guide for faces, that can be obtained from her website, but I have tried and cannot find it at all. It would have been great if it was provided as course material for subscribers to this course! Anyone knowing where we can download the file she quotes: "ColorGuideFaces.jpg", please let us know.
Kristin K Hand
Amazing! Suzette shows you techniques that are SO much simpler than you have used in the past to remove spots, cracks, and tears. Faster, more effective, and BETTER end results! The technique to colorize an old B&W photo was fabulous! I used to do handpainting black & whites by hand. With the skills Suzette shows you, you can now do this beautifully and easily in Photoshop. She uses restoration examples in this class, but the skills could be used with any new photos, as well. Thank you, Suzette!