Lessons
Lesson Info
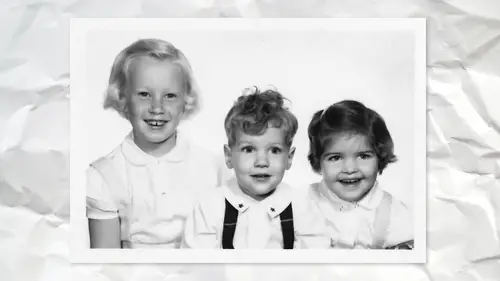
Camera Raw for Restoration
so here's a fairly typical problem that we face. It's just faded over time. Um, you know, there's some blemishes things of that nature. But the first thing I would always try toe fixes global things. Because if I'm going to eventually fix terrors and stains and things like that, I want to have the image looking as close as I can to the darkness. Contrast, etcetera. So hard to do that. I'm going to convert this to a smart object and use the camera raw filter. As I mentioned, beginning this has turned out to me to be like Justin Amazing tool for restoring old photos. Because when you think about it, what is camera raw? Do it deals with exposure? Contrast clarity. De Hayes de Hayes is for like, Oh, my photo has hazy clouds or maybe very light elements of old photos. So check it out. Go D Hayes. I mean, one slider, and it's already to me, like 50% better than what I used to do, right goingto levels and all these other adjustments. And now I move one slider I'm like, that's a pretty darn go...
od start, right? And because d hazes not in Photoshopped we need to use, even if that's all you did and moved on and then did other, more traditional retouching of things in Photoshop just D. Hayes alone to me as a huge improvement. Personally, I would also probably look at doing a little bit of clarity. And a very typical start with lots of old photos is lots of teeny tiny little bits of dust. Imagine, for a moment I had a photograph I taken with an older digital camera with high I eso, and there was lots of noise in it. That noise kind of looks like little tiny pieces of dust. So therefore, noise reduction in Photoshopped can go a long way, dealing with a lot of the teeny tiny, not the big scratches and marks and stains. But the little stuff. Let me get closer here. You can see there's the original just by moving the noise reduction slider up a little bit. It's already better now, the detail and contrast slider you can decide like so I want less detail at the expense of getting a little soft focus or more detail meeting. You won't remove the noise as much, so it will depend on the photograph. I tryto keep the detail as high as I can. Contrast can do the same thing. It doesn't do as much on a gray scale photo as you would probably know. It's in color, perhaps, but it's just again a scale. Do you want more contrast or less? That one. I normally don't do as much. So now for now, I'm going to click OK, and let's look at the difference so far, and that's by just doing a couple things right in camera. Let's get closer in here. So the other thing to consider now is the actual retouching of things like blemishes. And this is where we have to make a decision because I have two options here. The first would be at a blank layer and use the method of cloning or healing to a blank layer, which works. But with that, and if I'm gonna use that method, I have to be pretty darn sure that's the way I want my photo look because I talked about this in a previous session. If I took say, my spot healing brush and just did some quick little healing of things here and do a couple things you can see. I'm doing something again. Pressure sensitivity rocks on a tablet. This is awesome. Okay, so we just have a few little things. And then I saw, you know, I think I could probably stand into a little more in camera raw, So I, uh oops went to the wrong place, right to go here. So I say, let's darken exposure and increase the contrast and more clarity when I click. OK, now, my spots are very obvious. So that's the downside to that method Is that if you're going to do any kind of repair on its own layer, which I have to because it's a smart object, then I'd have toe hopefully do this after I've already decided this is the way. Want everything else to look in? Terms of contrast. Exposure, etcetera. If you save your settings in cameras a preset Can you apply those to your hill layer only? Yes. So well, to the to the smart on me to the so. In other words, if I had another photo referee someone of this, I would just open it instead of me going D Hayes clarity. I would just use a preset and would do all those settings. And then I would still have to do the healing part individually. Can you apply camera raw to your healing layer? Um, it's tough because I mean, in theory, you could try it. But you'd have to take the, um, do all the healing and then use the camera filter where there's an option called previous settings so it would be worth a try. I'm I feel it would be, ah, lot of time. It might work, but other times it might not, but it certainly would be worth a try. The ideal approach, of course, would be to to do this last the other option. And it's not to me as a great one, because I certainly prefer the way that the healing tools work in a photo shop is in camera raw. Could go that high, use its healing brush, which is I just don't like it as much. But I mean, it's it's OK once get useful because the advantage, of course, is now. If I do any further, tweaking, all of these healing areas will automatically update because it's part of the entire raw process. So in this case, if I change and he's setting, you'll see any of those spots that I used would work. Unfortunately, it's what you see is what you get. You draw a little thing and it says I'll use this spot you could move to somewhere else If you don't like, it's like, Wow, I mean, it's OK, but it's not the same as like the healing options in photo shop, which to me are just are better. But it's one of those weighing the alternatives. You wanna have the ability, continue to tweak your other settings and have the healing update? Or do you want more control in photo shop and just be know that I have to pretty much pick my setting still look the way that I want? Actually, so I wonder if we should just get in the habit of doing all the healing before and then on the player above that, Then do the camera raw modifications and then that's edible. Well, and that's a possibility that the challenge sometimes is, and this is where you have to look at each photo and decide is that sometimes to really decide about healing, you almost want to put the photograph into the correct brightness and contrast type of effect so you can see what needs to be healed. So it's kind of, Ah, good point. You have to decide. So I wonder, then, that if the best work so would be to first to some camera work just so that we can see the humans are healing that we need to do, then do the healing. And then it can encapsulate everything into another smart, smart object and do everything on top of that. And that's certainly a good option, because then you're not going back to edit the original raw. You're kind of building on on top of it. So any time you can feel like you're always moving ahead instead of I've done all this healing work and nine minute adjust the original at the risk of these not looking very good anymore. You know, that's certainly a good approach to try and in anything in photo stop. There's lots, but I'd say, particularly in photo restoration, you could look at 15 photographs that all have very different issues that need to be addressed, right, So that's that's why you have to decide, but that I think the key thing for me is to be aware of those issues, and then you can determine Okay, this photo, I think I can jump right in, start fixing terrors and stuff and then worry about brightness and contrast, all that kind of stuff or vice. First of depending on the photograph. This one was so faded that I felt like I want to at least see, see a little more. Um, now, having said that, let's see if I can step backwards enough, it might be quicker just to revert. So in this case is gonna be hard to see. But in theory, if I could see a little better, I could start doing all the healing type stuff at this stage. If I could see them well enough, then take the original photo and the healing layer, convert both through a smart object and then go to the camera filter to do the stuff like D. Hayes, etcetera. Needs to say, I only had a few of the spots, not all of them. So, you know, the good news is, I suppose there's several options available to you. It's a matter of looking at the photograph in saying in this one, the biggest issue is X, so then I'll deal with that accordingly.
Class Materials
Bonus Materials with Purchase
Ratings and Reviews
Margaret Lovell
While I use Photoshop, I wouldn't consider myself an advanced user. I'm slowly, but surely trying to move in that direction. I've also been interested in learning more about photo restoration techniques to fix some of my old photos. But also because I think it's a useful skill to have, which could function as a side gig. I'm glad that I took David's class. I found his explanations easy to follow, and it's a great beginner's program. I feel as if I can start using what I learned today.
artmaltman
Another superb class from Dave Cross. Well organized, well paced, very clear and extremely insightful! Voice of experience with wise advice. Thanks Dave!
Beatriz Stollnitz
Excellent class for anyone who is looking to restore old photos. Dave's usual clear explanation style makes it an easy and enjoyable class to follow along.