Lesson Info
16. Merging Images
Lessons
Class introduction
04:35 2Field Techniques, Camera & Lens Choices
08:15 3Selecting Gear for Great Panormas
10:44 4Camera Menu Settings & Exposure
09:58 5Troubleshooting Environmental Obstacles
04:04 6What Contributes to a Great Panorama
11:32 7Shooting Vertical Panoramas
04:57 8Shooting Techniques for Black & White Panoramas
04:59Handheld Technique for beginners
05:10 10Tripod Technique for Intermediate Photographers
07:43 11Advanced Technique for Panoramas
09:58 12Navigating Moving Subjects in Panoramas
04:04 13How Time of Day Impacts Panoramas
13:28 14Workflow in Lightroom
08:59 15Developing Images in Lightroom
11:54 16Merging Images
13:44 17Finishing Techniques
17:31 18Saving Images for Print
05:41 19Controlling Your Environment
05:23 20Profiling & Calibrating Your Monitor
20:54 21Wide Gamet Color Settings
12:37 22Soft Proofing Images
13:49 23Selecting the Right Paper for Prints
08:05 24Sharpening Images
28:33 25Printing with Lightroom
17:07 26Printing with Photoshop
05:46 27Black & White Printing
05:59 28Best Practices for Printing your Image at a Lab
07:10 29Analyzing & Displaying the Print
05:19 30Reviewing Panoramas Printed in Class
10:20Lesson Info
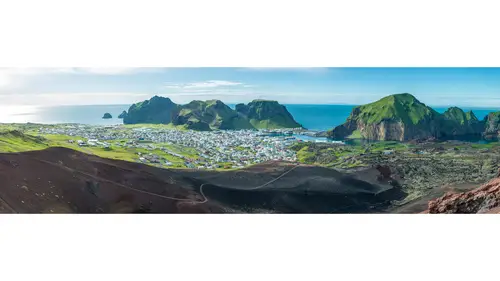
Merging Images
And the next step is merging, okay? So, I'm gonna show you how we merge. Now, I'm gonna make a little caveat statement here. These are giant images and if I actually merge these in the class it would take a long time. So we can click merge and we'd be sitting here waiting for the spinning ball of happiness to complete its process and then 30 minutes later we come back and finally be merged. So, I actually pre-processed a bunch of these a little bit smaller so that the merging will go faster. So I'm gonna go to a little bit different folder and basically do the same thing but on smaller files. I'm in this other sub folder here, it's called 2000 pixel JPEGs. I just already exported out a bunch of smaller images. And let's show you the Lightroom merge, go down here. Got a little airplane. That's not a panorama. Okay, cool. So now we're gonna take these images and we'll merge them. These are the same ones that I was just working on. I'm gonna make this a little bit bigger just to show you ...
what we're getting ourself into. Nice. All right. And I'm not gonna actually pick all of them just again to save time. I'm gonna pick the most important ones. So, starting at the Space Needle that'll be on the right side and then on the left side I'll pick right there. Okay, I think we're ready to go. So, we've got our images selected and you can do this from the library, you can also do it from the Develop pane, it doesn't matter. As long as all of your images are selected you can merge them. So I'm gonna right click and then we're going to go to photo merge and then merge to panorama. You also see there's a keyboard shortcut, Shift + M. So if you just wanna do that, go Shift + M, it'll start the merge. All right, so here we go. It opens up the Panorama Merge Preview. All righty. Let me maximize this so you get a better view of it at home. So this, oops. This is our first swipe at this and what we see is a little bit of error. We see a little bit of panning error. I can't remember when I took this if I was handholding or if I was on a tripod, I don't remember. It looks like though I was handholding. So, what do we do with all that white stuff? Well, back before Lightroom CC we actually used to have to just crop it out or we had to fix it with content aware fill in Photoshop or something like that. But now with Lightroom CC we have this really cool new tool. It's called Boundary Warp and it has taken all the brain power out of panoramas. It's so cool to move this slider, watch what happens. I'm just gonna move the slider off to the right and it automatically fixes the boundaries by kind of warping all of the pixels in the scene and just fixing, just fixing it. It's like magic, it's like wonderful. You know, I used to and I'll show you how we do this in a minute. I used to have to go to Photoshop and do all these weird funky composition stuff in Photoshop, no longer. So, here's my recommendation for you is if you can do all of our panoramas merging here in Lightroom, do it in Lightroom. It'll save you a lot of time and frustration. There's a couple of other options here. There's cylindrical projection, spherical projection and then perspective projection. There's no easy answer here other than I will tell you this, spherical tends to make your images a little bit shorter. Cylindrical tends to make your images a little bit taller and so, if you're shooting cityscapes and buildings you might choose a cylindrical panorama projection. And then perspective is really specialized tool. You're gonna use perspective let's say when you go like to, let's say the White House in Washington, D.C., you're standing in front of the White House and you take three photos. One this way, one this way and one that way. So, the middle photo looks normal but the photo over here it kind of fades off, it got this perspective fade. If you have like three images that you wanna fix, click perspective merge and it'll basically just open up those outer edges and make it look like a straight or a flat controlled perspective photograph. So, for this one though let's just stick with spherical. Sometimes when you click on these other ones it takes a little bit of time to process and now if you look in the upper left hand corner, it says it's creating the panorama. Okay, I'm gonna take this moment to answer a question. So, I know earlier today someone had asked a question about filters and whether or not filters matter for panoramas. I'm gonna say don't use filters. That's my recommendation especially polarizers, circular polarizers. And the reason why is because you're gonna swing your camera from left to right and as you do so, the light in the environment's gonna change and the sky will actually change dramatically. So I will say keep filter use to a minimum out in the field and if you have to, then do your polarizer adjustment maybe using a software program instead. So, I don't recommend filters for panoramas. Here's the result. Click on that guy. Let's go full screen so I'm gonna type the letter F. Great. It actually looks beautiful, really fantastic. I'm gonna zoom in. Now, remember this is just a 2000 pixel image so we're not gonna get a ton of detail here. There we go, that's what I wanted to do. But still, oh man, it just makes me happy. Look at all, you see texture and detail and on the full resolution image that we'll finally print, you can almost see people inside the buildings. And that's why I love using high resolution cameras because you can just explore the photo for such a long time. And another cool thing about panoramas is there's photos within photos. A lot of times when I do this I go, oh, oh, that right there, that's a photo and maybe I'll make that an eight by or a 20 inch by 30 inch print all by itself. (chuckles) I love panoramas. All righty. Let me show you now how we merge in Photoshop, okay? So I'm gonna take that same sequence of images, I'm gonna go back to the grid here and take that same sequence of images and I'll start with that one there. And now we'll do the panorama merge in Photoshop. But again, I use Lightroom as my base. I think doing, using Lightroom as your base of operations is important. So, here though I'm gonna right click and I'm going to go to Edit In, and then we're going to Merge to Panorama in Photoshop. So let me tell you what's happening here. What Lightroom is doing is it's taking all of the adjustments that you made and it's gonna put or it's going to export out a bunch of TIFFs. And then those TIFFs now are going to go to Photoshop and Photoshop is now going to arrange them into a panorama. So here we go. The first thing is it now it's exporting the TIFFs and that's why it's waiting a little bit of time here. And then once the TIFFs get exported it will fire up Photoshop, here we go. And it opens up what's called the photo merge dialog and this is a little bit more sophisticated than the Lightroom photo merge. So we get even more layout options, the automatic one, the perspective, cylindrical, spherical, collage and then reposition. Reposition let's you kind of manually reposition them as necessary. When you're first starting out here I recommend auto. Auto gets it right almost every single time. In fact, that's the one I'm gonna use here. But what'll happen sometimes is you will actually click OK and it'll go and then the resulting image will be all wonky. You know, this side will be up here and this side will be down here and you're like oh, oh. That was the wrong choice. So then you just have to go back through again and maybe pick a different projection option liker perspective or cylindrical or spherical. Okay, which files do you wanna use? Well, these are the files I sent it so please use those images. Down here, do you want to blend the images together? What this means is the edges of images that when they overlap, do you want Photoshop to kind of make them blend together so there's no visible seams? Well, that's a duh. Yes please. Vignette removal. I always click that. Is there anymore vignetting that I need to get rid of? And then geometric distortion correction. If the lens you're using has a lot of like barrel distortion or if there's other distortion from your panorama sequence then click that, that's good. The last one down there is content aware fill. All of these area down below and all that area above if I wanted light or sorry, if I wanted Photoshop to just fix it automatically, I would just click content aware fill. Sometimes it works well and other times it doesn't. You get little gremlins or Yodas showing up down there and you're like, where was that? That wasn't in my photo. So, I usually don't check that one. All right, I'm gonna click okay. And as this is merging I'm going to answer another question that came in. We got a question about HDR photography. Does HDR and panorama, do those two things work well together? HDR stands for high dynamic range and what that would require is taking multiple images of every frame so those building sequences. You take one, two, three, four, five images of this single composition at different exposures and then move the camera and do five more and then move the camera and do five more. And then at the end you have to merge them all together. The dark, the middle, the bright, so it's a very intensive process. I don't recommend HDR photography for your first go at panorama merging but if you get good at this over time then yeah, go ahead and use it. Go ahead and do HDR photography. It's just very intensive on CPU processing, computer processing. Okay. We're in Photoshop. Let's see what Photoshop did. Well, Photoshop gave us a bunch of different layers and then it actually used layer masks to block out portions that it didn't want to see in the final image. So you can see over here each of these are layer masks. Let's say that as Photoshop did this I found that there were two Space Needles. Photoshop for some reason made it so there are two Space Needles from two separate images. Well, using layer masks what I could do and I'll just do a real quick example here. I'm holding down my alt key and I'm clicking on the little eyeball next to that so it just shows me that one image. I can then paint on that layer mask with my brush tool with a white brush or a black brush to show or hide more of that one image. So you can see that Photoshop a lot of times gives you more capability to work on that image when there are errors and mistakes. As I zoom in on this I'm just going to click my zoom button here. A lot of times what I'll do is I'll zoom in to maybe 50% or 100%. I'm holding the spacebar key down now and I'm clicking and dragging and I just look around very carefully. Are there any problems, any issues with this photo that need to be addressed? Mostly at this point I'm looking for those parallax error problems where pulls are messing with each other. I'm looking for merging issues and if I find them then I go over here to my masks and I paint then in or out, okay. Command + 0 gets me back to the full view of the panorama. So that's the merging process in Photoshop and this one just happened to work out well. Let me just show you something here real quick. I'm gonna close down this. I'm gonna say don't save. I'm gonna go back to Lightroom. Let me show you one that didn't work out well. Let's see here. And this didn't work out well because of my field technique. Bump, bump, bump, bump, bump. Here we go. Go full frame on this, F. (chuckles) Okay. This one I brought it into Photoshop to do the merge, I actually tried to merge in Lightroom, Lightroom would not do it. And then I brought it into Photoshop to merge and this is what Photoshop gave me as a result. It's just all over the map. So I'm like, well what, what? What did I do? Well, I didn't follow all of my field technique rules, I didn't lock my exposure for one so every image in this sequence was at a different exposure. And you can see Lightroom tried to fix it but you can see all of the merging segments are all messed up. And then I didn't overlap enough from to photo to photo so Photoshop just had a real hard time merging it. So, that's an example of a problem. There's really no solution to fix that. Delete it, go back again next week and take it over.
Class Materials
Bonus Materials with Purchase
Ratings and Reviews
Fred Morton
Get it, get it and get it. I bought Mike's Speedlight course and this is on the list after watching it on line. The course design by Mike with the Creative Live staff is a successful blend of content and presentation. I absolutely loved how Mike took us on location for several shoots, where we could see the setup and problems that he had to resolve. This is a must have course for photographers interested in landscape work. Another powerful part of this class is Mike's willingness to demonstrate and show us what didn't work. The practical experience in his course was just like being in the field with Mike.
user a5f3c6
Mike combines two characteristics of a great teacher: he's obviously knowledgable and competent about his subject matter and he's relaxed and confident in how he presents his ideas. This class covers everything I need to know about photographing and printing panoramas. But, it is much more. It is a class that shows the essential skills involved in shooting, post-processing, and printing photographs and how to apply them to a specific application: panoramas. I learned a lot! Thanks, Mike.
Sue Sirius
This workshop was terrific! I learned so much about taking, processing and printing panoramas (and photos in general). I found the presentation very easy to follow with great examples and instructions. Highly recommend this!