Lessons
RAW vs. JPEG
08:17 2Introduction to Adobe Camera Raw 7
10:10 3Camera Calibration
17:08 4Intro to ACR Q&A
12:48 5Cropping & Straightening
17:35 6White Balance
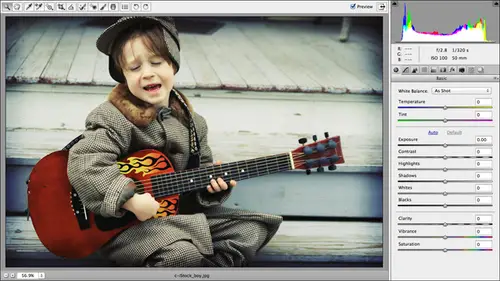
18:32 7Using the Basic Panel
1:05:33 8The Adjustments Brush
42:54Lesson Info
Fixing Chromatic Aberration
Now let's take a look at a problem called chromatic aberration. It sounds scary, Did. And it is scary because let me tell you, chromatic aberration kept me from selling this shot as a stock image, and I was so sure it was making me rich. I'm kidding, of course, but it did get rejected for chromatic aberration. Okay, so let's zoom in and let's see what I'm talking about here. I'm gonna go ahead and click the auto button and let camera I'll have a go at correctness in there, so it's a little bit prettier for us to deal with. And since I've got some clipping mornings going on in the highlights, I'm gonna go ahead and grab the highlight slider in drag it to the left so that I have recovering as much detail as I can. So now I'm ready. Teoh, zoom into this clock area and show you what the heck chromatic aberration is. I'm more like to call it color fringe because that's what the heck it looks like as I zoom in to the numerals on this clock got. This is this is possibly the best image in the ...
history of all images to show this on. Let me drag my highlight slider to the left a little bit more to try to get rid of all those at the red clipping mornings. So you can see on this three right here. And I made a rhyme. I'm a potent didn't know it. You can see on the three that it's not black. And had I really looked at this image before I submitted it at 100% I would have seen a little bit of that fringing, but I wasn't expecting it. I was just so happy with the composition and the way I positioned the model in the going to sleep. And I was already key wording this sucker in my head. I like workplace stress exhaustion. You know, I was already selling it nevertheless, because we've got such high contrast between the numbers on this clock being black in the face of the clock being white. We've got serious chromatic aberration going on here, and it will usually manifest as a blue or purplish haze. We've got both in this picture that's loitering around the edges of areas of high contrast. Okay, It's really common when you shoot something that's light on a really dark background like these. This clock here, it's super easy to get rid of here in camera raw. You can get rid of it in front of shop, but it's a three or four step process. It involves duplicating the image layer, running a Gaussian blur and then changing the blend mode of the Gaussian word overlay. Try to remember that. But here in camera raw is a check box. Not gonna believe it. And this did change from camera raw six camera, all seven. So the way we're going to fix it is we're going to open up the lens correction tab or panel, and the lens correction panel is the sky right here. It kind of looks like a bunch of parentheses jammed together. That's not what the icon is, but it's so small, it's kind of what it looks like. Okay, so we're gonna give that a click to come into the lens corrections panel, and what you want to do is you want to click the manual? No, but I can come over here to color and I can turn on remove chromatic aberration, and it pretty much got rid of it. Okay, so it's kind of a one step process. So either in the lens correction in the profile tab, if you can scroll down yonder, there will be a check box called chromatic aberration, and you can just turn that on. I don't know why we're not seeing it or in the manual tab. You can also put I'm missing some options down here. That's so strange. All right, we're just gonna go with color in the manual tab. There's another There's a difference. Pop up menu and you can turn turn on highlight edges and that will get rid of a little bit more of it. We have a couple of 20 Lisa, Lady, It was here on the couch or missing the color tab entirely. Same. Same here, missing the color tab entirely. Well, you know what we could be seeing here is the difference between this version of camera and the one that came with CS six initially. So this is 7.1. They do. You may have changed a little bit. That's kind of hard to believe that they would do anything different in the interface between for a 0.1 upgrade, but maybe they did, because I really can't scroll down and some of the options that I know. I mean, I was practicing these files last night, these two options that I'm trying to find or not in here. But this is 7.1, and I know I have 7.0 assault on my computer, So maybe that's what we're seeing. So course we did all this and purpose to tell you that if you're in camera raw, 7.0, you can click the profile tab and way down yonder, there's going to be a check box called chromatic aberration, and you can turn that on, and that should get rid of the color fringing. Also in camera raw 7.0 In the manual tab, you have a D fringe poppet menu, and you can set that to highlight edges, and that can also help get rid of this edge fringing. But evidently in 7.1, we need to go to the color tab in the lens corrections panel and turn on removed chromatic aberration, and you actually get some other helpful sliders here. So if you can't get rid of it in full by turning on that check box. Then you continue to sweet to tweak Seasiders right here. Tweak these sliders to try to get rid of it. But it did a pretty a job just by turning on that one check box. Yes. You have a question in the audience. When would you choose different all edges. Actually, I'm looking at different ging. The highlight edges and then all edges and clicking all edges seems to get rid of just a little bit more. But in general, when would you choose one versus the other? It just depends on the image. I mean, in my opinion, is kind of a trial and error type of things, So you could just use the controls and see which one is going to do. A better job of getting rid of it depends on if you've got, you know, fringing around all of the areas of high contrast or just a few areas. And that's another time when you might want to pop in and use the adjustments brush because it has a D fringe slider that you can use. So if you can't get rid of all of it here in the lens correction panel that you could use the adjustment brush and then selectively try to paint away the rest of it. But I am surprised that it is such a good job on that. I don't know if that would have been enough to get this image accepted by the stock photography agency, but I wish I had thought about it. And I actually don't have any other images that I can show you that particular feature on. But what we can do is zoom back out of this image just a little bit to take a look at that clock. And just so we can appreciate what it did, so we'll use our peaky to toggle the preview often on. They'd eczema a little bit more so you can see more numbers. So here's our before, and here's our after So it did a really good job of getting rid of that edge fringing, and getting this red right here is coming from our highlights or losing a little bit of detail in that area. So any other questions on on edge fringing just from Barbara Z and but British Columbia? Why would you not just apply removed chromatic aberration to every image automatically and not worry about it ever. I guess that would be one way to have a go at it. There's certainly nothing wrong with that. Do you want to do that? Go for it. And on the Topa, whose name is rich in Missoula, says that he's using a CR seven point and he does see the controls. Your speaking off it seems like a 7.1. See what I mean? Camera is the most frequently updated software known to man and, UM, old fashioned a J from Dubai on camera. Robbie updated to version seven from photo shop CS five Negative.
Class Materials
bonus material with purchase
bonus material with enrollment