Lessons
RAW vs. JPEG
08:17 2Introduction to Adobe Camera Raw 7
10:10 3Camera Calibration
17:08 4Intro to ACR Q&A
12:48 5Cropping & Straightening
17:35 6White Balance
18:32 7Using the Basic Panel
1:05:33 8The Adjustments Brush
42:54Lesson Info
Introduction to Adobe Camera Raw 7
There are several different ways for you to open your images. Of course, Right, cause they're always there's always six ways to do the same thing in a photo shop. So if you're looking at a raw file on your hard drive, you can simply double click to open it. Okay, because it has a special extension on the end mind carries extension of CR two. Okay, years may have the extension of D N G for digital negative because it has that extension. Your computer knows what software to open it. With a case, you can simply double click those files toe, open them in raw. Your computer will launch photo shop if it isn't already running and then the camera raw window will open. So that's one way to open images. We'll just do that. So we'll give this file a quick double click. Okay, so here's the camera Raw seven window Here. I'll go ahead and press the cancel that. Close that and show you another way to open your images. If you're using Adobe Bridge, which is also installed along with Photoshopped, Brid...
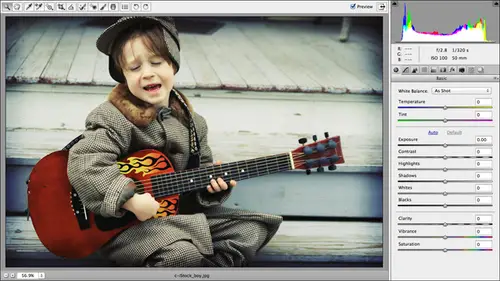
ge is an organizational powerhouse. Okay, so it's like a database for your computer you can use it to browse and view all the images on your computer. You can also use bridge to import images. Okay, you can open images straight from bridge in camera as well, by either double clicking or by simply clicking. To activate the file in using a keyboard. Shortcut of command are on a Mac or control are on the PC, and you could think of that as our for raw. Okay, so command our control, our and that will open an image in camera raw. You can also control Click an image Okay, either in the bridge window or on your hard drive control. Click on a Mac or right click on a PC and via the Think the contextual menu that appears you can choose open and camera raw. Now, if you're in your operating system in you, control or right click, you're not going to see open and camera raw, but you will see open with. And if you choose Photoshopped, it's still gonna open the camera. Wrong window. Okay, because camera was a plugging that's installed and only functions inside a photo shop. That's why it's not listed in the shortcut menu in your operating system. But if you choose photo shop, it'll still open. You can also open multiple images at the same time by simply clicking to activate them. So, for example, if I wanted to open all three of these images, let's say I was gonna do Cem cropping, and they all needed a similar size or aspect ratio of a crop. I could open them at once and then in the camera. Wrong window. I can make my edits apply to all those photos at the same time. Okay. And the way you do that is when you open multiple files, you'll see them appear in this left hand little drawer. You simply click the select all button, the very top left, and then anything you do to the image will happen to all of them. This is a really handy thing when you're correcting several images from the same shoot. Okay, that being said, if you've just shot 200 raw images, please don't open them all at the same time. Unless you want to crash your computer depending upon how new your computer is, how much memory you've got. Got a fast, hard drive. All that kind of good stuff that will limit your ability to open a slew of these things at the same time. But, you know, do your own test and see opened 5 10 see what happens. So, for example, just give you a little sneak peek here. If I did want to crop all these images, I could simply go and grab the crop tool. Choose an aspect ratio, which basically is a fancy way of saying choose the shape of the image you want, and then click and drag on top of the image to draw a box. Gonna turn on the crop overlay here. And when you get that just right, you need to tell camera raw that you're finished with the crop. Just like he didn't photo shop kind of has a one track mind. You tell it. Hey, I'm finished doing this thing. Please let me move on to the next task. Watch these images over here in my little drawer on the left hand side. As soon as I press return or enter on a pc to accept this crop, Kamerad crops all of the images in the same way. So that's an extremely handy thing. So I'll go ahead and cancel out of this. And no, I do not want to save my changes. Thank you, Cameron, for asking. So here we are, back in bridge. The last little thing I want to mention on opening files in camera raw is that you can also open J pegs and tiffs. I believe we got disability somewhere on camera or off five or six. And to do that, you need Teoh control or right click the image and shoes open in camera. Raw Enbridge. Okay, the camera raw plug in Does not have a file open command case that you can't launch it. You can't open another raw file and try to use file open because the file open command that you may see in your menu system while the camera around Windows open is actually photo shops file open command. So this is how you can open a J pig in camera raw, so we'll go ahead and do that. Just that you can see you won't have as much flexibility if you open J pegs and tips and camera as you do raw files. But that doesn't mean it's not a useful place to do color correction. Okay, so just be aware that you could do that to you. And once you understand how easy it is to make serious changes to your images using the sliders and the whole fact that it's nondestructive, you might be tempted to do most of your color correction right here in this plug in. So I want to mention just quickly. This is pretty much the interface that we're going to be dealing with the whole day. So we've got a nice big honking preview of our image on the left hand side here, and we've got a Siris of sliders on the right. We have a nice hissed, a gram at the top that we can see the microscopic little bar graphs that represent the information that was captured on our camera. These little buttons above the Siris of sliders change the sliders. Okay, these are all called panels. Okay. So as I click those little buttons, I'm getting a different set of sliders that lets me do different things. That's the whole interface right there. It's really amazing. I mentioned that editing in camera raw is nondestructive. That means that you can undo anything you've done whenever the heck you want. Whether it's tomorrow or a year from now, assuming we still have computers and software, I want to go back to my desktop here to show you how your edits restored. Let me cruise on down the exercise files. Look at all these wonderful files you're going to get. Here's one. Okay, So right here, I'll zoom in a little bit so you can see, actually, let me increase the width of this column so we can see the full file name. So this file right here Que image number nine and the exercise files. It has the extension of CR two. That means that's my raw file. And again, yours may have the extension of D and G for digital negative. Well, you also see a file with the exact same name underneath it, but it has the extension ex MP. OK, what the heck is that? X and P is a file called a sidecar. Okay? And this is what's in that file. Okay, so I've opened up the X and P the sidecar file. This is the list of changes I have requested camera raw to make on that image. So I'm showing you this to really make you guys understand that the edits that you request in camera raw are not being applied to the image it all cameras, simply keeping a text list of what changes you've asked it to make. That means they're not being applied to the file until you tell camera raw. Two. Specifically, apply those changes in a more permanent manner. Let's say you do all your correction in camera raw, and you need Teoh Export A J peg, maybe descend to somebody else or a J pay to submit to a stock photography side If you are stopped, photographer. Or maybe you need to submit a J. Peg this into your online labs, such as in picks dot com for a nice big print so on and so forth. At that point, when you export to a different file format, your changes are applied. But you can always, always, always reopen the raw file and back out of any of these things. Very simple way to revert to the original raw file so that you can reprocess it Really an amazing thing. So this is what an excellent P file looks like. If you were to open it and you can see what I did here. Just for example, I've changed the white balance on this image. The image that you haven't seen yet. I've changed the temperature, I've tinted it. I've set the shadows slider to five brightness and 50 contrast. So you can dig into this final see exactly what was done to the image and that sidecar file travels along with the raw file.
Class Materials
bonus material with purchase
bonus material with enrollment