Lessons
Day 1
1Difference Between Adobe® Photoshop® Elements and Adobe® Photoshop®Creative Cloud®
54:22 2Creating an Album and Connecting to Lightroom
25:48 3Guided, Quick, and Expert Edit Modes
32:36 4Layers Options Overview
40:52 5Guided Effects
24:13 6Puzzle Effect
18:26 7Resolution Dicussion
22:26Resolution Discussion Continued
20:20 9Canvas Resizing in Adobe® Photoshop® Elements
22:47 10Color Correction in Expert Mode
27:55 11Layer Masks in Expert Mode
16:33 12Correcting in Adobe® Camera Raw
12:24Day 2
13Creative Color
25:37 14Partial Color Images
25:13 15Converting Color to Black and White
29:10 16Custom Gradients and Vignettes
30:01 17Removing and Replacing Backgrounds
43:43 18Cookie Cutter Tool
17:17 19Retouching in Expert Mode
44:14 20Recompose Tool and Color Select
21:46 21Adding Digital Make-up and Text
23:10 22Creating Photo Collages
22:19 23Sharpening Your Images
20:16Lesson Info
Resolution Dicussion
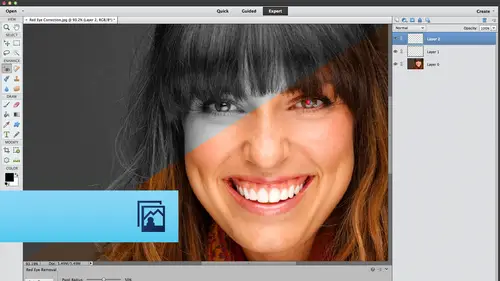
So I've got several effects in here for you to create. We're not gonna trot through the out of bounds one because it's another guided edit. But I've included a file for you to use for that. We created that in elements, so popped out a piece of a photo and added a frame and skewed the frame and perspective so that it looks like this piece is actually in the foreground. All of that was done in elements. So if this was just a regular old photo, so that's one of the guided it's that you can trot through. So if you purchase the course, you've got that in your exercise files. But another neat one that might my good friend been Wilmore likes to teach and photo shop is this photo stack technique. So if we look at what's going on in our layers panel and expert mode, we can see that Holy Thor elements really trotted through a bunch of hoops to make that effect happen. I mean, my goodness. So even when your skill level does increase in the program, there will still be effects that are faster to c...
reate over in guided at it, mood than you'll ever be able to do in expert mode. So I'll just delete these layers and show you this one real fast. So there's, uh, the original image. This is my girl Kitty Samantha thes air My babies. My Children are here. One of you'll see the other one later. So we're gonna come over here to guided edit mode, and if we come down to picture Stack, we can choose how many pictures we want. Four pictures, eight pictures, 12 pictures. So how is elements doing all this? With the click of a button? It's an action. Step two is changing the border. It make that large, and then we cruise down here. Step three would be changing the color of that background, and when you click done, then you can pop over into expert mode and you can see all those hoops that elements jump through to create that picture stack effect. So that's another really great one. Now, let's talk about quick edit mode. When I opened up quite a few images here, there's my other baby that Sherlock, please, Sherlock in Samantha. Okay, so I've got several images open. So this is where the photo been comes in handy because I can see all the open images and I could just double click to bring that particular window to the forefront. So in quick edit mode, you might want to fix the red eye in an image. Okay, so that we're gonna come appearing. Quick, quick mood. I've still got my before and after set up in this view will stay this way until you change it. So in quick mode, we've have a few more tools accessible to us than we did in guided mode. So one of them happens to be a red eye removal tool, and you don't have to go into quick mode to get to its their an expert move. So what you do is you click to activate the tool. Don't do as I do. Don't come over here to the before in the engine. Start trying to remove the red eye because nothing's gonna happen. But you can come over here to the after image, and you can either click inside the red area or you can click and drag to draw a box around the people, depending upon the severity of the red. I one of those methods is gonna work better than the other. That's it. Or if you don't want any of that, you can just click the auto correct button. Elements will go in and analyze the image for that particular tint of red and eradicate it, which is really awesome. And if you're clicking or clicking and dragging, the Dropbox doesn't do the trick. Then you can manipulate these sliders down here. Increase the people radius. If the people's were really basic at a really big red area, and if it still doesn't seem to get rid of the red eye, then you can adjust the dark in the slider, which just makes the people's a little bit darker. And if we come over to expert mode, we can see the elements. Did that particular change right on the original layer? So let's close that image in open our photo, Ben. And now let me show you the new pet I feature, which is easily accessible in either quick mode or here we are in expert mode, so you've got that red eye tool right there. So if you wanted to do it an expert mode, we could simply duplicate the image layer by pressing Commander Control J so that we're not harming the original image. And then when we click the red eye tool, we can see it's exactly the same options as we get over and quick mode. It just depends on where you're more comfortable starting out with a program You might wanna hang out in quick and guided modes most the time. But, you know do venture over here an expert land cause it's a lot of fun. So now what we're gonna do is turn on the pet I check box that is new in elements 12. This is a feature that even Photoshopped CC does not have. It wishes it does, but it doesn't. So now we can come over and I'll zoom in So you can really appreciate this. You're gonna click on the offending people. Didn't. Okay, job, not a great job. What can we do to fix it? We can step back a couple of times by pressing command or control Z. So we backed up two steps. Now let's increase the radius of that people. Slider now is click. We're getting there. Let's undo a couple more times. I'm just pressing and holding the command key and tapping Z. Now let's pump the radius up all the way and let's dark and a little bit more see what happens. So that's much better. I think if we drive the dark and slider up even further, we'll get to where we want to be. Here we go. See how I'm just undoing and fine tuning those sliders to get what I want. That's probably the best, the best we're gonna get. But Holy four, we've never had that capability before, ever. Seriously. To fix that, you would have to create a new empty layer, create a selection of the offending quite golder green biz. You would have to then fill that selection with black. Then you would have to add another layer to paint on the glens because the eyes are gonna look real unless the people has a glint in it from a reflection of the light. So this is really incredible stuff, and it may not look perfect, but if you zoom out of the photo to about roughly the size it might print, that is a printable picture you know of your own pat. Obviously, you're not going to sell that to the client or sell it as stock photography. But for your own personal use is that is a lot more usable than that. So that is the red eye in the new pet I feature both accessible either in quick edit mode with the red eye tool or an expert mood with the red eye tool. Neat, neat stuffs will pop open the the photo been again? Another thing that I want to show you here in quick mood is also knew in elements. 12 are some Instagram style effects which were really need. So in quick mode, you're gonna come down here to the effects button. And these were all Newman elements 12. So their little instagram ish Well, hips dramatic ish in there. Look so you can just click each one to apply to see what that's gonna look like on your image. That's a pretty decent contrast, black and why this is interesting. Look, So these are just really quick little treatments that you can apply it to your image. I kind of like this one. Well, what if I want apply a neat looking little frame to? Can I do that here? Absolutely. So we're going to click the frames button. So these three buttons right here effects textures and frames or new in quick mode of elements. 12. So if we click frames, we say that we've got a bunch here. We've got, like, a little movie strip looking thing we've got, ah, arts and crafty Look, I like that one so you can just have a big old party with these frames and Instagram style effects. So another great thing for a scrap Booker, somebody that wants to just accentuate a photo on their website. And if we pop back into expert mood, we can begin to understand a little bit about how elements made that effect happen. This one is a little bit more difficult to figure out, so we've got some whole lot of transparent areas and some masks over here. But you guys get the get the gist of that. So for this particular image, let's say we need to color correct it. Let's go to quick mode and let's click the adjustments button down at the bottom left. No, we talked briefly about this earlier. Any of these panels we give their little but Mary is a click and you get that Siris of thumbnails that show you what that particular adjustment would look like at varying strengths. So the smart fix is pretty much a one stop correction shop, if you will. And that's you saying elements. Do whatever the heck you think you need to fix this image. So, really, if you use smart fix, you may not have to use any of this other stuff. Adobe certainly thinks that you won't but do whatever you need to you. So nine times out of 10. If if the problem is obvious, like if it's just washed out a little bit, then I'll come down here and maybe do levels instead of smart fix. But if I'm short on time, then wow with a timesaver, right? Because look at that. Even if I just did nothing else but applied 100% smart fix. Look at the before and after of that photo that maybe all some photos need, so it's really incredible. So that's how you can use the quick mode to correct color and lighting in your image. So I'm gonna go ahead and drag that to zero, and then I could come down here and change exposure if I wanted, or I could just do a levels adjustment right from here. So the possibilities are endless. Any questions on using quick mode? Very good. Are you able, Teoh? Um, like the last image you did with Kitty Cat. You did your little instagram e type filter, and then you added the frame. So you wanted five other images to do the same exact thing. Can you copier without having to go through the steps again? No, on that particular one. Yeah. If you wanted to apply those instagram style effects to other images, you need to trot through that. Yeah. Each time you were navigating through the been without opening the bend, how are you doing that with your keyboard? Your mouse? Oh, actually, I just clicked. The photo been toe pop it open right there. E didn't see you open it up. So where is there a way to not open the photo Ben and navigate through the images that are down there? No. Huh? No. So it's kind of it's a collapsed or expanded panel. So it's always hanging out there. This button just collapses or expands it. So Okay, now the next thing I want to get into you is cropping and straightening in expert mode. So that really is all the time we're going to spend in guided in quick modes. So the rest of today and all day tomorrow we're going to spend an expert mode do It's in pretty high level stuff. So hold on to your desks, grab that frosty beverage. So we're gonna talk a little bit about cropping, resizing, slimming all the different things that weaken dio in with the crop tool in and around the crop school. So it's fun with these exercise files. I hide little notes for you. With the naming of them, I let you know what we're actually going to be doing. And sometimes I had notes to myself in there too. So I need to see some of these things. So we're gonna use the crop tool at first toe crop an image to ah, five by seven, and we're gonna take ah, look at the inner size dialog box, which is really, really powerful, and elements because you can tell all kinds of things about your image, the pixel dimensions, how big the file sizes and more importantly, the resolution. Before we do that, we're gonna pop back over into keynote for just a moment to explain what the heck it is that you're looking at in your images and what the resolution measurement really does. So images were made from pixels. And if you zoom into any image like we have here, you can see this cross section of a sunflower. You're gonna begin to see the individual pixels that comprise that image, those air solid blocks of color. They're not Grady INTs. They're each a tiny little square perfect square that is filled with a solid color. If they're tiny enough, if those little pixels squares of colors or small enough, then you're not going to see them. And the image just looks like a beautiful, toned, continuous tone image. But if the pixels are large enough, which happens when you zoom in or when you try to print a graphic that was posted on the Web, then you're going to begin to see those individual pixels, the measurement that controls the size of those pixels. Second, any size you want, and you can change that all day long. The measurement that controls the size of the pixels is called resolution couldn't be more cryptic, so high resolution images. I love this graphic. High resolution images have teeny tiny pixels, and you could think of them like they're really, really little. And they're more tightly packed together, so more of them smaller. That's what you want for print, because you don't want to see the individual blocks of color. When you're printing an image, you want them to be so little that you can't spot them. So high resolution just means that the pixels are really, really small. My current favor analogy for helping to explain resolution and its relationship with pixels is to talk about baking cookies. So when we're making cookies, we use brown sugar. And if we were to take a measuring cup and we were to put brown sugar into it and not pack it down, then let's say the brown sugar comes up to the one cup mark of the measuring cup so you can think of the Granules of brown sugar as pixels so we pour some brown sugar into a measuring cup, comes up to the one cup measurement line. What happens when we put our fingers in there and mash that brown sugar down now, its surface space. It takes up less surface space because they're packed more tightly together and the Granules aren't really getting smaller. But let's just think of them as getting smaller and more tightly packed together. Now those same number of Granules, pixels, Onley come up to the 1/2 cut mark. That's kind of the way resolution works with pixels, so the smaller you make them, the more tightly packed together they are, the harder they are to see that high resolution, the more loosely they are packed together, the bigger they are, the easier they are to see. So if you've got a photo that is, you know has a certain width and height when you start packing those pixels more closely together and making them smaller and smaller and smaller than the surface space are the resulting print size of your image is decreased. Just like the surface space that the brown sugar Granules take up in a measuring cup decreases when you packed um, tightly together. The exact same thing is happening in your documents. Now the reverse is also true, as you make pixels in an image at a given width and height larger as you increase the size of those pixels, then the surface space or the resulting print that you can make with that particular size of pixels increases. So the bigger the pixels, the larger the print could be not saying a good quality print. I'm just saying it will take up more surface space. The smaller the pixels, the smaller the width and height becomes a smaller. Your image becomes just like brown sugar and a measuring cup when you pack it down, takes up less surface space than it did before you packed it down. I hope that makes sense to make cookies. Tonight. Everybody's gonna be having pizza and cookies. So low Resolution refers to large, loosely pat pixels. You can think about it that way, which is perfect for on screen use. That's why we get the the hands coming out of the monitor trapped in the monitor. So the only time resolution matters at all, ever, ever, ever, ever, ever, is if you're gonna print the image if you're never gonna print the image, don't ever even think about resolution because it doesn't matter, because on a monitor or on a projector or on a TV screen. That output device is controlling the size of the pixels. You don't have any control over it whatsoever. So it's the video driver in the computer that's determining the size of those pixels, cause there's a maximum, whereas a printer can print really, really, really, really, really, really tiny pixels, which is what you want. You don't want to see those big, chunky blocks unless you just like the look of Legos than go go for it. But we've all printed a webpage, and seeing how those you can see it looks really blocky, the images that you print off the website. That's because their low resolution, because high resolution, cannot be seen on a monitor because it just can't display pixels that small. And this is a great illustration of that. I love this photo from Istock Photo so you cannot see the difference in pixel size on this monitor. The top him in just 72 pixels per inch, which the lower the number, the larger the pixel kind of the opposite, as you might think so, that it would be considered low resolution image. Where is the image at the bottom is 300 pixels per inch. That means they're really, really small that small enough where you're not going to see him when you print What's the magic number? Anything over 240 pixels per inch, you won't be able to see the pixels ready printed anything over 240. And if it's easier just to remember 300 remember 300. The higher you go, the tiny or the pixels. But unless you've got a really super duper, newish, fancy, really high quality printer, you're probably not gonna be able to tell the difference between a print at 300 pixels per inch versus pixels per inch. But folks like magazines, magazine producers now they will print at a higher resolution because the paper stock, their printing process allows for higher quality meeting tinier pixels. So if you're in magazine production of Preparing and Add four magazine, you may be requested to prepare at a much higher resolution than 300. But that's just because they've got the fancy your equipment right that can actually take advantage of of higher resolutions, which means tinier, tinier pixels. But most of the changes that we have at home at least the consumer levels. You're probably not gonna be able tell the difference, even between a 240 pp. I print and a 300 peopie I print, but by all means run your own tests at home. There's no harm in resolution overkill, except for it can take your printer a hell of a lot longer to print the darn thing. And if it's not a really great quality printer, it may not look as good at a higher resolution because you're getting dots on top of dots on top of dots, so you'll have to do your own tests. But three hundreds of good magic number to remember.
Class Materials
bonus material with purchase
Ratings and Reviews
a Creativelive Student
Creative Live has opened my eyes to education on-line and out of all the on-line resources I have come across, Creative Live is the best and there's never a catch. Creative Live is one company I trust 100%. They never would take adavantage of anyone. I love Creative Live.
a Creativelive Student
Every workshop I have watched LIVE is absolutely FREE! And... there is a rebroadcast that follows that is free. It is only if you want to go back again and again and again - that there is a purchase price. The knowledge of the instructors is phenominal..... well worth the cost if you choose to buy the workshop.
a Creativelive Student
Love the class and have been thoroughly enjoying it. One question- has anyone else had issues downloading the files? It seems to only go up to folder 13 and most of day 2 is missing?