Lessons
Lesson Info
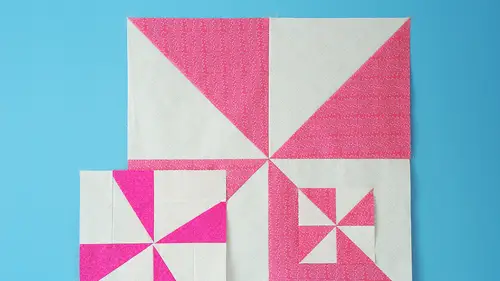
Basics of Making a Pinwheel Block
Very first step we need to do is we need to cut two squares from each fabric, and I want you to cut them out. Put the instructions up here two high contrast fabrics at home of giving the instructions in the supply list for a fat quarter of each, so this gives you even more than you need, but we're going to cut two squares at seven and seven inches by seven inches. Okay, so you can layer up your fabrics if you want to get the two squares, cut out or keep your fabric folded and do it that way, make sure you don't have your salvages that's all I request so the salvages air the edge of the fabric that either have the nicely printed words one see if I have any here. I think I've cut all this salvages off of these ones or they'll have the little dots there we go see there's ah that's your salvage with the printed words on it. Alternatively, you may have ones that one's got the words as well, just to show everybody at home more words look at all the pretty salvage is here. There we go um, and...
the salvage is just your edge of the fabric on this one you can see I don't have the pretty printed words, but there are tiny little dots and if you get the fabric is thicker there as well and it's got the tiny little dog so if you get them on your thing it kind of just it's an inconsistency that doesn't look it's pretty so cut your salvages off first and then you don't have to worry about it random aside, some people collect salvages the pretty ones and turn those into quotes I don't personally keep mine let me rephrase that I don't collect them but I keep mine and give them to somebody who does so if you're not a collector of them that's fine, but ask around you may know someone who does and they love getting thie extra stuff you know and then ok, so once you've got your two squares, you're gonna have to I'm going to say dark and light for our high contrast, you've got too dark and too light squares okay, make sure they're nice and flat give them a press if you on I have a little bit of a fold in this just give it a little bit of a press so it's nice and flat on then I want you to take some kind of a pencil we're marking pencil or something like that nothing too dark new sharpies here but either a fabric pencil or a regular pencil pen marker just nothing too dark and you're going to take your two light squares and you're going to draw a line corner to corner on the back of the fabric, so I've done it on this one. I'll do it on the other one already to show you line up your ruler corner to corner. If you've got a little bit of a thicker marker, give yourself a chance. Hold your ruler in place that also holds your fabric down nicely and just a faint line enough so that when you get to the sewing machine, you can see it. Okay, when you're drawing your lines, just be careful, especially if you're using a pencil, it can kind of snag the fabric, so if that's the case when you're drawing it, I'm just going to pretend here, but if you are pulling it, it can kind of pull and then your fabric will do this when you go, you don't want that, so if necessary, do kind of a dotted sort of line as you go, just lifting up your pencil or your marker as you go, and that gives you the same thing. Okay, so we have our two light fabrics, and I just kind of smudged that the way we have our two light fabric squares, and we had our two dark fabric squares now let's, get to sewing line them up right sides together. If you are more comfortable with the pin at this point, then I recommend putting a pin in, you know, steal the ten off this design wall here, you know, take that down actually as well as toss ups not not tossing a quote side we just don't need that um and just give yourself one pin each toe hold it together while you so ok, you'll do that with both of them because we can so both at the machine we're going toe just do some chain piecing with us, okay? So I'm just going to demonstrate the chain piecing part okay, so that line that we drew is not your sewing line, okay, if we so down that then we couldn't cut it apart and get two blocks from this. Okay, this is standard half square triangle sewing together, so that is your line you're going to sew a quarter inch on either side of that line, so line it up with a quarter inch mark or if you have a quarter inch foot on your sewing machine holding your thread to start away down when you get to the end, do a couple extra stitches have your second pairing ready on, put it through the machine again and you'll go all the way down and you'll have done on one side of the line take those out and do the other side of the line and what that gives you and I'm just going to show you with the pencil here because it's kind of hard to see on this this is the line that I drew should give me I'm gonna grab one of these colored pencils over here but I've got right here this is the line that I drew here is my stitching line I can go see that now a little bit more I'm just trying to give it a little bit of color as opposed to just pointing right might well I did straighter than I drew you can't really see it anyways um but I'm a quarter inch on both sides I've got one here one here so you actually sewn twice on your set of squares? Does that make sense to everybody here in the studio? Awesome ok, so the next thing that you want to dio after your host takes a sip of tea no, no your whole I took a sip of tea, not tracy. So now that first line that we drew that's you're cutting line so we're going to take our ruler back again don't do it without a ruler, you may have a nice straight line, but you won't get a straight cut unless you have the ruler and cut straight down corner to corner on the line that you drew right and you're left with what looks like that for those of you here in the classroom you're left with that once you cut okay I have impressed this yet a soon as I cut then I will go and press it ok I'll go to my board here I will set the scene and pressing becomes very important at this point because if you do this and then pull it you have that corner to corner he is a bias edge and so as soon as you do that it's very very stretchy I'm going to show you I have some triangles that air already cupped right this is straight of grain we have cross grain if I pull here I've got a little bit of stretch if I pull here I have a lot of stretch so even when we're pressing we don't want to pull and stretch that out so what I do is I've set the scene with the heat that gives me a nice warm that warm makes it easier to get a nice crisp line and I actually use my fingers and kind of finger press it before I even go back at it with the iron and then what I'm going to do with the iron as I'm going to put it down and lifted up and put it down and lifted up I am not doing this right if I do that suddenly my block is like all weird and wonky and not flat anymore and not very square, right? And so from each set we did the two to begin with and we sliced in half I get two of these right? I get two of those from each set so because we started with two lights and two darks I'm going to end up with four of thes because one light one dark gives me two of the blocks that makes sense to everybody we're going over very basic this is you know, sort of the fundamental of making this quote block all done when you've got that now we're playing but that doesn't mean we're forgetting about technique in this okay, we're still quilters we're still using quarter inch themes were still pressing right? We're still squaring up so it's really tempting at this point to put all this together into the pinwheel block that we want but they're not ready to do that yet first of all you have these little ears on there so you could just cut those off but this is still not actually a nice square piece we want to square it up so you're going to take your ruler I'm lucky and that I have a six and a half inch ruler which is what we're squaring up to so I like to use this there's also a line on it for my forty five degree which this is a forty five degree line so what I'll do is I'll line that up right on my line and shift it up and down the line to make sure I have no empty spaces underneath the ruler hold it in place nicely and I'll trim two sides and then flip it around and do the other making sure I'm lined up with my now cut edges and now I have a nice square block so that when I go to sew it together everything is there when we're quilting we still need to remember all these basic rules right? Because the basic rules following them now means that when this goes into a finished quells it lays flat it quilts nicely it stays square all along the way ok, if you have one of the bigger rulers, this is still totally doable there is still that forty five degree line on there you're just gonna have to look for the six and a half inch measurement all along the way really very simple seal press and square up all of your blocks and then it's about putting it together in a pinwheel shape again we're on that overhead shot so we can see your four going together if you're putting laying it out before even go to the sewing machine lehto make sure it makes sense if you're going to do it you're like uh which one do I dio just look focus on the center don't look at the edges to see how it might go and know that you're always alternating right dark light dark light dark light, dark light all the way around there and once you've got to this point then you'll sew it together like you would a regular four patch block so I'm going to so that together and I'm going to so that together we'll take it over to my machine get this stuff out of the way show you now I just put those down I remember if I was in the right order yes that was the right order he's so together the first one wrong or you're worried to stop and take it out and adjust the way the second one's air laying to get you to the point where you need it ok, I'll take my second pair and so those together I haven't back stitched I'm not much for back stitching but that's a personal preference when it comes to these belongs ok, so I've got my two blocks I've changed stitch there's still attached I'm going to give those oppress when I press the's I like to press to the dark so in this case I'm pressing towards this darker fabric with my seem you can press open but I'll show you why I like to press to the dark in a second again we're pressing weaken still stretch things out at this point so we're pressing not running over things with the iron and now we're left with just one seam left to sew together guys you're so quiet here in the studio my goodness sewing away intently right? Okay the reason I've pressed mind two different sides is I'm going to go over here is when I pressed two different sides I can now feel whether this is lined up or not if it's not lined up and I go like that I feel a lot of extra bulk and if it's moved over here I can feel that there is a gap in between there but when they're together nicely it feels smooth that's called nesting the seams and if you want at this point you can put a pin their toe hold that in place but what I do is once I know I have a good nest there I just tend to keep my fingers on it if I can I might start sewing and then stock make sure I have the good nest and then hold on to that until I get to it because we went to the effort of squaring up our blocks it should be no problem to have that nest nicely and have our ends line up nicely without any effort because we put the effort in before okay and now is the moment I contradict myself because this is one of the times that I press open is this last scene I tend to press open because where all of these points of our half square triangles meet up it's very bulky and if you press to one side, you're putting all that bulk on one side, so I like to press open to have it lay a little bit flatter again set your seem and I'll go from one side and then turn it around like half too open up the same again impressed towards the center if you chain piece like me and that little bit of threat is there and it's keeping your scene from opening carefully snippet at this point and then open that up and give it another press race. So there is my pin whale block simple, straightforward, nothing exciting we've got here let's put them all up on the board, right? I'm gonna grab yours, it's ok, I'll grab it. There's michelle's, pinwheel block grand turquoise is another awesome combo that I love everybody else is almost done to clothe house where triangle so she is just burning through this because she absolutely loves to make these don't worry the rest of your not rushed or anything like that. All right, one of the things I'm going to point out already to you is ours the blocks are a bit different, you see how they're different ones going one way and the other is going the other way exactly I did not give you the instructions on to do that and that's totally fine right, there's no right or wrong way in terms of the direction when we do this and that's actually one of the very first things we're going to talk about when it comes to play. Right? I didn't put ahead for you guys. The basic instructions on the penn will, but we went over it and it will be in all of your bonus materials. So if you didn't catch it just now and up on the board, then we will have it in your bonus materials and you can get it there, right? So just to go over it again, it's reminder you have your two squares, the exact same size. In our case, we wanted to make a twelve and a half inch block, so we started with seven inch squares. We drew a line across the back so right sides together a quarter inch from either side of the line. And then we cut on that line, opened it up, opened it up and pressed it there. And then what we had to do after that is square up he's now to six and a half inches, right? So we squared them up and we laid him out to create the pinwheel shape, okay, and there's two different ways to do it it's with dark light or light dark either way is correct there's no right or wrong and that it's just about changing the direction in those things it's actually completely subjective depending on what else you put it with? Yes. So what is dark? What is light? Right? And what is going to be your foreground in your background? It was cool. Yeah, because let's say michelle put this one pinwheel block in a whole bunch of the other fabric actually here give me the scraps we'll show them what we mean way let's take my block down it's not distracting us we're just going to move this down a little bit so it's away from the right if we take what is her light fabric and put it there now the pinwheel is the dark right it's really popping off if we take the dark fabric now the pinwheel is the light right? So that's a great point michelle that it is entirely subjective if you get two very different things if you wanted to just do this and have the light on one side in the dark on the other it's like an optical illusion right without even trying really so great point great throw that I know you had spent the time to fold that play is messy, right? Remember my kids and their pains play is messy so here there's another one and she's gone the same direction that I did but interestingly because you've done the gray and you put the two of them together right now we have some different design elements showing up this is part of the play we're starting to see these different ideas and what we might be able to do and where we can go with um and that's what I'm going to be doing is I'm going to show you all these I'm going to let me rephrase that I'm going to suggest to you here in the studio and at home all the different ways that you can take this block and play but they're only suggestions and there joe it's the start right when I was preparing for this class I could have spent base in my sewing room playing because I would make one block and go but then I could do this and then I could try this and then I could say I'm like I don't know what you did I mention we have three small kids so I don't have all day but it was fun in the time and I want to go back on dh try some of the ideas maybe you guys will come up with him I'm only giving suggestions there's absolutely new um no rule that says that you have to do with the way I've done it on dh play that way so okay my points to line up but that's what you just did I know oh, they look great, that's, a busy enough fabric that you wouldn't even notice, right, there's. A fun one, because we have some directionality and our print of surprises all going the same way, to be honest with you. Sometimes it where does that way, I don't even try. I tried it wouldn't have them sure so and great. Another one that's, really awesome together, right, totally different collection of fabric, really, and assumes you were like you. Ooh, I like it, there's, the excitement, rage. So we can do totally different things when it comes to playing like this.
Class Materials
bonus material with purchase
Ratings and Reviews
Sondra
I have taken all four of Cheryl's classes and she is an excellent instructor. Amazing. She is clear, engaging, non-judgmental, informative and has a ton of quality suggestions. Can't say enough about her! I hope that she does more courses in the future. Thanks very much, Cheryl and Creative Live. Very inspiring.