Shoot: Stylized Portrait - Close Up Part 2
Lesson 28 from: Portrait Photography: Creating and Styling your EnvironmentJohn Keatley
Shoot: Stylized Portrait - Close Up Part 2
Lesson 28 from: Portrait Photography: Creating and Styling your EnvironmentJohn Keatley
Lesson Info
28. Shoot: Stylized Portrait - Close Up Part 2
Lessons
Class Introduction
20:10 2Creative Photography Path
22:57 3Importance of Personal Work
15:25 4Concepts and Inspiration
12:04 5Choosing Your Environment
05:03 6Research and Mood Boards
06:58 7Finding Your Style
09:34 8Establishing a Team
10:44Jobs on Set
28:38 10Production Hurdles
13:45 11Working with an Art Director
07:01 12Pooling Resources
03:43 13Casting
17:26 14Wardrobe
11:24 15Set Design and Props: Interview with John Lavin
35:06 16Gear
09:59 17Lighting
29:10 18Technical vs. Flexible Lighting
07:56 19Creating Environment
07:59 20Gear Essentials vs. DIY Solutions
07:02 21Lighting for Your Subject
04:10 22Lighting for Your Environment
05:17 23Q&A
08:36 24Directing Your Subject
34:03 25Tips for Directing Talent
09:58 26Pre-Lighting and Test Shoots
05:08 27Shoot: Stylized Portrait - Close Up Part 1
49:55 28Shoot: Stylized Portrait - Close Up Part 2
20:19 29Shoot: Stylized Portrait - Close Up Part 3
17:19 30Set Tour and Lighting Set Up
05:41 31Shoot: Building Environment & Lighting Adjustments
33:13 32Shoot: Building Environment Part 1
18:45 33Shoot: Building Environment Part 2
18:39 34Photo Critique
26:06 35Shoot: Row Boat in Fog Set Tour
03:54 36Shoot: Row Boat in Fog Part 1
42:19 37Shoot: Row Boat in Fog Part 2
28:34 38Shoot: Row Boat in Fog Part 3
24:34 39Shoot: Row Boat in Fog Part 4
04:10 40Shoot: Scuba in the Hull Part 1
44:27 41Shoot: Scuba in the Hull Part 2
21:50 42Shoot: Scuba in the Hull Part 3
16:40 43Image Selection: Stylized Portrait
30:53 44Image Selection: Building Environment
10:52 45Image Selection: Row Boat in Fog
11:53 46Image Selection: Scuba in the Hull
06:38 47Next Steps: Create New Work
05:44 48Next Steps: Share Your Work
12:03 49Next Steps: Marketing and Branding Consistency
12:52 50Final Image Reveal - Concept and Casting
13:20 51Final Image Reveal - Retouching: Communication and Direction
14:13 52Final Image Reveal - Final Q&A
34:52Lesson Info
Shoot: Stylized Portrait - Close Up Part 2
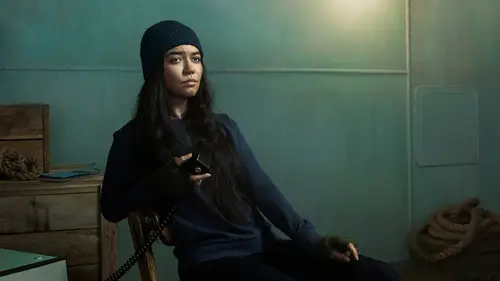
You wanna come in and put a little more dirt in there and then we'll maybe even do a couple more tattoos also, just to have some options. Dirt and tattoos? Let's start with-- We have the scar too. Yeah, we could try that. Beanie, or lose the beanie? I feel pretty good about the beanie. Yeah, me too. So, some more dirt, and maybe more tattoos? Should we start with just dirt? Yeah, I just need five, maybe, I need like two minutes to kinda, to go through these and think about this. Okay. I'm bringing in pictures right now, so I'm just-- Thank you. Seeing if I can fix that. You can stand up too, if you need to. So, John, a quick question as you do go through these, people are wondering if, A, you know sort of what the final shot is going to be with regards to not just the portrait itself, but is this gonna be a composite shot, is there anything you're gonna add to it in the background, do you know that yet? Coming into this, I was very sure that we were gonna ...
change the background in post, and that could still happen, but sometimes when you do have an idea, when you spend so much time on that idea and you plan so much around that idea, it can be hard to let go of it. You start forcing it to work, and that's where the stress can come from. And I think coming into this, this was supposed to be on the side of a ship panel, which we can show when we're kind of tearing down, but we built this wall for this, and the idea was there, and I love the idea, but the reality was it just wasn't working. And so then I was like, okay, well, we have this blue ship wall, we have to do that, but then I thought, okay, let's do a blue wall, just a blue seamless. And even the blue was just kind of overpowering the mood and the feeling of the whole image, and I like this idea of the red lip popping and the tattoo really standing out, and it felt like the blue was kind of competing. And I could take that blue and de-saturate it in post and it would probably get to the same place but I'd rather feel really excited while shooting about what I'm seeing, than thinking, oh, well, we'll fix it later. So I try to do as much in camera as possible. But that being said, once we get to the editing process, anything goes. Nothing's too precious, I'll change anything if I feel like it's gonna make the image better. That being said, as of right now I feel really great about this. What we will definitely do, either in pre-lay, which we kind of already did, and what we'll do at the end is I will still shoot plates of that original wall of maybe some different color and tone backgrounds. So we do have those elements, should I change my mind, but right now, you got me on record saying I feel really great about this. We'll see what happens when I come back and I show the finals, but it'll be interesting to see. Thank you. I don't think that it missed anything, but-- What do you mean, missed anything? It said it was 11 images behind, I restarted the program. I think those images came in when I restarted the program. But just make sure what you expect to be there is there. Let's see if we got her judging Ken. Yeah we did. Yeah, we definitely got that. That's the important thing. Not really but, okay, so let's mark this, and... Did you feel judged, Ken? Not aside from you. Oh my gosh, he's a hard customer to please. So let's put a little more dirt on maybe her left side, and just kind of push the whole look a little further. Okay, do you want more dirt everywhere, or just what we have but darker? No, I don't want to just darken what's there, I wanna add. Add more? And I think for sure let's start with her face. And it doesn't, don't do it more intensely, I think just go for more, basically. Just a little dusting everywhere. (ambient chatter) I think right at the end we should do a scar too. Nervous to commit to it, but I do want to see it. I know Erin wants a scar, too. Will you talk us through again what the direction is, that now you're adding on to this or going towards? So now we're just adding more dirt. I like to build. In a lot of this, I rely on Jennifer for. I'll ask, if we do that, can we change it? Because I reserve the right to change my mind. So some things she'll say, "if we do this, it's not coming off," so then I have to make a decision, or if she's like, "I can do that and totally take it off," it's no big deal. So we try to add in layers and build, and so by the end even if it seems excessive, we'll just kind of go as far as we can with it, and then we have options. Doesn't always work, sometimes it's like, holy cow, that's really cool, and I didn't expect it to look that good. It's just kind of giving yourself options even outside of what the plan is, because it's just acknowledging, first it's good to have a plan. We couldn't have had tattoos and a beanie if we didn't bring those things, you have to have some structure, but it's acknowledging that you don't always have the right answers and know what's best until you explore for yourself and see. We're just trying to push the envelope and see if this character can develop into something even better. Thank you. What do you feel about the tattoos? I like the balance. As in, should we add more? Yeah, do you think it would become too distracting? I don't think we need more, I think the dirt's gonna kind of fill in. Okay. Can you check, are we getting any, especially when she turns, are we getting any shine on the material on the edge of the stars at all? I really like the beanie like this too. I'm trying to remember, did we look at other, I'm hesitant to change it because I like it but... I don't think we should change it, I like it. The backup one was the green one. No not the beanie itself, did we try, I can't remember if we did this with a bigger fold or not. We haven't looked at that. I don't think we should. Turn towards John real quick, I wanna show him the... I like that, the only thing I'm wondering about is if it balances too well with her other cheek, you know? With her what? Oh, other cheek. Like, does it seem too symmetrical? I can blend it a little bit. Make it more overall dirty instead of a... I think what I love about what you did so far is just that it feels natural, like it doesn't seem, it seems kind of chaotic and beautiful or balanced. I wanna make sure, as we're adding more, that it doesn't start to feel like it's too calculated, you know? Gotcha. On average, how many shots are you going for in this scenario, where it's a personal project, say, and it's not like you're with a celebrity where you have a limited amount of time. Is there a sort of a number of shots you go for, to give yourself options? Usually, one image per look. If we do different looks, I would try to hopefully get an image for each one. I dunno, I'm very much less is more, simplicity. We talk about boldness and confidence, so, for me, I like to find one image that feels really strong and just go with it. There's nothing wrong with showing multiple images from one shoot, but sometimes I feel like you lose a little magic when you show too much. Again, this is just my personal style, someone else could do it differently and it would totally work for them, but for me, I think of it as going to a party, telling a joke, and just leaving early, as opposed to being the last one hanging around and asking if there's more dip, or whatever. I just feel like less is more in that sense, and I like to find one that I love, and that's the memory of that character. In addition to that, is there an average number that it actually takes to get there? A hundred, or can you even determine that? With Erin, it takes so many to find one. (Erin laughing) I'm just kidding, Erin's great. It doesn't really matter at all if the person's good or not, I'll probably take less if I'm uninterested in the subject. Or maybe there's a point where it's like, you can only do so much. But when you're excited, even though I, right now, could leave, if this was a client shoot and they were like "Okay John, we gotta move on," or something, I am totally satisfied, I know there's one that I love. But when it's this much fun, I will just keep shooting until the lights go out, because it's fun, and there's also that what if there's something even better, so there's not really any rule. So far it looks like we've shot about 250. And without reviewing, two or three that I can think of that I'm really excited about. Sometimes it takes 500 to find one, so it totally depends. Thank you. Alright, let's see, come a little bit that way. Feel dirty? Alright. (camera click) There we go. I might like that, that's cool. Been workin' on the dock. Now turn this way, there we go. (camera click) Did you put more on her forehead? I did a little bit on the clean side. Not over here, I did it on the other side. I did it right there. Alright, let's try a couple straight ahead. Lean towards me a little bit at your waist, and lean a little bit this way, swivel your head back this way, that's good. (camera shutter) I think you might have to back up. No, you're actually pretty good. Maybe I need to back up. Here we go, alright, sit up real straight. Lean towards me a little bit, and then swivel your head this way. (camera shutter) (camera shutter) Can we compare that to the earlier ones? I feel like the light changed a bit. I feel like a scar's gonna be too much, I feel like it's gonna compete with the tattoos. With the tattoos? You don't think so? Alright. Because it's gonna be up here. I know, but then it feels like, a thing, a thing, a thing, you know... If we do the one that is a divot, that goes in, it's just gonna catch the light a certain way. It can be subtle, or we can do a little red in there. You would do the inverted one as opposed to the... I think that one's cooler. Oh, you do? Versus the gelatin one that sits on top. Really? How come? Because it constricts the skin, so it looks more like a knife slash through. Oh, I thought the gelatin one was the one that would read better. That's the raised one, more like a keloid scar. What would be a better application for that, then? For the gelatin one? I mean, we can do that one. That one's cool because you can draw a little red in there too. Right, I thought if it's going through her eyebrow. I mean, I'm just asking you. Either one works, it just depends on which one you like better. Okay, alright, let me think about it. The gelatin one can peel right off. The other one is like, that's gonna be our final look. Okay, you're going home with that one. Chin down a little bit. (camera shutter) Your boyfriend will be like, "did you get in a knife fight today?" (camera shutter) No flash, go ahead test it, there we go. (camera shutter) I like this a lot, just right at the camera, just slightly lean yourself there, an inch. Hold it right there, that's good, that's good. (camera shutter) (camera shutter) Look just past me here. (camera shutter) Lips apart a little bit. (camera shutter) And right back at the camera. (camera shutter) No flash? Want me to start reshooting? No, that pocket may have slid off the camera a little bit perhaps. Just slide back a centimeter, there we go. (camera shutter) We adjust the receiver. (camera shutter) Look just past me here, eyes up a little bit more. (camera shutter) That's good, hold it right there. Now really push the expression like, what the heck? (camera shutter) More confusion and disgust, there we go, yeah. (camera shutter) Eyes right at the camera. (camera shutter) And then, don't look at her, Ken, but judge Ken again. (camera shutter) Chin up a little bit more. (camera shutter) More kind of just like, revolted. (camera shutter) There we go, yeah, I like that, that's good. (camera shutter) Alright and then square your shoulders up, straight towards me, just slide like an inch... There we go, that's good, and lean towards me a little bit, chin down, perfect, eyebrows up kind of like... (camera shutter) Chin up a little bit more. (camera shutter) Chin up a liiittle bit more. (camera shutter) Swivel your head a little bit this way. (camera shutter) And then extreme disgust for this one. (camera shutter) (camera shutter) And then give me lips together, like a little sass, like an I told you so kind of thing. Chin down a little. (camera shutter) Even more attitude. Push your lips out a little more, tilt the top of your head a little bit, and kind of angle your eyebrows way up. Maybe it's more of the, mouth to the side kind of thing. (camera shutter) Alright, just lips apart a little, deep breath. (camera shutter) And then tilt your head straight up again. And then drop your shoulder a little bit. Swivel your head a little bit this way. (camera shutter) Lean towards me a little bit at your waist and then chin up slightly. (camera shutter) Lips together, very regal for this one. And look just past me over here, there we go, just like that. (camera shutter) And then turn your head quite a bit over, and look just like that, that's good. Lean your body a little bit to the right side. Actually keep your shoulders pretty straight but just kind of lean. Tilt the top of your head a little bit more, not quite that far, right there. Chin down slightly. (camera shutter) And eyes towards me. (camera shutter) Bring your head back a little, chin down. (camera shutter) Lips apart a little bit. (camera shutter) Like you're about to say something. (camera shutter) Kind of more like, listen I've told you a million times. Don't come around here. Lean this way a little bit, there we go, good. (camera shutter) Eyebrow up too, while you're doing it. (camera shutter) Do we need to hit that, Josh? Okay, J-pop, can we blow it out a little bit on the bridge of her nose? I do think you could slide back a little bit further, though, too, let me see what that does. Because I think that shadow has crept up a little bit. And then you wanna get ready for a scar? We'll throw it in there. Yeah, do you wanna do a little test drawing? I can sketch that line to see if you even like it. Sure. Or do you want to just go for it? We can go for it, take a little risk in life. Do you wanna do the one that divots in? I trust you on this. I like the idea of making it look like it was a knife fight. But whatever way you think is gonna translate best we'll do. Don't mess with me, I've had a rough day.
Class Materials
Bonus Materials
Ratings and Reviews
a Creativelive Student
What an amazing show. I'm so happy that I could be a part of it. It was so great to see John at work and in his element. I learned so much from watching his process from beginning to ending. So many questions have been answered. I feel more confident, to get myself out there and create and make work that comes out from my imagination. I will definitely be keeping a journal/notebook with me at all times. I would also like to suggest that we have another course for John Cornicello, home studio. I'm curious to see what John is working on in his studio.
Doppio Studio
It's amazing to watch and understand how this great creative professional work. There's a lot to learn about with his production process. For me, that lives in Brazil, is a major opportunity to enjoy this class.
Vitamin Dee
Wow! There's just so much great information in this class. If you've ever wondered what it takes to produce an environmental portrait, this is the class for you! John did a superb job of taking us step-by-step through his process. From model casting to set building, lighting setups to culling; it's all here. He even wraps up the class with next steps and how to put it all together. He gives the knowledge so you can take it to a place you can create your own magic!
Student Work
Related Classes
Portrait Photography