Lessons
Class Introduction
04:10 25 Shots That WOW
14:08 3Four Fundamentals of Photography
08:05 4Create a Visual Impact with Composition
07:04 5Importance of Foreground and Background
08:30 6Create Depth in Landscape Images
18:09 7Photos Don't Always Follow the Rules
02:11 8Composition Practice Exercise
10:41Composition Critique of Student Images
05:28 10Keys to Posing
05:37 11Shoot: Classic Elegance Female Pose
14:46 12Shoot: Modern Female Pose
09:04 13Shoot: Rollover Female Pose
08:10 14Female Hands & Arms Poses Overview
19:52 15Shoot: Hands and Arms Poses for Female
08:58 16Seven Posing Guidelines
04:18 17Headshots Poses with Male Model
14:59 18Shoot: Headshot for Male Model
06:45 19Shoot: Sitting Poses for Male Model
10:03 20Shoot: Leaning Poses for Male Model
06:43 21Shoot: Standing Poses for Male Model
03:32 22Keys to Couples Posing
10:31 23Shoot: Couples Posing
06:17 24Couples Transitional Posing Overview
14:28 25Shoot: Transitional Posing
15:25 26Keys to Group Posing
07:12 27Accordion Technique with Groups
07:46 28Shoot: Accordion Technique
04:11 29Shoot: Best Buds Pose
04:54 30Shoot: Talk with Your Hands Pose
02:33 31Shoot: Lock Arms and Hold Hands Pose
04:34 32Run at the Camera and Dance in Your Seat Poses
04:13 33Shoot: Pod Method Pose
17:58 34Posing Critique of Student Images
09:32 35Introduction to Lighting
05:38 36Soft vs Hard Light
17:10 37Difficult Lighting Situations
05:52 38Bright Light Techniques
18:16 39Overcast Light Techniques
10:34 40Low Light Techniques
10:27 41Lighting Techniques Q&A
14:58 42Drama Queen Lighting
06:26 43Laundry Basket Lighting
09:44 44Make it Rain Lighting
03:48 45Smart Phone Painting with Light
07:53 46Mini LED Bokeh Lighting
08:22 47Choose the Right Lighting System
13:30 48Hybrid Flash System
06:42 49Innovative Accessories
05:35 50Gear Overview
06:19 51Theatrical Post-Processing
06:07 52Ten Keys to Post-Processing
08:37 53Essential Skills to Post-Processing
08:25 54Headshot Post-Processing
24:53 55Bright Light Post-Processing
09:45 56Flat Light Post-Processing
14:46 57Low Light Post-Processing
08:24 58Introduction to Fine Art Post-Processing
09:06 59Light & Airy Fine Art Post-Processing
27:34 60Dark & Moody Fine Art Post-Processing
13:36 61Post-Processing Critique of Student Images
36:56Lesson Info
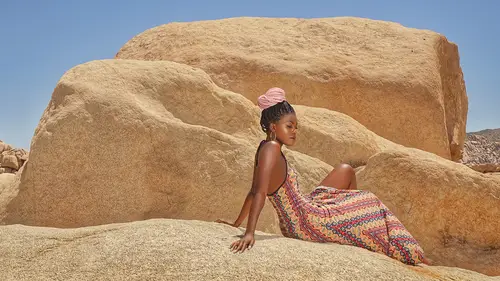
Create Depth in Landscape Images
I hope you're starting to see things now. See how these shapes are. There's one there, and she's there, but I chose to put her right there. I took a lower angle, because I wanted to accentuate her beautiful legs and her height, give her more of a hero feel, so I took a low angle so I could put her right in the middle of that shape. And so you wanna place them in the middle and not on the edge, okay? And so I walked around and I took a different perspective, and that's what I do a lot. I'll look one way but I'll walk in the entire area where I'm shooting, just so I can get an idea of what kind of shapes there are. And so let's say, "Well I like that shoot "but I actually like this composition better, "because now I show more depth." And now, the other shot, you didn't know there was a beautiful leg there, but now you can see the leg and so again I'm doing the same type of philosophy. Putting and finding a little backdrop, and then showing some depth behind it. So find your backdrop or s...
cot-spot and then find the depth behind it, of where you are and that kind of technique will not steer you wrong. It will always lead you to a good shot. And I love to show depth in my epic landscape shots. So when you're doing an epic landscape shot, I love to show just how vast that area is, and depth is very important. And so this is a little bit different. It's more of a backdrop shot, but again you see some depth. To the left of the image is the beautiful sky. I could've just shot her all on that red, it would look pretty cool but that could be anywhere, that could be inside. But because I'm showing that sky there gives you a sense of where I am. Now let's go to Spain. And I saw this beautiful structure there. Actually that entire structure was just white, but when I took the image back home and I looked at it, I go, "You know what? "If I post-process this "and because she's wearing a red dress, "and I use some complementary colors with it, "I think this could be a very interesting, "contemporary portrait." So here, not only do I do the composition, but my post-processing was huge. If you just saw this picture in white, I guess it would look okay. But I just think it has much more impact by using the different colors too. Okay, here's another shot, and she's jumping. And so I wanna accentuate what? Height. So I'm taking a lower angle. And so not only when I take a lower angle, I'm also kind of seeing the texture of those rocks on the seashore and I love how that light just highlights, gives a highlight to all those rocks, and then you can see the depth involved with that. And then she's jumping and I'm able to put her legs and her head into areas that you clearly see. So her legs are in a shape and her head is in a shape above her, and everything look organized there. And so understanding these shapes in your composition also helps with learning how to crop. And so you with that understanding of "I want this person to look at every single pixel "of this picture." And if you see it that way, you'll "well maybe this extraneous stuff over here "really doesn't add anything to the picture. "And if I crop it, then I could make it "so they're looking at the entire photo." And that's really how I decide on cropping too. So I didn't really get into cropping but cropping and the composition go together. So you have to learn, how to crop it, but also you learn how to compose it. Okay, here's another picture in Spain. What have I? I'm doing the same darn technique again. I'm finding a backdrop and I'm looking for some depth. I'm looking what gives the character of where I'm at, and I just happen to catch this jogger coming, and I liked he was wearing yellow and I think the yellow and the orange in the blue sky, it all works together. So I actually like that shot, but it gives you reason to take your eye, and look across the entire frame, with that little jogger there in yellow. Let's get to the next slide here. And you see where I put her head? Right at the top of that, so you see those vanishing lines. So I took a slightly lower angle, so I can position her head right in the middle of that. Here's another photo where I saw some trees and I saw an empty shape there, so I positioned her so her head was right in the middle, so you can't miss it. That is the first thing that you're gonna see. So those, my elements, the trees will just frame that subject. So that's what you're looking for, is framing of elements. And also your use of light and your posing will all add to that. But bam, you can see that. Another technique that I like using, is I like using corners. And so you can see I shot that at the corner of the dock there, because that gives you some natural leading lines is when you can use corners. Alright, let's go to Paris again. I rented this beautiful place out, on the idea that we could shoot there too, and have a great view of the Eiffel Tower. I put her, as you can see, I put her right... It's the same technique. Where's your little scot-spot? And where's the depth? Find the backdrop, and then depth. And it creates a clean shot. Now this is a little bit more complicated. I had a few things that I had to worry about here. One, if you've ever been here in Paris on this bridge, it's one of Paris' most famous bridge, there's hundreds and thousands of people walking on this bridge all the time. Which is the front of those lanterns there. I said, "Well it's so busy over there. "Let's go around the corner, "where nobody's gonna really walk in front of me "so I have a better chance of taking a clean shot." Really the only place that you can put your subject is right there below that toes, because you've got a little area right there, where you can put her head and this photo would make sense. If you didn't put her head there, then it would be cluttered by all that stuff in the background and it wouldn't be as clean. Here's a little bit more obvious shot in New York, Central Park, where those arches create a great shape. She's wearing white. Bam, pops off. There it is. Here I'm creating the sky, I'm taking a little bit lower angle again. And another thing is, is that you wanna try to create your shapes at different heights. And the reason why you want them at different heights is that it creates a diagonal as you're looking across the frame, and diagonal lines make you look at the entire picture. So if you have different heights, then it forces your eye to look across things. Okay, and so that's why I had that Eiffel Tower a little bit higher than my subjects so you will look across that frame. When you put two elements at the same height, then your eye tends to stay at that level, and you won't look across the entire frame. Here's another great shot. You have to do your homework, when you go to, especially if you're gonna shoot at iconic locations, you can't shoot in the normal places, because where the normal places is what? There's thousands of people. So I'm gonna walk a quarter of a mile down and get a shot where there's less people. I mean there's the smell of urine there, but that's okay. (laughs) You want the shot. But I love how everything comes together. Again I'm finding a backdrop. It is a side of a wall. I'm placing my subject there, but I have something of significance in the foreground, and in the background, and I'm putting Notre Dame. Guys you know Notre Dame is, right? That's where the Hunchback of Notre Dame lives, ringing the bells. I put that in a shape also. You can see how I'm using those leading lines. So everything is being set up here, Notre Dame is being set up by a shape, and also my subject is being set up by a shape too. Foreground, background, taking a lower angle. I had to take a lower angle here to make everything work and it looks perfect. Often you can also use texture. I was shooting this wedding and I just saw this sea of yellow. That's great. That's kind of like a backdrop to me. And I'm gonna have a foreground and a background, so I'm gonna have a little bit of yellow in the front, yellow in the back, and then boom. Put them in that sea of yellow, and that also, they pop out from that shape there. Here's a more traditional situation, where I am now... Now there you can see texture. If it's small texture in the background, that's okay. Especially if you're blurring it out too. Where I'm here, I'm using my 85mm lens, and so now, if I'm shooting at one point eight, that background gets a little bit blurrier. And so that kind of makes it more of a shape when you see less texture there. But regardless, it's still a shape. It'd be worse if I put the cactus right behind them. That would be very distracting. But those trees behind them are actually as a nice shape, and then I'm using the cactus as leading elements to point to my subject. I wanted a lower angle because I love the color of those flowers. And so that, when you walked into this area, you just felt like, "Wow, I just love the color of those flowers, "I love the cactus. "How can I incorporate everything to make it look logical?" So I put them in between, went to the cactus, took a lower angle so there heads would right be in those trees, and put some nice rim lighting behind them, to separate them. So all those things had to come together. Here is a tree I'm using, fairly obvious. There's texture there, but it's definitely a shape. Here I'm using the sky and taking a lower angle so her head's in the middle of that sky. Here we are gonna go to Hawaii, and there's this, I'm not in the water, okay? Just there's this pier that goes out there. In fact, next week I'm gonna go shoot here, if you wanna come with me, we'll be there. And I can take a lower angle, because this pier goes all the way and out, and then I had her surf out to this little area. But isn't that the perfect... There's a huge spot right there. She just pops right out. Something in the foreground, something in the background. But there's a huge spot and you see her immediately. Downtown Los Angeles is a very famous place to shoot. And again this same technique, I love these curves, right. I thought those curves were really interesting, but where am I gonna place the subject, there's a background there. And I put the subjects right in the background, and I have some depth so I can show the streets of Los Angeles, and the lights and things like that. And so everything works together there. Now let's go to Portland, up here. And you can see the texture, the shape that I put them in with the rocks. I of course had to raise my camera higher to put their heads in the middle that, but again it's the same technique. I mean, where's your backdrop, something of significance in the background, which was that beautiful waterfall. So you have two elements there. You can also use the ground as a shape too. And so I'm using the ground as negative space, to set up my subjects there and then I put them right in that tree, and so you can see all those elements in the tree kinda framing them. But that ground and the chairs create an awesome leading line so you look directly right at the subjects. I'm using light here, so I'm finding a bright spot, creating a silhouette and then that is creating a shape, and doing the little bouquet balls in front of my lens to create an interesting picture. Here again I'm going to Central Park here, and I'm finding "Okay, I wanna get the feel of Central Park. "I love those columns. "Oo, I love those trees in the background, "how it's lit there." She's wearing red. Red and green are complementary colors, it's gonna pop off right there. Put her in that small little square area there, right there. And now I get the flavor of where I'm at, plus a nice spot to put the model. Here is a very famous place, Trocadéro Plaza to take photos. And I'm using... Now when you're shooting an iconic element, here's the key. You don't have to shoot the entire thing. It's so famous even if you show a part of that iconic element, then people know, "Oh, okay Eiffel Tower, there it is." You don't have to show the whole thing all the time, because sometimes these structures are so tall that it's hard to fit everything in there, but you can just use part of it and still create a big picture. Again, I'm taking a lower angle, putting her head in that beautiful blue sky, the orange is a complementary color, so everything pops forward. I dragged that old fence in front of my camera, just to give me something interesting in the foreground to lead to my subject. Central Park again, where again I'm finding a backdrop. And here's another thing that you wanna have in your arsenal is a shallow depth of field lens. Something that goes down to one point eight, that's 50mm or more. Every camera manufacturer makes a cheap 50mm, one point eight lens, so there's no excuse why you shouldn't have one. But it helps with your composition, because it can blur out images in your background, so it makes it less cluttered and I use that technique a lot. Okay, here's another. You can see the shape and then the leading lines, leading up to her. And she's popping off with that red, and I have that umbrella, raising it above her head, and makes for a very impactful photo. Again I'm using the sky as a shape and the trees. I do that a lot. Sky, trees, give me the frame, boom. Let's go with their heads right there. Here it's at... Now this is a little bit interesting shot to talk about. That shape was created, as you can see the subjects are right in that nice little shape there. That shape was available only because I created my own light, and I had a video light to light up that pillar. Because that was lit up by a video light, now it gave me a perfect shape, because it was all dark there before. So your understanding of lighting also will help create shapes. And in this case, I had to use that video light to create that nice shape, and then I love how there's shadow to the other side of them and again I'm looking for a corner, so I see a nice corner and then I have the nice train on top and the leading lines and everything comes together. Here in Positano, Italy. Again, taking a low perspective. The texture of those rocks on the ground are very interesting and it leads you right to the subjects and you can see them, right? Boom, right there. That's the place. And that's when you're gonna create impact as you have a clean shape and you put your subjects there. If you're doing a silhouette, make that silhouette interesting. Here I blurred out the background. You kinda know it's Eiffel Tower, again because its an iconic image. But here, using a shallow depth of field, or a fast lens was my saving grace here because it could make those elements behind them not as obvious and so my subject will stick out. The next one I'm using a reflection as my shape. So I see a beautiful reflection on the ground, I can also use that as a shape. So you can go out of the box on finding these shapes. It's not just the obvious all the time. You can even use stuff like reflections. Here, taking a lower angle on stairs is a good idea. So if you see stairs, you can put your subject on the top of the stairs and then you can go more towards the bottom, so you can put their head more in the middle of the sky.
Class Materials
Bonus Materials with Purchase
Ratings and Reviews
Vitor Rademaker
This course is amazing! Scott is extremely straightforward. He goes directly to practical problems, tips and etc. He explains every thing very clearly, and he is also very funny and charismatic, making you laugh as you learn. He shows that you don't need a lot of expensive gear to make very nice pictures. So I have saved some money as well, cause I was about to buy some gear that I wouldn't need right now. It is for sure one of the best photography courses I have ever attended to! I highly recommend! Thanks a lot Scott! You are the best!
user-9994d2
I have purchased a number of classes, this being one of them. The quality of the information was good and the level at which Scott spoke was appropriate for me. Having a course sylibus would add greatly to the value, which usually is not part of the programs I've purchased including this one, unless I've missed it. I believe the speaker should be required to provide one. After watching the videos, much of material can be recaptured by seeing it in writing. I would like to hear back from Creativelive their thoughts. In sum, good topic, good speaker, good technical audio and video quality by Creativelive
user-b48fe5
Another fantastic class with Scott Robert Lim! The combination of his knowledge, willingness to share, passion & entertaining personality makes him a top choice for photography education. Learning not only the "what", but the "why" & "how" can transform one's entire approach towards MAKING pictures. A constant inspiration to get better & better through practice.
Student Work
Related Classes
Portrait Photography