Lessons
Class Introduction
04:10 25 Shots That WOW
14:08 3Four Fundamentals of Photography
08:05 4Create a Visual Impact with Composition
07:04 5Importance of Foreground and Background
08:30 6Create Depth in Landscape Images
18:09 7Photos Don't Always Follow the Rules
02:11 8Composition Practice Exercise
10:41Composition Critique of Student Images
05:28 10Keys to Posing
05:37 11Shoot: Classic Elegance Female Pose
14:46 12Shoot: Modern Female Pose
09:04 13Shoot: Rollover Female Pose
08:10 14Female Hands & Arms Poses Overview
19:52 15Shoot: Hands and Arms Poses for Female
08:58 16Seven Posing Guidelines
04:18 17Headshots Poses with Male Model
14:59 18Shoot: Headshot for Male Model
06:45 19Shoot: Sitting Poses for Male Model
10:03 20Shoot: Leaning Poses for Male Model
06:43 21Shoot: Standing Poses for Male Model
03:32 22Keys to Couples Posing
10:31 23Shoot: Couples Posing
06:17 24Couples Transitional Posing Overview
14:28 25Shoot: Transitional Posing
15:25 26Keys to Group Posing
07:12 27Accordion Technique with Groups
07:46 28Shoot: Accordion Technique
04:11 29Shoot: Best Buds Pose
04:54 30Shoot: Talk with Your Hands Pose
02:33 31Shoot: Lock Arms and Hold Hands Pose
04:34 32Run at the Camera and Dance in Your Seat Poses
04:13 33Shoot: Pod Method Pose
17:58 34Posing Critique of Student Images
09:32 35Introduction to Lighting
05:38 36Soft vs Hard Light
17:10 37Difficult Lighting Situations
05:52 38Bright Light Techniques
18:16 39Overcast Light Techniques
10:34 40Low Light Techniques
10:27 41Lighting Techniques Q&A
14:58 42Drama Queen Lighting
06:26 43Laundry Basket Lighting
09:44 44Make it Rain Lighting
03:48 45Smart Phone Painting with Light
07:53 46Mini LED Bokeh Lighting
08:22 47Choose the Right Lighting System
13:30 48Hybrid Flash System
06:42 49Innovative Accessories
05:35 50Gear Overview
06:19 51Theatrical Post-Processing
06:07 52Ten Keys to Post-Processing
08:37 53Essential Skills to Post-Processing
08:25 54Headshot Post-Processing
24:53 55Bright Light Post-Processing
09:45 56Flat Light Post-Processing
14:46 57Low Light Post-Processing
08:24 58Introduction to Fine Art Post-Processing
09:06 59Light & Airy Fine Art Post-Processing
27:34 60Dark & Moody Fine Art Post-Processing
13:36 61Post-Processing Critique of Student Images
36:56Lesson Info
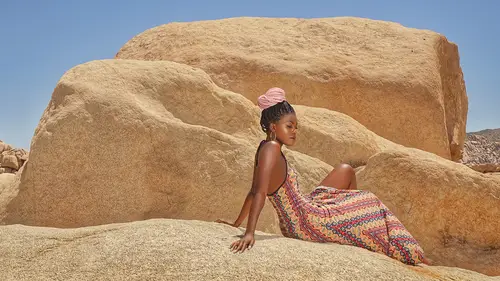
Overcast Light Techniques
Let's go onto overcast lighting, this is difficult right? Well because it's just flat lighting. So here's the characteristics of overcast. You're usually shooting in this camera range here you're F stop is like 5.6 to 8 right. Your ISO is about a 100, so when you're in this situation. Overcast your camera settings are gonna be right around them. What is it, it's flat light. There's no, what's flat light mean? There no highlighting shadow. Okay so you don't have many highlighting shadow. It's easy to take a picture but there's no light. It's not dynamic and so for your post processing, it's really gonna be flat at that point. Okay subtle highlights and contrast if any. There might not be any of that available depending on where you are. Soft light situation, it's definitely a soft light situation so you wanna use that to your advantage. It creates beautiful soft light when it is channeled into an archway door, window or tunnel. So when you're an overcast and you're out there in the real...
world. You wanna use that light out there as a huge soft box because that's what it is. That's you're advantage. So if you find a doorway or a window where that beautiful soft light can come through. You're gonna get some really nice light. So that's what I look for first is this when I'm in that light gets channeled through a door way or gets channeled through an arch way or through a tunnel. I have got some direct light where I can create some shadows from because the light is just not all around. So you don't get any shadow when the light is all around but when it's directed, oh man. Now I can use that as a huge soft box, okay. Alright so method one, look for channeled light and catchlights. Diffused light will act like a huge soft box which I just talked about method number two. Add flash to create contrasty shadows. Add interesting sky with post processing okay. So I love doing that method when I don't got none. It's like I create the contrast and then I do the post processing afterwards to make it a lot more interesting. So those are the two methods. Here's method one. You can see that archway, giant soft. This huge arch way here is letting that sun come through. It was raining this day, off and on and that light came right into my subjects. I'm using those towards the like right and so I'm using that to my advantage. It looks beautiful. Okay so here is another shot where I'm using that beautiful light come in. I think it's oh, hey recognize this. This is the hip to hip pose. Alright so that light comes in here and what I did was take me video light to give me a highlight there. That's real quick and easy to do 'cause you can see it. So I've got really, really soft light coming in. I don't need really strong. I mean, I can use my video light to give me real light at that point. But that light is not very strong. Okay, alright so here, this is the location where I shot the next shot. So I just wanna show you the location where I was and what I was using so you see how this light, It was an overcast day and see how all this light is coming in right channeled into this hallway right here. And so that's one huge soft box right there and so that's how I got this next image. Looks like it's in the studio, right? I'm just using that huge soft box to create that light for me and using the inverse square law putting them right as close as possible to that archway so I could eliminate the background. Then I used that same archway and I do side light. So that light's coming in and now I use it as side light. Here in this next situation, this is straight out of camera. I'm shooting it but this is an interesting thing because if you go in between say two buildings or you have some huge structures here. The only way light can get in there is through the top. So that's channeling the light, but the light is from the top but you can still use that to your advantage, 'cause look at it. It still creates beautiful highlights and shadow on my subjects still. And so I love using that and after post processing, you can make it look like that. So everything is still there for you to really use that light. Here again, I have that beautiful channeled light coming through here, nose towards the light. Everything is not over exposed and it's so even and it's really easy to create a even exposure because there's no highlighting shadow. So everything when you expose one subject then everything is exposed correctly, because the light is so flat at that point. So here's method number two. So here's method number two use a flash and so here's your camera settings. And so how this works is one, all you need at this point is one flash. So the only time you're gonna need more than one flash is in super, super, super bright light. But if you're not shooting in that and you know you're not shooting in that. You should can just bring one flash and you'll be good. Right so one flash and your range is gonna be, probably be between 16 power and 1 1/4 power. You're gonna just have to figure it out but it's pretty easy to figure out once you look it in, but you're gonna be right around that range and then you add the sky in post if necessary. And try creating side light, that's the key. 'Cause if you create sidelight then you get highlight and shadow. So let's take a look at that. So before there's no flash, it's very flat. There is light coming from that direction but it's dead in the eyes there. It's an okay shot I guess. Right if you had to do, but for me its like I gotta create some wow out of this so hey, get the flash out, put it over there. Fire it on my subject, give me some highlight and shadow. You get the flash, pop the background in like I showed you before. Straight at the camera and then post process, now you got something that's interesting out of the whole hum situation. You created it. You did it, that was your vision in your mind and you created that. You gotta be able to execute what's in your mind. That's gonna make you different. Okay so here we go, over cast, how hum. I gotta create some drama here. I gotta flash through an umbrella right on top. That's what I end up with, okay. Now I've got highlight shadow. Highlight shadow, I got something interesting to post process with. And now you can really, it really sings with that highlighted shadow. Here's the same situation. I'm in a super flat light situation. Two flashes on full with the umbrella. So if you're gonna diffuse the light. Then put two flashes on full still and just put your umbrella over it. And so I'm using soft light here. So basically on a bright and sunny day, two flashes on full. If it becomes overcast, guess what overcast is? Overcast is the sun with a giant umbrella over it. That's what overcast is. The sun, this makes it overcast. What is this two stops? So that's you you're at F8. That's two stops below F16. That's why if you still put them on full right then you put this so you see overcast. Oh okay, a giant umbrella went over the sun. Okay I'll put an umbrella over my flash. Same thing, get it. Don't confuse yourself, it's very easy once you understand it right. Just go get crazy stupid light if this is not making sense to you and then you'll be good. Alright so that's very easy and you get a shot like that. Okay and you get some highlight. You get some shadow. I dropped in a little bit of contrast in the clouds behind her, and you can use it straight too. So on this next shot here, it's overcast but I didn't do any ... That's a real sky there. And I just popped it in, it works great on landscape shots when you're shooting super wide and you're subject is small. If you just flash them a little bit there. Then it looks good. It just makes them pop out from the seam. So if you're shooting a landscape and it's overcast and they're really small. You could put a flash on them and it will look good. Because they just popped out from the seam. Okay so here's typical situation shooting on location. Does this set look familiar to you? People walking by, you're trying to post the subjects and they're getting distracted and feel weird posing in front of people and getting all romantic and everything. So I pose them there. What do I got? I got us some soft light through a flash firing on them. I'm gonna come back here and shoot through the flowers and I get a shot like that. Okay and but when I didn't add the flash, they had shadow across their face. They had a bit of raccoon eyes, so I had to get that out to get a good exposure on them and still see it creates a little shadow on the side.
Class Materials
Bonus Materials with Purchase
Ratings and Reviews
Vitor Rademaker
This course is amazing! Scott is extremely straightforward. He goes directly to practical problems, tips and etc. He explains every thing very clearly, and he is also very funny and charismatic, making you laugh as you learn. He shows that you don't need a lot of expensive gear to make very nice pictures. So I have saved some money as well, cause I was about to buy some gear that I wouldn't need right now. It is for sure one of the best photography courses I have ever attended to! I highly recommend! Thanks a lot Scott! You are the best!
user-9994d2
I have purchased a number of classes, this being one of them. The quality of the information was good and the level at which Scott spoke was appropriate for me. Having a course sylibus would add greatly to the value, which usually is not part of the programs I've purchased including this one, unless I've missed it. I believe the speaker should be required to provide one. After watching the videos, much of material can be recaptured by seeing it in writing. I would like to hear back from Creativelive their thoughts. In sum, good topic, good speaker, good technical audio and video quality by Creativelive
user-b48fe5
Another fantastic class with Scott Robert Lim! The combination of his knowledge, willingness to share, passion & entertaining personality makes him a top choice for photography education. Learning not only the "what", but the "why" & "how" can transform one's entire approach towards MAKING pictures. A constant inspiration to get better & better through practice.
Student Work
Related Classes
Portrait Photography