Lesson Info
4. Healing and Clone Brush
Lessons
Lesson Info
Healing and Clone Brush
Now, what I will do from here is I'm gonna be setting up a folder. And this folder, I will be naming it my cleanup. I'm gonna start with a healing brush, in this folder specifically. And the way that I do that, is I am going to not duplicate the background. I am gonna simply add a blank layer, and in a blank layer, I'll be doing a lot of my retouching. So, I'll put a blank layer, with a layer icon here. I'm not gonna name it just yet, because I might heal a little bit. I might clone a little bit, but for the most part I'm gonna be healing. Now, if you're using Photoshop 2017, or the previous version, what you'll notice is that when I click on my healing brush, I don't have something that says diffusion. So, recently Photoshop changed the healing brush algorithm, to be a little for me personally, I think it's less accurate, and so, I turned off the new healing brush, and the way to do that is under Photoshop preferences, or under edit preferences, if you're on PC, there's an option call...
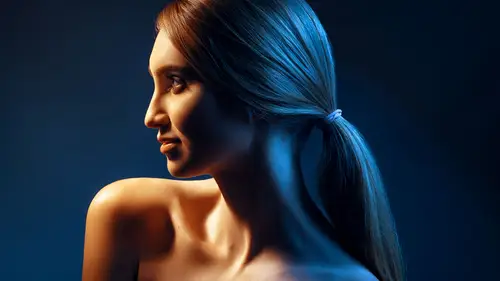
tools. Now, under tools you'll see something, that says use legacy healing algorithm. If you don't have this option, chances are you already are on the original version of the healing brush, and you'll know this, because if you don't have a diffusion slider then you're fine. If you have a diffusion slider, then you should see this option. However, there's, I think two versions out there, that you can't change it, unless you enter a manual code, which is why if you're on Creative Cloud, update to the newest version, or at least one of the most recent versions. So, that way you can change it, 2015.5, also has the ability to do this. So, if you're on one of those two versions, you should be set, just putting out there, because they made it really easy, right, mmkay. So, you use legacy healing algorithm. When you have it checked it allows me to use the original healing brush. Now, I think that from here, we're going to simply start working, and the first thing is that I always like to make sure that my healing brush here has a hardness of 0% to start with. Now, I know this is subjective. Some people like using 100%. Some people like using 0%. Some people are insane, and use like 50%. I don't know who those people are, (audience laughs) but all joking aside, someone's gonna take me literally, I know it. Someone's gonna attack me, (audience laughs) be like I feel attacked. Okay, 0%, and the reason I say 0% is for me personally, I feel that it's a lot easier to heal on 0%, especially, if you're new to healing brush, because it blends better with the surrounding texture. Mmmkay, take my word for it. Try it out, try both. So, yeah, don't take my word for it, try both, and see how it works, cause that's the only way to learn. You someone do something, you try it out, you don't like it, but you do something else, right. So, try both, but for me personally 0% seems to be a lot easier than 100% on most situations, specifically, areas with a lot of transition and hard lighting, cause you don't see a lot of edges when you're healing. The next step is the sample size. I'm gonna make sure that it says current and below. If you do not have this on current and below, if you have it on current layer, it will not work, and you will have wasted the whole day. So, use current and below, cause this will allow you to actually work on a blank layer. So, I'll show you how this works. Now, when I zoom in here, you'll notice that, typically, by default, if it's set to current layer, and I start trying to heal something, nothing happens, it just does nothing. Cause there's nothing on the layer itself. It needs something to sample from, it needs to pick up information. So, by setting it to current and below, it's actually trying to sample everything below it. So, everything we're visually seeing right now, if there's nothing on top of it, it's sampling from. So, if I start working now, it starts working, and it allows me to actually, start healing, and as you see here, if I turn this on and off, it actually starts removing the hair itself, mmkay, makes sense. Now, the other thing that I like to do is I wanna make sure that I make it easy for myself as well to work, and some, the biggest problem for me, and I'm talking from personal experience, and you might find this as well, might be a concept that's foreign to you, and that's okay, when you zoom in too far, sometimes you get inundated with too much information, and that is also a problem. Especially, if you have a camera, that shoots like 40 megapixels or 100 megapixels, and it just goes on forever, you never know when to stop healing something, and it can drive you crazy. It drives me crazy. I think this is a venting session for me to vent to the audience, (audience laughs) about what I hate. We're gonna be here for awhile. Okay, the one way that I got around that is I like to put a layer of noise on top, and I'll show you why. I'm gonna add a new layer here, and typically I have actions here that just say grain, I just click on it, and then run it, and then it'll run. So, I don't have to do this every single time, but I wanna do it manually so you can see. So, with this layer selected, gonna go to edit, fill, gonna say contents 50% gray, the blend mode is going to be on soft light, and what that's going to do is basically really didn't put a soft light, so, I'm gonna do it again, soft light, blend mode, and gray layer. So, it does nothing at the moment, because 50% gray set to soft light is completely transparent, that's just the way it is, don't ask me tell you exactly what the algorithm is I don't know, okay, but it's completely transparent on soft light. The reason I did that is because I only want noise to show through, and not that gray layer, okay, I just want the pattern of noise to come through. So, I'll got to filter, noise, and add noise. So, the reason I did this is when I said, let's say about five, I'll say, so about like 7%, kay, so, I've uniform checked, and monochromatic checked. If I don't have monochromatic, what happens is you'll notice that the noise is colorful, right. It's like a bowl of Trix. So, I'll set to monochromatic, and it becomes equal. So, when you see the image itself, I turn this on and off, what happens is it temporarily acts like a screen to break up information, okay, so I'm gonna hit okay, and let's zoom in here. So basically, what happened is if I turn this on and off, it's temporarily breaking up the information, when you zoom in too far. So, it's kind of like a preventative measure. So, what happens is it stops you from going, oh, I need something fix, well, you're not gonna see it, cause it's stopping you from seeing that, if I turn this off, everything starts looking like something, that has to be fixed, and with this on, it subtly breaks it up enough, where you're not, it's not overwhelming, you'll see less color information and detail information. The best part about this is when you're zoomed out, it does almost nothing, okay, that helped me tremendously. I know people are thinking that's dumb, well, no it's not, try it out, it's awesome. Okay so, I'm gonna keep that on, I'm gonna go back to the layer I'm working on. Okay, so, this is gonna be just my noise, it's a helper layer, I would call it, and then on my blank layer here, I have it set to current and below, and then now, I'm gonna continue healing, and the way this works is that my brush size itself, there's a couple of ways to change that, normally, ya know, you can come here, and change your brush size. Everybody, I think, knows that. Also, you can use a bracket key, right, on your keyboard. I say that, like you can see my keyboard, like look, you see. Okay, bracket key, or, there's an area, that you can change your shortcuts in under edit keyboard shortcuts, and what I typically like to do is it allows you to change a shortcut for any tool that you want. So, you can, if use a tool, you can put it to whatever you want. So, at the bottom of that list, there's a brush size, so, you can see here increase and decrease brush size. I change it to Q and W, and the reason for that is because I'm right handed. So, the left hand is sitting right there on Q and W, so, I can just, ya know, tap and change my brush size. So, when you change it to any key that you want, it'll probably give you a warning dialogue the first time, just ignore it, and hit accept, like the rest of my life. (audience laughs) Hit accept, and you hit okay, and suddenly, ya know, you're gravy. Okay, so, that's what I wanted to mention, in case you're wondering, how are we changing my keyboard shortcuts, so, I'm gonna go in, and zoom in here, and let me stay zoomed out a little bit first. I like to use the Z key to zoom in and out, I hold the Z key, and go back and forth, and what happens is I can quickly go into the image, and out of the image, as I see fit, with one hand, and the space bar, the space bar allows me to move the image. So, I zoom in, I move the image, and then go from there. So, I'm gonna go in, continue, at a pretty zoomed out distance, and kind of work my way through some of these blemishes, that we highlighted, and like I said, I'm just worried about the bumps, I'm not really worried about any, color issues, or anything that's issues with transitions, cause you'll see it come together as I work. Mmmhmm. So, how do you know, and maybe it's just a conversation, with the model or the client, what bumps, what blemishes should be left, which ones should definitely go? All of them. (audience laughs) No, I'm serious. Okay, so, I would recommend, first of all, asking them in a very diligent manner, what marks you like to keep, and what I mean by that is ask them if they have any identifying marks, that you want them to keep, they'll usually be obvious, if there are issues with, like they might have a scar, that they actually, ya know, wanna keep, usually they do, for a lot of reasons, and stuff like that, there's birthmarks, but for the most part, I would look at their other portfolio, like if they have a portfolio already, see what they prefer, like see what they're using as, in their book, and go about that way. So, I do that with photographers all the time. I look at their portfolio first to see their style of preference, like what they like do keep, do they like a lot of texture, less texture, transitions, et cetera. So, that's probably the best way to do it. Like with this one. Mmmhmm. over her eye, on the outside edge. Ah yes, this something I would ask, definitely, cause, like you said, you just don't know for sure, yeah, and the other good part is that in case you do remove something that they find offensive, it's easy to go back, because you have layers, to ya know, tweak it, it happens a lot actually, ya know, I'll remove something I thought needs to be removed, and they're like, could you bring a little bit more back in these areas, that's really easy to do, because now that I have everything on this one layer, you see it's easy to go back on, but I think 99% of the time, they won't mind me removing, what I've removed, because that's something that everyone's kind of hide away in their like closet, ya know, so, that should be fine. Now, when it comes to things like freckles, that is something, usually you would keep, but if it's minor freckling, then it's something, that you wanna talk it over, because you're just never sure what the intent is for example, if I have a fashion image, that can be a little bit more difficult, because sometimes with fashion, they wanna keep it about the clothes, and not the skin so much, it's not offensive, it's more subjective. So, I'm gonna continue here, and I'll do a few of these spots on the nose, and like I said, when you also have a photographer, that you're working, if you're a re-toucher, you'll know pretty much the aesthetic when you, we look at the work as well, like, for example, Scott, he may look at this, and go what are you doing, right, and but I only know this, because I've analyzed his work before, ya know, I've checked out what he likes, what he doesn't like, and so forth. So, let me show you what we've done so far, and you've noticed that, when I turn this on and off, we've gotten kind of rid of some of the bumps, that we were talking about on the face. Now, the best part about the healing brush is the fact that it allows you to sample, where you want to pick from. So, by holding the option key or alt K, remember, I did mention that, just in case, nobody's used the healing brush before. It's the option key or alt key, and I simply click on the skin, where I want to sample from, and that picks up the information, that I wanna use to cover up blemishes. So, if I have a specific blemish, like this on the top of the lip, I'll just click on the option key, click on the skin, and then come down, and then heal over it, and so, I'm gonna continue around, for a few more minutes, while I tackle, kind of what I'm looking at. Now, another to thing to know is that everybody will have their own preferences in terms of what they wanna remover, what don't wanna remove. So, it's not something you have to completely get stuck on. So, in case you feel like, I would've kept that, or I would've removed that, that's totally okay too, but as long as the principles stick, I think, that usually is the most important element to the whole thing. So, basically, this is kind of like removing a spot, removing spots across the skin, but keeping everything else in check. Sometimes that can be a little bit difficult to do, but for the most part, it can become something that you get used to over time. So, when it comes to flyaways, along the edge of the hair, I usually will sample, say, on the edge on the hair, itself, and then carry that over, and brush cause what happens is it carries the edge over, and pastes it, so, you don't get that blobby looking thing, cause normally with retouching, and if you're working on an edge, you'll end up something like that, and it changes the texture of the blemish, so, I'll hit command Z to go back, and then continue forward. So, if you mess up, you hit command Z, and continue. So, the other question, that I get asked often is well, what if I wanna go back at a specific area, that was like 200 steps back, how would I do that, well, the answer's actually quite simple, because, you have this in a blank layer, and so if you say, wanna bring back, anything we've done on the forehead, for example, all I need to do is go to the eraser brush, and then you can erase certain areas, that way you can just redo those areas. So, you've noticed I don't even have my history panel open, because I have it on a layer, it's also visual, it's visual history. It's like artificial intelligence right, it's like you know where you've, anyways, yeah. I've been doing this type of work in Lightroom. Yeah. And I know there's a whole bunch of differences in terms of how the software works. Mmmhmm. But the reason I've done this type of work in Lightroom, and I'll mess up the name of the tool, but I think it's clone, or spot removal. Mmmhmm. Is because first it'll just automatically choose a, what it thinks is a reasonable sampling location. Right. And it usually does a real good job of that. Mmmhmm. But if it's not right, I can move it. Yes. After the fact, and see where it works best. Yes. Is there anyway to do the same in Photoshop? because if there was I'd probably be doing it in Photoshop instead. Sure, yeah, absolutely, that's a good question, and there's a couple of answers set up. The first thing is that one of the most powerful things about Photoshop, itself is that you have the ability to pick kind of where the spot is to begin with, that you're sampling from. So, it saves a lot of steps. The second thing is that with Photoshop, if I click on option or alt, and click on my I, you can see all the steps that I've done, and already trying to do this level of work, in Lightroom would take a lot of sample strokes, and the other thing is that with the healing brush itself, in Photoshop, you'll notice, that each healing brush shape is different, and so it's very customized to the stroke you're doing, and all of that. So, in Lightroom it's a little bit harder to do, but to answer your question in terms of, can you kind of adjust, where you're doing it, not as much, but one of the ways, that I try to circumvent that is there is another tool, which is called the spot healing brush, and with the spot healing brush, it only has sample all layers. So, I'm going to quickly just turn off any layer on top of what I'm working on really quick, and the spot healing brush is very similar in the sense, where you don't need to actually decide where to sample from. It will do a automatic sampling, but it does it better than Lightroom, because it has a content aware functionality built in it, and the content aware functionality is really amazing, because a lot of the times it does a very accurate job in how it's picking a sample point. So, if I decide that I want to remove, ya know, I don't know, I think I've done what I want to, with like these little spots here, I just click on them, and it finds where it's supposed to pick from based on the texture around the area, and also, sometimes picks multiple sample points to fix what I'm healing. So, the spot healing brush in Lightroom, it picks like one point, and kind of ya know, samples, but with this, it kind of picks multiple points, and merges it into one area to reconstruct, by just clicking on it, and if I wanna redo it, I just hit undo, and simply, do it again. So, if something messes up. So, if I do this, and it messes up, for whatever reason, I just hit command Z, and redo it, and it redefines the area, but there's no way to kind of pick a place, and then remove it after the fact. The only other tool, that will probably do that is going to be the patch tool, and the patch tool is okay, in the sense where you can kind of decide, where you want to first select, and then drag it over, and before you let go, you can quickly, do it that way, but you always have to undo, but, so, that's kind of like the pros and cons, but there's no direct way of re-sampling, kind of after the fact, unless there is one, and no one has told me. (audience laughs) So, really quickly, let's zoom out here, and the next step, I wanna do is I'm gonna quickly fix some of these other areas here, they're just little spots. Now, let's say for example, ya know, when I zoom out here, the skin is looking much flatter, okay, obviously, you'd go a little bit further, but for the most part, I would say 80%, this is where I wanna end up right now, okay, and the reason I say this is because the texture's still there, but we got rid of the spots, that I had my eyes on. The next thing that I mention was my clone brush. I mentioned evening out areas very gently with the texture. Okay, so I'll do that on another layer. I'll gonna call this my healing brush. I cannot type today, okay, healing brush. I'll put my clone brush on another layer. So, I'll say clone brush. Now, with the clone brush, what I'll do specifically, for the skin is I am gonna make sure that my opacity's 100%, and my flow, I'll put it to 5%. So zero, five. Mmkay, everything else don't worry about it, aside from current and below, that's you mantra for today, current and below, don't forget it, and once you've said it, it's there, forever, okay. So, as you notice, my hardness is also still 0%, kay, I haven't changed that very much. Now, I'm gonna increase my brush size here, and let's say this area here. This area has quite a lot of texture, in comparison to say, some of the other areas here. I wanna soften up, just a bit, so, that during the next stage, it'll be easy for me to even that out further, without being distracted. I'm going to hit option, and sample right next to this area here, and then I'm gonna start brushing, in just about three or four strokes, I'm able to even that out. So, it kind of matches the rest of the textured area. So, I turn it on and off. You'll notice that it softens it up, just enough to match how sharp or soft it looks, next to it, and that principle, I apply to any area that I am inundated by, with too much information. So, for example underneath the eyes, I'll do the same, I'll sample below, and I'm just gonna do a couple of strokes. This is gonna make sense, once I'm actually done with the next step, but you'll notice it that it just feathers out that texture, that's ultra sharp, because I don't like things to be ultra sharp all the time. People usually don't like being ultra sharp, if they're, if ya know, you're doing a portrait of somebody, if it's a beauty shot, then it's obviously different. Same thing goes for ya know, any areas, that you wanna kind of even out over here. This is an optional step, meaning that, if there's nothing, that you want to do this to, that's fine, you don't have to do this, this can come in handy for, ya know certain times, where the client's like, can you make me a little bit softer, like whatever right, that happens a lot, and you just wanna make sure, that they're happy, in a relatively short time, without dodging burning for like five hours, okay. The same goes for something like this. I'm just going to gently soften that up. It also kind of, at the same time fills in that highlight, if you need to, okay, again, I didn't abuse it, it was just, two or three strokes normally, and it's good to go, kay, it's very powerful, and really easy to use. I'll do the same thing on the bridge of the nose. Now, when it comes to things like highlights. You really have to be specific, in what you're trying to do. Cause if you remove highlights from the face entirely, you change the construct of your lighting. You don't want that to happen. You don't want it to look CGI, right, cause nowadays , CGI's looking more realistic, and photographs looking more CGI, it's like they're crossing worlds, and going from one side to the other, just show them a photograph, and like, wow, how'd you make that in CGI, okay. Now, this also works for textural areas, like on the lip. You can also look up frequent separation, that also does this. We won't have time to talk about that today, but if you look that up, you can separate texture from color, and on the texture, you can, you know, even that out separately. So, you're not mucking up the colors as well. So, that's an option too. Kay, so, let me zoom out here, and quickly show you the before and after really quick, so far. So, it kind of exemplifies what we've talked about, with the skin. Ya know, we have removed some of the blemishes, and I wanna keep ya know, a lot of the texture, and if there's anything else you wanna do now, you're able to do it. So, if you're like hey, well, I think I wanna remove a couple more spots, I'll go down to my healing brush layer, and just start working again, and what happens is automatically, you're able to continue working on things that you might have missed out on, which is the best part. Then I can say, hold on a second, I wanna go back to my clone brush there, and even texture out just a little bit more, like so, and so automatically, you're able to, to do that, it's cool, right, and the skin is nice, it's realistic. We haven't done anything crazy, ya know. We're not gonna do anything crazy, promise, and the same principle applies to the rest of the body, okay.
Class Materials
Bonus Materials with Purchase
Ratings and Reviews
Elizabeth Mesley
This is a really wonderful class. Clear instruction - the only thing is that I wish there was a bit better explanation about liquefying and what the purpose of using that tool is. However, wonderful class overall!
Paloma Aviles
He is fantastic, the best online teacher you can have. You learn a lot from him, he made easy photoshop. I recommend his course 100%.
Anastasia Roschina-Kulakova
Retouching is my favourite part of the art process, and here I found really nice and helpful tips for an easier workflow! Thank you!
Student Work
Related Classes
Portrait Photography