Lessons
Class Introduction
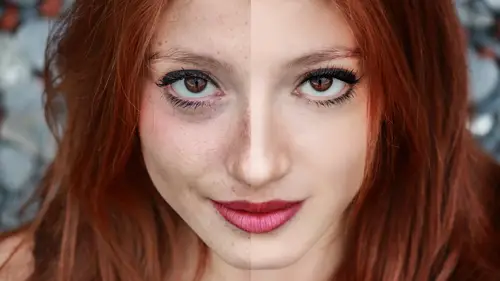
07:26 2Getting Started on the Image
05:12 3Mark Up Process
21:14 4Spotting & Cloning
28:53 5Gaussian Blur Smoothing Skin
21:34 6Surface Blur for Smoothing Skin
12:08 7Frequency Separation for Skin
24:30 8Create Skin Textures
10:24Color Correction for Skin
21:29 10Add Details to The Face
10:25 11Add Natural Looking Eyelashes
11:05 12Enhance the Eyebrows
03:20 13Brighten Whites of the Eyes
05:54 14Sharpen the Eye Details
05:08 15Replace Face Details with Masks
05:30 16Subtract Details: Freckles
15:27 17Add, Subtract & Paint Hair
08:46 18Create Hair Highlights
04:42 19Change the Hair Color
08:27 20Body Shaping: Overview
07:36 21Basic Body Shaping
08:48 22Body Shaping Through Masking
06:35 23Body Shaping: Liquify Tool
06:09 24Body Shaping: Puppet Warp Tool
08:14 25Retouch Wrinkled Skin
20:28Lesson Info
Body Shaping Through Masking
Body shaping through masking. Body shaping through masking. One of the ways you can reshape a body is how you mask. I'm gonna turn this off and on a couple times. Look under her armpit, her waist, her hip. This is the most common and easiest way to body shape. You just tuck in on the file. I'm gonna turn the original back on, and I'm gonna put it at an opacity of 50 so you can see this. This is the most common way. I would say a good 80%, if not 90%, of what I do is masked out and stripped onto another background. So for me, masking makes a lot of sense because I'm always putting it on a separate background. Other people's job flows might not, so if you are not putting it on, if you are not masking it out, you would do the same process only you'd be re-touching the background into the dress, as opposed to masking the dress out. And we did that on the hair. Do you remember I brought the hair back in? It's the same process, you're gonna only just do that on the hips. So, number one way o...
f doing body shaping, and the easiest way to do body shaping, is with the mask, and it is flexible. What I mean by that, if the client comes back and says, "Girl, you lost your mind. "Put her bottom back," you could go back in, re-draw your path, if you saved it with a path, if you did it with path or an airbrush. you could go back in... (swish) I'm doing this very quickly, just to illustrate a point. Select her hiney-hiney, and fill it back in with white. Awp, I gave her too much. Take some more back out. You understand what I'm saying? It's really easy. It's an easy fix. I personally am not afraid to have to re-draw this. Folks who are uncomfortable drawing a path again will double-mask their item. I'm gonna say that again, slowly. Folks who are uncomfortable with the process of masking, like it's uncomfortable, it's hard for them to get a good mask. What they will do is they will mask the figure to her actual form, the regular form, not trim, nothing. They will take the entire set. They will put it in another layer set, and then they will mask that out. That way, if the client comes back and says, "I don't want her to look like a Lilliputian. "I want her to have bottom back." It's done. Double mask -- it's a very fast way of doing it, and if you're slow at drawing a mask, or it's a problem for you, do it that way. It's perfectly acceptable. It's a double mask. OK? Very common, by the way. Also, you know what I would say to you guys, for those of you who are working with new clients and you're not entirely certain of what the client wants, that's a good way of doing it because you can provide image A and image B, and you can undo it very quickly. All right, now the next thing I want to talk about... So that was body shaping with the mask. Very simple, you just go in, it's nothing exciting. The one caveat, by the way I do want to make sure, is make sure you watch your blur of your edge when you're masking. So the blur of the original, you want your edging to have the same blur, otherwise it's going to look cookie-cutter and scissor-y. When you body shape with masking, you have to watch out if you have a bubble, like that, and you have a highlight and a shadow, you might have to go in and lighten the shadow, because it's an unexplained bump, like, why is there a shadow there? Doesn't make sense. For the purpose of this class, I think you get the idea. Second way of shaping is by contouring. So I'm gonna add contour, and contouring is nothing but lights and shadows. So how this is done is, you guessed it 'cause I love them, (singing) curves, glorious curves. And what I do is I generally just take a standard contrast straight up in the regular curves. I bring down the highlights, and I paint it in. So that's the curve. It looks horrible when you look at the whole file. But when you just paint it in, into the area, then you decide how light or dark do you need it. It's really basic but it's really all you need. It's really not that hard. So curves, you can do them lighter or smaller. You can paint them in or out. So I'm gonna illustrate this with myself, let's say you have someone you want to darken them, you may have a thigh coming out. You just paint the curve out of the thigh, so the thigh has a highlight, or you paint a highlight on. It doesn't matter. I'll illustrate it here. Move this. Actually I may not have put enough of a curve. See if you can see this. I'm gonna kind of do it heavy so you can see. Can you see that? So you can paint it out in an area, if that helps. If you have to do folds, and you have to actually give someone folds, you can do it this way too. It's a rare day. I've only ever had to do it on a tablecloth. I'm serious. I had to actually paint folds in the tablecloth, and the client didn't have much money, so what we ended up doing is I didn't work the fabric. They didn't have money to do all that. I literally just painted lights and darks. All right, whatever you want. You'd be amazed at what people will take for a job. It's embarrassing sometimes, but there you go. It's all about time and money, isn't it? All right, I hope I don't offend anybody, but it's always boob watch. You always have to add volume or take away volume. I do it a lot in entertainment, and a quick way of adding some... Bulk? I don't know quite how to say this, is to simply use soft light. So I'm gonna add a gray layer just so I can show you this. A little awkward. (Lisa and audience laughing) All right, it literally is just like doing the eyeballs. You know how we did the eyes and we did soft light? Or adding soft light contrast to the hair? It's the same thing. All you're doing is adding some highlight. I generally do it on soft light because it's lighter. That mask is just for the arm. And it's subtle, but there you go. Uplifting, it's uplifting. There you go. So that's body shaping through a mask and body shaping with tone.
Class Materials
Bonus Materials with Purchase
Bonus Materials
Ratings and Reviews
Tab
If you were like me and had no idea on where to start and feared that the editing process would be too destructive and would have to start all over again if the client didn't like your completed work - then this is the class for you. I watch this class often for review and to make sure that I maintain these good habits Lisa suggests to do. If you follow all of her helpful commentary on her how's and why's you will end up in a far better place when that time comes that you have to re-edit your edit. I cannot say enough great things about her work flow and how it not only enhanced my images to the result I was looking for but also decreased my editing time(bonus!!!!). I also on a whim sent her a email through her personal site and she replied with a massive helpful technique for enhancing freckles on a job I was working on. She is amazing! She is a true teacher who is there to show you how to use photoshop for you to find and gain your own editing style. Far too often i find myself in retouching classes that only demonstrate how to make your images look like who is teaching the class... Workflow and Style are very different, you can have the same workflow but your style is determined by your taste. Her workflow is solid and delivers time and time again. This class should be in everyone's dashboard hands down.
Kristine Pye
Thank you for taking the time to answer my question and take us through your "delivery" process, I found that extremely helpful. I have purchased two of Lisa's classes immediately after the live stream during Photoshop Week 2017 and was very excited to stream another set of lectures from Seattle. I will be purchasing the last two courses of Lisa's within the next 24 hours as I did just over a month ago. I find her classes to be absolutely brimming over with useful information--everything from the technique, her process, what other professionals in her work are doing, and **why** she chooses the methods she does in retouching. She is relatable and genuine, and her knowledge of the program and how to maximize efficiency while "skipping the actions" really reinforces the educational part of her courses. There are "easy way outs", but she emphasizes that you should understand the ways in which any adjustment effect the entire photo. These courses have helped me to move forward in my education, helping me to realize that with enough practice and good habit formation--such as naming every single layer every time-- that it is not irrational for me to make an effort in building a portfolio and a Master's degree with little-to-no- previous experience with the software. I am very appreciate. I hope to see more from Lisa in the future, but I have plenty to practice with for now! Thanks again, Kristine Pye kristinepye@gmail.com
Jeff Robinson
Lisa Carney is amazing! She has a depth of knowledge of Photoshop, retouching techniques, and compositing that she shares in a fast, but straightforward, easy to follow, step by step manner. No matter what your level of expertise, you'll find gems, shortcuts, and methods in her teaching that you can practice and put to use to make your work stronger, faster, and cleaner. And with the bonus materials she graciously provides, including workbooks with her detailed steps, practice files of the images she uses in class, and before and after comparisons, you'll be on your way to improving your skills immediately. She's an accomplished retoucher and gifted teacher. If you have the opportunity to take one of her classes, take advantage of it!