Lessons
Class Introduction
07:26 2Getting Started on the Image
05:12 3Mark Up Process
21:14 4Spotting & Cloning
28:53 5Gaussian Blur Smoothing Skin
21:34 6Surface Blur for Smoothing Skin
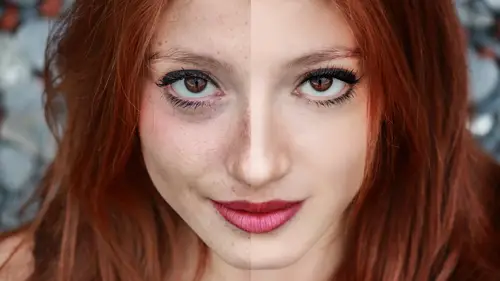
12:08 7Frequency Separation for Skin
24:30 8Create Skin Textures
10:24Color Correction for Skin
21:29 10Add Details to The Face
10:25 11Add Natural Looking Eyelashes
11:05 12Enhance the Eyebrows
03:20 13Brighten Whites of the Eyes
05:54 14Sharpen the Eye Details
05:08 15Replace Face Details with Masks
05:30 16Subtract Details: Freckles
15:27 17Add, Subtract & Paint Hair
08:46 18Create Hair Highlights
04:42 19Change the Hair Color
08:27 20Body Shaping: Overview
07:36 21Basic Body Shaping
08:48 22Body Shaping Through Masking
06:35 23Body Shaping: Liquify Tool
06:09 24Body Shaping: Puppet Warp Tool
08:14 25Retouch Wrinkled Skin
20:28Lesson Info
Frequency Separation for Skin
I'm gonna show you a very quick and easy process as best I can with frequency separation. This is an incredibly complex idea that is not a complex execution. I'm gonna repeat that. This is a complex idea but it is not a complex process. So what happens for most folks including myself for this process is the idea of frequency separation is like, oh my god, what? (groans) And I'll explain why. But if you actually look at the steps, it's crazy easy. And for me, it's hands-down the most effective way at doing retouching. There's not a single job I do now that is not frequency separation. And in fact, I will be honest, all of those techniques I just showed you, I don't even use them anymore. I do everything in frequency separation. I still could use them if I need to, but I don't. Now, this is a basic conversation of frequency separation, we have an entire class devoted to frequency separation, and it takes it way further than what I'm gonna do here, or that I possibly, what, it's an hour a...
nd a half class? It's complex. We're just gonna do a little tiny touch of frequency separation, okay? And I love it. Alright, how I do frequency separation and for those of you following along at home, it is in the bonus material, a complete step-by-step. I do two copies of my spotting, Command + J. Command + J, two copies. And you can do this in a couple different orders, this is just the way I like to. I like to organize, I like to grab my two lovely new layers and put them in a layer set. I like to call this frequency separation. I have trouble spelling frequency separation, I'll admit it, so I put fs. There, I admitted it, I said it. The bottom layer is going to be your blur layer. The top layer is going to be your gray layer. For you Google hounds out there who like to Google frequency separation, the proper terminology for frequency separation is high-low frequency. What the heck does that mean? It means something to somebody, absolutely, it means nothing to me. For those of you who are in Google land, they'll call this high, and they'll call this low. That means nothing to me in Photoshop land, so I don't use it, okay? I just wanna be very perfectly clear about that. On the handouts, I did write those words, high and low, for a minute, and then I stopped. What you do is you turn off the gray layer, you don't have to but it's just nice to be able to see. You are on the blur layer. Very important, take your hands off the computer, and know where you are. You are on the bottom layer called blur. And I'm gonna blur it. Gaussian blur. How much you blur it depends on the file size, and in fact I'm not sure what file size I have here. Okay, I have a 42-meg file here, flat, 42. So the blur is gonna be anywhere between five and seven, as a general rule. So if I have to give you a general number, I would say any file under 50 megabytes, you will blur it five. Any file above 50 megabytes, you're probably gonna blur it seven. On those crazy Hasselblad files that you get that are like, what, 183 megabytes flat? I will occasionally blur it 10. Doesn't matter, you can do it any number you want for the desired results. The frequency separation course will talk about this process more. For those of you, if you're gonna try it on these files, I would suggest five. And if your files are somewhere around that size five, if above 50 megabytes, seven. Here's the next part, now you go to the gray layer, and this is where you wanna pay attention. I've got all your attention? Excellent. Image, Apply Image, pay attention, Layer, you wanna refer to the blur layer, that's gonna be the source. You wanna go for multiply, which is the default, down to Subtract, it's gonna be on scale two, offset 128, these numbers do not change unless you're using a 16-bit image. These numbers do not change unless you're using a 16-bit image. These numbers do not change if you blur it seven, they do not change if you blur it 10. These numbers do not change, Sam I am. I like them green eggs and ham, alright? This is the screwed-up section of frequency separation. This is where people lose their mind, right here. 'Cause what the hell does this mean? Don't worry about it, just do what I ask, and here we have. What we now have here is we have separated the image into its blur or tone, and its detail. Highlight detail, detail texture, tone. Alright. Well this doesn't do us much good at this moment, because at this moment that gray layer needs to be on linear light. All this work, Jesus, and we haven't even started yet. This has done nothing but get you ready to start. Now, how you know you're in the right area, or right position, are ready to go, is when you turn this folder, frequency separation that you made, on or off the image looks exactly the same. Alright, we've done nothing but prepare the file. This is your mise en place, this is you getting your stuff ready, and then you're gonna start cooking. Alright? It's all in the handout, all in the handout. Alright, so let's start cooking. Now, the idea here is very much like we just did with the blurring before, that gaussian blur, the surface blur, all that, we're gonna clean up the skin. Only this time, the texture is separated from the skin. Color and tone. So because I'm a very safe retoucher I always have to go backward. And you are gonna be in danger at all times of doing this too hard, always. You wanna make a copy. This is what you have to do with the copy, and I need you to pay attention, this is another area where you're gonna mess up potentially. The blur copy is easy, Command + J. Retouch on blur layer. The gray one's not so easy, here's what we're gonna do. We're gonna do Command + J, make a copy, oh sweet Jesus, Mary mother of God, she's been in the sun. No, she hasn't been in the sun, she just happens to have two layers that are on linear light. This is very important. You need to turn the top layer back to normal, and you need to clip it to the layer below. It's all very easy, I know it sounds complicated, it looks weird. Just look, it does, right? This just looks weird, what the hell are we doing? It's actually quite, quite easy. It's simple, it just sounds complicated. Alright, moving on, ready? Here we go. Alright, so what I like to do is I like to try a bunch of techniques out when I'm starting to see if it's gonna work, or if I like it. So what I would try is, remember those blurs we just did? I might try those blurs. So I'm gonna try... I'm gonna try surface blur, 'cause that worked out pretty well for me. And I'm gonna blur the holy heck out of this. And I want you to look up here and see what's going on. So I have just blurred the heck out of her tone, but I haven't touched her texture. That's actually the good news. So if we like this, and you know, I kinda like this. It's a little too much for the whole piece, but selectively this'll be nice. I'm gonna put a black mask on that new retouched blur layer, you should probably write what you blurred it at. Alright. And I'm gonna paint that in with a mask, into the areas I like. Now, the thing about this process is, the good, bad, and the ugly of it, is you're gonna have to go back and forth on two different layers. So let's say we get started and we're thinking this is kind of looking okay. Now, we have the skin texture to deal with. And there's some things I'd like to reduce down. So what I'm gonna do is I'm gonna go to the gray copy and I'm gonna call it retouch on gray. Please, I beg of you, be very careful of your tool settings. I have a tendency, 'cause I'm kinda old school, I like to have my tools set at the default, which is Current Layer. Many of you folks are probably using Current & Below. If you're doing your spotting on a blank layer, your tool's gonna be set to Current & Below. Please make sure you reset your tool, and I'm gonna show you the difference. So I'm gonna use the heal tool to now go in and maybe heal out some of those textures. And what's nice is I'm healing out texture without touching the color. I don't even care what the color is, all I'm looking at is texture, that's all I have to worry about. Capisce? (speaking in foreign language) Okay, there you go, that was my shout-out to our Italian friends. Alright, now, ooh, what if I went too far? Not a problem, you could reduce that new clone layer down to 50%, so you have some options here, okay? File management here can get a little tricky, so you're gonna have to figure out what you're doing, or what you wanna do. The nice thing is they're completely separate, the color is separate from the texture, okay? I love this technique, I find it really useful. There's a huge problem with it, it is that a lot of people don't use this. A lot of retouchers do not use this, so I cannot deliver this as a layered file. I cannot deliver frequency separation folder responsibly. I've done it, but it's kind of a not-nice thing to do. If you don't know if they know how to use it. So when you've done your frequency separation, if you're happy with it, my suggestion would be to just do Command + E and merge it and deliver your file that way. Do you understand? No? The reason being is that, that whole frequency, I'm getting a look, so I know there's a question of sorts in there. The reason I do that is I don't wanna give a file that someone can screw up. And this is kinda complicated. And if they screw it up, then I'm in trouble, 'cause I'm responsible for the job that I am delivering. And I'm responsible for delivering it in a way that whoever's getting it in their hands knows how to use it. Now, on that note, you know full well I'm saving a version for myself that is not merged. This is a file that goes out to a client. Okay, really important distinction. So what you can do in addition to the basic blur which we've done already, we're just doing it in a different fashion now, is you can do a paint layer. Just like we did on the first go, and it's the same deal. I take perhaps a gradient, and I can select a color, maybe her forehead color, and I can click and drag. I can click and drag on this cheek color, and I can change maybe some bag color. This is, again, a little tricky 'cause you gotta retouch in two different spots, right? You gotta retouch on the, I love that face that people get when, it's great right? It's awesome, I know, ahhh! The God-rays have just come down and everyone's happy. Alright, there's a couple things about this, is it can be tricky 'cause you have to use two different layers. You've gotta be really conscious, there's texture and then there's tone. And you have to kinda think of them separate. I'm gonna go over here, I'm gonna mask her eyes out. We're not gonna put flesh tone in her eyes, 'cause that would be cruel. Sarah, we love you. But I have to tell you, I don't tend to paint with a paintbrush in this tool, I tend to use this gradient. Like I'll lighten the skin a little bit, put a little highlight, and I don't have, look at there's all that texture. Awesome! Isn't it fantastic? Alright, so I kinda feel like you maybe get the gist of this, yeah? Can I see the paint layer-- You can. Without the stuff underneath it to see what those gradients look like? Thank you. I'm gonna make a gray layer for underneath. Boy, you have to be a really good painter, don't you. You can be sloppy, I love this. It's weird, right? Now, I wanna admit something that I'm not overly proud of, but you guys might find this. I've been doing this for what feels like 100 years. Seriously, since before you were born probably, I've been doing this, which is just embarrassing for me. And this came along, and I was like, yeah. I don't need this. And I was really stubborn, and it was 'cause my brain couldn't, that high-frequency, low-frequency, what does that mean? Like my brain really could not get behind the mechanics, and I find that, I say this with absolute love, the folks who tend to describe it on the internet tend to be kind of engineery types, and I love engineers, don't get me wrong, but just not as spazzy as me. And it really took some doing until my brain could wrap my head around this. And now that I have, I, wow. And you'll hear people say, oh I barely use this, I use it just for tiny little touch-ups. I do my entire job in this, my entire job. Now, I kinda can't do the entertainment stuff, the entire job in this, because I have to hand off a fully layered file to somebody who can change it. Let me repeat that. I have to hand off a fully layer filed, and what I mean is, the eye color changed, the added highlight I put on the skin, I have to give a file that someone can go all the way back to zero, all the way back. And sometimes all they wanna do is take off that highlight, everything else is groovy. They can't use this. So that's a bummer for me, but that's my life. But you as a photographer, you don't have to give it to anybody. You can do this 'til the cows come home. I wanna talk about another function on the texture. 'Cause we're not done, that was just a little healing. If you want to clean up even more so, you can duplicate your gray retouch layer, Command + J. And we're gonna try a dust and scratch on this. On the gray layer. We're gonna link it, and we're gonna go to the Filter, Noise, Dust & Scratch. And what this can do, it can do bad things and it can do good things. You can take these sliders, and you can see if you can obliterate some more of the texture in a gentle way. Or a hard way. This is a little bit confusing, and a little dangerous, I'm trying to see if you guys can, do you see that haloing you're getting here? You gotta be really careful with the halo. So if you take the threshold down, the halo will disappear. Every shot is completely, completely different. I tend to use this dust and scratch technique on men all the time. Six, six. I'm gonna give you some numbers. For men, I don't know why it works out like this, it tends to be six, six, or 10, three, or three, 10. I don't know. Six, six; 10, three; or three, 10. And that's all you have to do, you tend to not have to clean up the rest, that's it. Now, the dust & scratch, there is gonna be, and it depends on your job level, like if this is going on a billboard, it's really hard to see on this screen, there's this tiny little pixelization that's going on, it's very tiny, will show up on a huge billboard. Tiny, tiny, tiny little gaussian blur, 0.3, just takes that little crunch out, tiny tiny. Again, I'm talking super fine quality, high-res quality here. Now, this dust and scratch, please, you're not doing it over everything. Absolutely not, it's just for the skin, so you need to remember to mask it, put a black mask on it. You know me, truck-stop Lisa, I'm gonna paint full throttle with 100% brush. By the way, I don't think I mentioned this earlier, when I paint I tend to paint with the layer at 100% opacity so I can see it. It's a little hard for me to see if that texture layer is at a lower opacity. It's hard to see on a screen, so I tend to paint it at 100%, then I pull back and then I come back and I take a look at different densities. And then I zoom back in. So that's at 58% opacity. The painting is not bad. Do you guys notice that I'm holding the Option key and clicking on the mask? I'm doing that because occasionally what will happen is you get these little triangles, now let me see if I can make one. Or these little wormholes. Now Option + click, eh, there's a little bit of a triangle, that's not so bad. Occasionally you'll get this, like that, a mask like that. And if you option click on the mask, you can go back in and fill it in. 'cause you won't see it, you won't see it on the file. And it might show up on the print. Wah-hoozy. ♪ Your skin is clean ♪ ♪ Your skin is clean ♪ There are occasionally filters that we call the $500 filter. High pass is one of those, and why it's called the $500 filter, I'm dating myself here, is before people knew high pass existed, to sharpen you used to have to hand-paint highlights and shadows. And you'd charge $500 for that. Well high pass came out, and it became the high pass filter because, well, you still charge the $500, you just use the filter for it. Frequency separation kinda lives in the $500 mark, still. What that means is not enough people know it's out there, and when I say people I mean clients. You can extrapolate all you want. Anyway, are there any questions about frequency separation? Well a question had come in, what is the difference between frequency separation and inverted high pass technique? Inverted high pass technique, oh my god, I feel like I'm under exam, this is fantastic. Inverted high pass technique is taking, I'm gonna see if I, don't do it, but I know what they're talking about. You take a layer, you take, you go to high pass. Filter, Other, High Pass. Filter, Other, High Pass. Generally 1.5, you put it on overlay. You invert it, you put a mask on it, and you paint it in. Okay? Now, while that may look like it is smooth, what it has, I'm gonna explain this in English, you are absolutely gonna understand. It is taking the tone that you have, and flipping it to the opposite. So if you have a highlight, it makes it a shadow. If you have a shadow, it makes it a highlight, only very subtly. So if you have pores, or you have skin blemishes, it cancels it out very subtly. So it effectively is softening the skin. The problem is, or not necessarily a problem, the limitation of this technique is all I've done is blurred the skin. The color is not on a separate layer, the texture is not on a separate layer. So in fact if you look at Sarah's nose, she has a little bit of sun she got on her nose. I might like the texture of her nose just fine, all I wanna do is change the color. All I wanna do is change the color, well I can't do that this way. So hopefully that answers that question. Completely different method of retouching, for kind of a different problem. I'm gonna show you what I'm talking about real quick, I'm gonna go back to the frequency separation. So when I was talking about Sarah's skin color on her nose, you can, for example, make a new layer and let's call it paint color. Paint color, what do I mean by paint color? Well what I mean is when you have paint, you have paint, you're painting, you have the option of the color and the tone of the paint. So I'm gonna select the color maybe of her cheek area, or her upper nose, and I'm gonna paint with a paintbrush that is not too ginormous. Oh heck, just go to a regular one. And I'm gonna paint her nose. Well that's awesome, but I painted the color out, but I painted the tone out as well, I don't wanna paint the tone, I just want the color. So that layer is called paint color, we're gonna call that color, and now we're like, oh, but now I've got some trouble here. That's alright, maybe we try hue, that's a little better. Still taking the color out. Or maybe we go back to color and we just don't apply as much, we take it down. So these are different ways of adding tone. I can take a lighter tone and paint it in. So you have this kind of flexibility. The other thing you can do is you can paint shadows. You can't do this with that other area. Actually, I'm gonna paint a highlight. I think I might be able to see it on the screen a little better. Gonna paint a highlight. So I mean quite literally, a highlight. I'm gonna select the color white. Just making my brush a little smaller if I can. Come on, baby. Okay, it's a little ridiculous, it's a little, what do you call it, sunscreen in Australia? But that's alright, just bring it down, bring it down a little bit. You can't do this with that invert section, you can do it with this. And like anything you can mask it in or out. Again, I feel it'd be irresponsible if I don't mention this is really the most awesome way of retouching, I think, if you're working by yourself, and you don't have to deliver layered files to people to make it work, you know, as a commune. But if you can, you could talk them into it, teach them how to use it. I cannot stress how this is barely even scratching the surface of frequency separation. This is like teeny-tiny little bit. If this is all you do in it, though, glory days this is gonna be awesome. But this is barely covering anything. Now, there's two quick little things I wanna address because they were asked earlier, and then I wanna do a compare and contrast. Alright, I'm going to pull out, holding the Option key, I'm gonna pull out that texture layer, and I'm gonna throw away both of these layers from below so that, do you remember that person that checked in on the internet and said, hey, can't you just use the texture from the skin? Yes you can, if you know how to make it. So I'm gonna go to the spotting layer. I'm gonna do that frequency thing, pull that texture out, which is what he was asking, and I'm gonna go ahead and do surface blur. 25 sounds good, 20, 25. 120, 220, whatever it takes, whatever that joke is 20, 25. Alright. I'm gonna now do that ubiquitous square, we keep doing it but it's a way to see what's going on. That retouch texture, do you remember how we did that? The retouch texture? We had to do that by putting it on Linear Light. Here we're gonna link it to the surface blur. There it is. So basically, we just did the exact same thing you did in frequency separation. Only, it's a subtlety here, can you see how much crunchier it is than the original? When you do frequency separation, the color gets canceled out, the gray layer uses the blur layer to erase the color, and the blur matters. Like if you blur the lower layer more, the gray layer looks different, it comes out different. So it's the same for this. So while you can do it this way as the caller, caller, the caller called in and mentioned. However, to me, if you've gone through this whole process, why don't you just leave it in frequency separation? But you can do it. I would not do it, it is doable.
Class Materials
Bonus Materials with Purchase
Bonus Materials
Ratings and Reviews
Tab
If you were like me and had no idea on where to start and feared that the editing process would be too destructive and would have to start all over again if the client didn't like your completed work - then this is the class for you. I watch this class often for review and to make sure that I maintain these good habits Lisa suggests to do. If you follow all of her helpful commentary on her how's and why's you will end up in a far better place when that time comes that you have to re-edit your edit. I cannot say enough great things about her work flow and how it not only enhanced my images to the result I was looking for but also decreased my editing time(bonus!!!!). I also on a whim sent her a email through her personal site and she replied with a massive helpful technique for enhancing freckles on a job I was working on. She is amazing! She is a true teacher who is there to show you how to use photoshop for you to find and gain your own editing style. Far too often i find myself in retouching classes that only demonstrate how to make your images look like who is teaching the class... Workflow and Style are very different, you can have the same workflow but your style is determined by your taste. Her workflow is solid and delivers time and time again. This class should be in everyone's dashboard hands down.
Kristine Pye
Thank you for taking the time to answer my question and take us through your "delivery" process, I found that extremely helpful. I have purchased two of Lisa's classes immediately after the live stream during Photoshop Week 2017 and was very excited to stream another set of lectures from Seattle. I will be purchasing the last two courses of Lisa's within the next 24 hours as I did just over a month ago. I find her classes to be absolutely brimming over with useful information--everything from the technique, her process, what other professionals in her work are doing, and **why** she chooses the methods she does in retouching. She is relatable and genuine, and her knowledge of the program and how to maximize efficiency while "skipping the actions" really reinforces the educational part of her courses. There are "easy way outs", but she emphasizes that you should understand the ways in which any adjustment effect the entire photo. These courses have helped me to move forward in my education, helping me to realize that with enough practice and good habit formation--such as naming every single layer every time-- that it is not irrational for me to make an effort in building a portfolio and a Master's degree with little-to-no- previous experience with the software. I am very appreciate. I hope to see more from Lisa in the future, but I have plenty to practice with for now! Thanks again, Kristine Pye kristinepye@gmail.com
Jeff Robinson
Lisa Carney is amazing! She has a depth of knowledge of Photoshop, retouching techniques, and compositing that she shares in a fast, but straightforward, easy to follow, step by step manner. No matter what your level of expertise, you'll find gems, shortcuts, and methods in her teaching that you can practice and put to use to make your work stronger, faster, and cleaner. And with the bonus materials she graciously provides, including workbooks with her detailed steps, practice files of the images she uses in class, and before and after comparisons, you'll be on your way to improving your skills immediately. She's an accomplished retoucher and gifted teacher. If you have the opportunity to take one of her classes, take advantage of it!