Lessons
Class Introduction
07:26 2Getting Started on the Image
05:12 3Mark Up Process
21:14 4Spotting & Cloning
28:53 5Gaussian Blur Smoothing Skin
21:34 6Surface Blur for Smoothing Skin
12:08 7Frequency Separation for Skin
24:30 8Create Skin Textures
10:24Color Correction for Skin
21:29 10Add Details to The Face
10:25 11Add Natural Looking Eyelashes
11:05 12Enhance the Eyebrows
03:20 13Brighten Whites of the Eyes
05:54 14Sharpen the Eye Details
05:08 15Replace Face Details with Masks
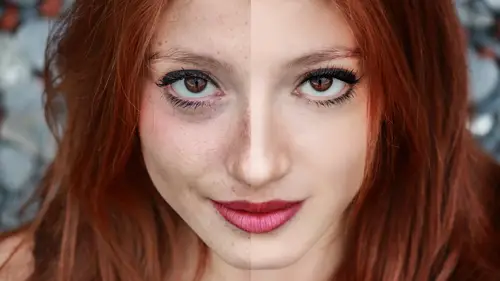
05:30 16Subtract Details: Freckles
15:27 17Add, Subtract & Paint Hair
08:46 18Create Hair Highlights
04:42 19Change the Hair Color
08:27 20Body Shaping: Overview
07:36 21Basic Body Shaping
08:48 22Body Shaping Through Masking
06:35 23Body Shaping: Liquify Tool
06:09 24Body Shaping: Puppet Warp Tool
08:14 25Retouch Wrinkled Skin
20:28Lesson Info
Subtract Details: Freckles
Freckles. I want to stress this image is not completely retouched. This is just start file, so don't panic. Freckles, how do you get rid of freckles? Do you want to get rid of freckles is not the conversation we are having. How to get rid of freckles is the conversation is the conversation we're having. So what I will often start with is that paint layer. Do you remember how we painted earlier at the very beginning of the day for smoothing skin? We just painted. I will often start with that. I'm just gonna repeat myself for one second because as I said earlier and I wasn't kidding, I really want you guys to be able to extrapolate to figure this out on your own. You got a problem, you need to solve it, how do you do it? So we're not skin smoothing, but we're using the exact technique we used for skin smoothing and what I did is I sampled the color on the face and I just lightly painted. You would be amazed what you can get away starting to paint and you don't have to add texture to it. ...
If you paint, look how low that opacity is. That's nothing, it's just a light, tiny airbrush. 10% opacity and you don't have to necessarily add skin texture because its not gonna show. One thing I feel at this point I really need to say, your final destination is always primo, right? Print, web, whatever. In my world, my final destination, every file I retouch without fail gets noise put on the top, without fail, it's a unifier. Without fail. So when I'm retouching, I generally have my final grain put on. I'm gonna say that again. When I am retouching, my final files almost always have grain, they hide mask edges, it helps unify. I'm gonna give you a reference. When you were children, some of you, you used to watch videos, soap operas on TV and do you remember how they looked cheap because they were video and they didn't have film grain? There is something about reference and resonance that we have that we associate grain and grittiness with quality, I don't know why. We just do. So files that are too smooth, they have no grain. They just want a little tooth to 'em and I think it's a reference and resonance thing that we have with imagery, so that being said, all of my files go out with grain. So why not put that on the top because why we're, and I'll continue in one second. Why worry about all that skin texture if you know you're putting some grain on the top, okay? Bob, I love the look on your face. You have a good question. I can feel it. Give it to me, come on! (laughter) Okay, so if you put that, is that uniform for both print and web, and all different kinds of sizes? No, that's why it sits (mumbles). Excellent question. Is that grain uniform for all different sizes? No sir, it is not and that's why it sits on the top and per application, the grain that is appropriate will get applied at point of delivery. What does that mean? That means when I have to deliver this file, I turn off that grain, I size that file to the size of that delivery, and then I grain it. That is an excellent question. All right, here is the other thing and I hope this makes sense a little bit about starting to get rid of freckles. There are actually lotions and makeup you can buy that blur, its called Blur, and the whole idea is it kind of blurs your skin and makes light bounce around your skin so that you can't see the nooks and crannies. I am effectively doing that, I'm not gonna say the brand name, but that lotion, Blur, with paint. So please do not be afraid to try this out. You'd be amazed what you can get away with with just some paint. Now on the more, when you blur that, you might want to add some contrast back in or lighten. It depends. Another method. Method one was paint. Method two is going to be that curve. We did a curve on matching color. We're gonna try to do a curve very quickly for matching color, curve. Hopefully I'll get it right because I'm doing it very quickly. It's in the color class. Ladies and gentlemen, explained very clearly. You want to make sure you are on the curve, not the mask, but you are on the curve. You go to the black eyedropper and you double click. You can replay this. Do not panic, those of you at home. You can replay this. All right, once I am on the color picker, you want to pick the color you want. Not the color you're trying to change, the color you want, and that happens to be the lighter color over here on the edge. It has now picked it. That looks nice. I'm gonna say okay. Once I have said okay to that, poh. No panic here, we're calm. It says, "Hey lady, do you want that to be your new target "as default?" No thank you, I do not. And now, at this point, this is in the handouts. No panic. At this point, I have the black eyedropper available to me again and I have to click the color I want to change, and the color I want to change are those freckles. And it is now light in the file. Well, that's nice. What are you gonna do with that? What you're gonna do with that, because you are happy channel pulling moddy fo-foes, we are gonna go to the channels. I know this is complicated. You guys can play this back. Do not panic. If this is way over your head, relax, relax. You'll come back to this another time. You can go to your channels and look at the channels and say hey channels, which channel will let those freckles show the best? I'm trying to clear up the freckles, that's all I want to clear up. No, red channel, no, it's all white. Green channel, I can sorta see the freckles. Blue channel, yeah, that's much better. Why would the blue channel be better? Because yellow is light, pardon me, yellow is dark and lighter flesh color which has blue is light, so you're gonna get a little more contrast. You know flesh has a lot of yellow in it. All right, I'm gonna drag the blue channel down. You can see I've already done this here. I'm gonna adjust the blue channel. How are you adjusting it? Well, I want the freckles to be dark and I want the skin around it to be light. That is the guide you are looking for. I want the freckles to be dark and I want the skin around it to be light. Now what is selected and or available here is the skin. On your selection and when you do channel pulling, and please don't be afraid of channel pulling. Channels are your friends. You want to know what is available. What is available right now is the skin. The freckles are not available because they're dark. What's available on a channel is white, what is not available is black. So I actually have the opposite of what I need. A way to handle that is invert. Command + I. And now I just flipped it. Everybody's calm. All I have is freckles or dark coloring available and the skin is not available. I can now Command + click, Command + click on the icon for that channel pull. Go back to that curve, curve to minus freckles. I'm gonna Command + H it. The Command + H just to hide the marching ants so I can see what I'm doing. Please do not be on the curve mathematic code here, be on the mask for the curve. Pick a paintbrush and let's see. Well, there you go, it's starting to work. It's a little heavy handed. I'm gonna lighten it up, but at least it is starting to get there. I think my curve was a little harsh when I did the selection. I did a little too crunchy. I'm gonna show you what happened before. This is a little more gentle. Do you see how light that is? It's not quite as crunchy and in fact, let me go ahead and show you the channel that I did. When you guys do a channel pull, please do not be afraid to do multiple channel pulls. So sometimes when you do it, this is the blue channel I pulled last time. There you go. When I did that contrast move, I didn't make it as contrast-y. Look how contrast-y I just made it. I'm gonna flip it so you can see it. Aye, get out of there. There you go. See how contrast-y that is versus this one? The lighter contrast one worked better. Do not be afraid to do this a couple times. Sometimes the channel pull you did, again, that hand fisted thing, even I just did it. I just did too much. No big deal, throw it away, do it again. I know folks are really terrified of channels and there's really no reason to be, as long as you drive the car slowly, know where you're. You know when you first learn how to drive a car and doing the stick shift, and the rear view, and the this, and the clinker, the turn indicators, and the turning? It's all very overwhelming, but eventually you get there. That's how channels are. You will get there. It's like a stick shift car. I know that is the weirdest analogy you've ever heard, but there you go. All right, so look at the result. That's getting there too. A little heavy handed, but it's starting to go there. Do you guys? For those of you who were at the color class, one of the things I told you is I always try three or four different attempts at the exact same solve very quickly to see which one is the most effective, and I think that's a good repertoire to have. There's never one move. So we've done paint, which is dead ass easy. Curves, heck, you might even want to do a combination of the two. Do you see how it's starting to go? Now let's go to the third way, which is frequency separation. All right, I'm a fan. You can obviously tell I'm a fan. Frequency separation, you've got your base frequency separation. I'm gonna turn that off and on. Do you see how nothing's happening? Nothing is happening because it exactly matches the retouched image underneath it. I'm going to turn on my retouch layer, retouched gray. Remember how we always made two copies because you don't know if they're gonna make a mistake. I decided to do a blur 20 on the skin, Gaussian Blur 20, and I painted it in just around the freckly area. Well, that's not horrible. It's not great, but it's not horrible. And then I said, "Ah, maybe I'll copy that." I want you to pay attention. I have not discussed this. This is brand new. I made this blur 20. I kinda like it, but it's not quite there. I'm getting close. What I did, pay attention here, is I copied that blur that I'm doing in frequency separation and then this is where I gets a little tricky. I'm speaking slowly, you are all understanding everything I say, I can see you. I apply the mask to that and I blur it again, and what that is gonna do, because the mask is applied, is it's gonna even diffuse it slightly more. It's gonna go out just that much more and it makes a difference. This is a great technique, so let's review verbally what we have done. I have the standard blur, which I don't touch. I did a Gaussian Blur 20 on top of it, I masked it in just in the area I want, and I'm like, "Ooh, I'm gettin' there, I'm gettin' there, "I'm just not quite there." And blurring it more and expanding the mask is not gonna make this work. What I've done is I've then copied it, I applied the mask, and then I blurred it because it's gonna blur out even more than it was before. And sometimes I will do multiple copies. I think one extra copy is good enough. And now I feel like I'm getting there, I'm getting closer, it's looking desirable close except for with frequency separation, you gotta work on two layers. You gotta do the gray with the color, back and forth. So the texture is now my problem. Do you see the texture? So what I did on the texture is I duplicated my gray because I'm always making a copy, and I use that filter which we have already talked about, which is Dust and scratch. Image, Noise, Dust and Scratch. 10 and three, look at that. Do you see how that goes away? Again I don't want it for the whole file. I'm hoping you guys can see that. I just want it in selective areas, so I'm gonna mask it in. So I know this looks complicated, but it's actually another step, another step, and it's all repeating process. This is all process we've talked about since the beginning of the day, just done differently so you're not scared, you're handling this. And you might want to add a little more paint. Like, I couldn't stand those bags under her eyes so I started to paint color. I'll pull this out so you can see it. I just couldn't look at it anymore. I know this is a lot to take in. I promise you, you will get this. That's just a little eye bag color for good measure. All right, another freckle job. I'm just gonna discuss this really quickly. This is only one way to do the freckle job. I do want to tell you, I think frequency separation is probably your best bet and if you have one chance to do a job on getting rid of freckles, you're gonna want to do frequency separation. So its ubiquitous. Its the same process every single time. You run the blur, you do the gray, you make a copy so you don't mess it up, and on this one I did Dust and Scratch on the color. I did Dust and Scratch on the color and I used the code 40 zero. Dust and Scratch, 40, zero, okay? I masked it in just where I wanted to see it. Oh, did I tell you this before? You wanna look at your mask option. Click on the mask. We talked about this before, those little triangles. Oopsie! No problem, we're all fine now. And now, remember, I've got that texture problem, right? Color's the first thing, texture's the second thing. What did I do? I ran a textured Dust and Scratch on the top. This is exactly what I did on the other file. The numbers are just different. The numbers are different. These numbers are what you're gonna play with, okay? I know this is overwhelming, but you're gonna get it. It's fantastic. Once again, a little extra blur. What's the extra blur for? Do you see this Dust Scratch with a 40 zero, copy two? I blurred it just a little more. I don't know if you can see, but there is this, with Dust and Scratch, what you get is, it's almost like a little fractal thing that happens when the shade moves to, I don't know if fractal is the right word. It's kind of a triangle. It's a little hard to see, but it's a geometric shape. It happens, by the way, when you have a darker color against a lighter color. Dust and Color tries to not blur the edge, so you get this little bit of a linear thing through it and it's very subtle. I can see it, but you might not be able to see it. So I often just do an extra little blur on the color layer when I do Dust and Scratch, okay? So I mean, it's a good start. It's not done, but it's definitely a good start. And inevitably, someone's gonna come back to you and say, "Oh, I'm sorry, what was I thinking?" And you pull back 50%. There you go.
Class Materials
Bonus Materials with Purchase
Bonus Materials
Ratings and Reviews
Tab
If you were like me and had no idea on where to start and feared that the editing process would be too destructive and would have to start all over again if the client didn't like your completed work - then this is the class for you. I watch this class often for review and to make sure that I maintain these good habits Lisa suggests to do. If you follow all of her helpful commentary on her how's and why's you will end up in a far better place when that time comes that you have to re-edit your edit. I cannot say enough great things about her work flow and how it not only enhanced my images to the result I was looking for but also decreased my editing time(bonus!!!!). I also on a whim sent her a email through her personal site and she replied with a massive helpful technique for enhancing freckles on a job I was working on. She is amazing! She is a true teacher who is there to show you how to use photoshop for you to find and gain your own editing style. Far too often i find myself in retouching classes that only demonstrate how to make your images look like who is teaching the class... Workflow and Style are very different, you can have the same workflow but your style is determined by your taste. Her workflow is solid and delivers time and time again. This class should be in everyone's dashboard hands down.
Kristine Pye
Thank you for taking the time to answer my question and take us through your "delivery" process, I found that extremely helpful. I have purchased two of Lisa's classes immediately after the live stream during Photoshop Week 2017 and was very excited to stream another set of lectures from Seattle. I will be purchasing the last two courses of Lisa's within the next 24 hours as I did just over a month ago. I find her classes to be absolutely brimming over with useful information--everything from the technique, her process, what other professionals in her work are doing, and **why** she chooses the methods she does in retouching. She is relatable and genuine, and her knowledge of the program and how to maximize efficiency while "skipping the actions" really reinforces the educational part of her courses. There are "easy way outs", but she emphasizes that you should understand the ways in which any adjustment effect the entire photo. These courses have helped me to move forward in my education, helping me to realize that with enough practice and good habit formation--such as naming every single layer every time-- that it is not irrational for me to make an effort in building a portfolio and a Master's degree with little-to-no- previous experience with the software. I am very appreciate. I hope to see more from Lisa in the future, but I have plenty to practice with for now! Thanks again, Kristine Pye kristinepye@gmail.com
Jeff Robinson
Lisa Carney is amazing! She has a depth of knowledge of Photoshop, retouching techniques, and compositing that she shares in a fast, but straightforward, easy to follow, step by step manner. No matter what your level of expertise, you'll find gems, shortcuts, and methods in her teaching that you can practice and put to use to make your work stronger, faster, and cleaner. And with the bonus materials she graciously provides, including workbooks with her detailed steps, practice files of the images she uses in class, and before and after comparisons, you'll be on your way to improving your skills immediately. She's an accomplished retoucher and gifted teacher. If you have the opportunity to take one of her classes, take advantage of it!