Lessons
Rethinking Retouching
10:36 2Basic Retouching Workflow in Lightroom
10:17 3Correcting Color Issues in Lightroom
07:56 4Small Blemishes in Lightroom
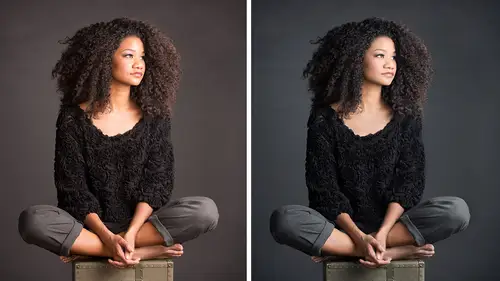
05:20 5Removing Distractions in Portraits
05:19 6Retouching Eyes and Fly Aways
20:42 7Reducing Shadows in Lightroom and Photoshop
08:56 8Liquify in Photoshop
03:32Lesson Info
Removing Distractions in Portraits
Want to go back to my basic panel? Here? I am in hs l want to use my shortcuts also want my history and maybe open. So this time I'm gonna press command zero for open up the history am command and control windows, and then commander control one gets that basic panel open. I know some people hate shortcuts, which is totally fine, I think if if you're not short cut, if you don't like him, just work without him. But if you do or if your energy if you want to get better at, um, the best way is just to pick up a couple occasion. I have students that get one of those pdf printouts of all the shortcuts and light room, and they stare at it and then they stare at their computer, they don't learn anything it's better actually make a list of your own shortcuts and kind of build them up. All right, so anyway, this image going to drop my highlights down a little bit little bit exposure problem is like the lower half of the face is bright upper half isn't, so I need to do something like we did befor...
e, so I'm thinking retouching isn't just blemishes, it's light and color and tone, so someone will remember a radio filter shortcut what is this one? Shift yet shift if you forget you know you could just try a couple and we're not going to drag something out I got a shape and a lot of times what we talked about it we'll do something let's say I want to brighten it up but it's breaking up exaggerated brighten up everything but the area I want teo again just rendering the shortcut it's apostrophe gives me the ability to flip that because it will remember what you did last and almost always it's wrong so you just gotta flip it around all right? So want to bring up my light up here kind of the shadow from the hat area and so apostrophe make sure having in there may be a little bit of shadow again I'm not trying to overwhelm the image but to spring up a little bit of light into the picture and maybe this light will just be for the forehead let me exaggerate for a moment looks bad but stick with me duplicating these adjustments to do that if I want to have a couple for the eyes right, click and then choose duplicate or control click and that will give you the same adjustment the same values and settings and again I'm aware that these look really strange but sometimes doing strange things makes the demo more relevant than making a super settle so let me make this a little more more subtle just a touch of light in the eyes, right click duplicate and I'm I'm just looking to bring in some light into and a few those areas overlays look crazy distracted me my shortcut to hide those is each key great! We're making good progress, then we're going to zoom in we want to get close for doing our detail work, and we want to use the tool which allows us to get rid of little spots. So also, if you're thinking chris, I know all this stuff stick with me because forgetting it will be getting new stuff cuchi gives me the ability to get rid of little blemishes, and I'm going to go quick here because, you know, we it's not very fun to watch someone get rid of small little blemish is what I tell my students is when they do this work you should have good music on and you should also work on multiple areas of the image. So what tens happens, people retouch away blemishes from, um area like in the forehead, but then there, then they don't do the cheeks or they don't do the neck or whatever it is, so we need to make sure we're spreading around when we start to retouch if we get to an area where gonna do a really big one just so we can see it we have a sample area that isn't good, the forward slash key is a key to ask light room to give me a new sample area, for example and if you've ever had this happen like it brings in hair on her face if you press forward slash light room's going to try to find a better match and so that can help you out when you're working on a little bit bigger area, this image doesn't need it, but I'd be remiss not to talk about that um okay with this photograph uh, what I want to dio get all these little things taken care of and then in a second we're gonna jump to photo shop to take care of what might be maybe the little ten percent right if I were actually working on this and people weren't watching me, I would take a little bit more time here, but like I said, we get the just you don't need to see me go plant clink, clink, clink, clink, clink all over all the little dots, and we just we fall asleep and change channel to the beach and all right, so so so we have all that stuff we reiterate the things that we've been talking about, we have r h key to to show her hide the overlays we have that awesome one, that helpful little thing that the one that gives us this visualize spots perspective of our image, which could help us realize all shoot there's. Little things here that I didn't even, you know, didn't even really see where issues. And sometimes that can give us insight into that. A toggles that, on and off.
Class Materials
bonus material with purchase
Ratings and Reviews
brad in glenwood
Not sure where all the criticism is coming from. It is a good source for a basic workflow to create realistic portrait retouching. Probably not for the advanced Photoshop user, but I consider myself an intermediate and picked up some very good tips that I will consider and definitely add some to my workflow.I think Chris gave some good philosophy for retouching in the short amount of time. If you want a more involved course with more info then I would recommend Lindsay adler's portrait retouching, but even then her course is given over THREE days! In under 1.5 hours for this lecture, did you really expect more for $19-29? By the way if you look in the upper left hand corner of Lightroom it says Adobe PHOTOSHOP Lightroom, so if you want to be technical he was using Photoshop for all of his retouching! Would you have felt better if he was in Camera Raw? It's the same thing!
Rebecca George
Chris is an amazing teacher -- and he's all about efficiency, which I LOVE. He knows ALL the shortcuts and he's so skilled at smoothly working in repetition as he's teaching, so by the end of the class I found that I had effortlessly learned so many important shortcuts and had shifted my editing into warp speed! Such a great class, as are all his classes
grrjr
Lots of good information here. I just wish there would have been more of a walkthrough with the main image that is used for this lesson. It would be useful to see how he manipulated the color in the portrait of his friend for a beginner like me. I like the side by side comparison, but would like to know what else was changed in that photo besides getting rid of shine and softening skin.
Student Work
Related Classes
Portrait Photography