Lessons
Rethinking Retouching
10:36 2Basic Retouching Workflow in Lightroom
10:17 3Correcting Color Issues in Lightroom
07:56 4Small Blemishes in Lightroom
05:20 5Removing Distractions in Portraits
05:19 6Retouching Eyes and Fly Aways
20:42 7Reducing Shadows in Lightroom and Photoshop
08:56 8Liquify in Photoshop
03:32Lesson Info
Removing Shine in Photoshop
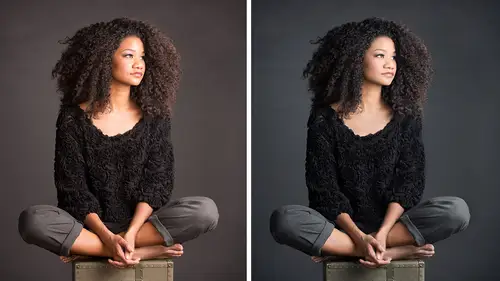
This is a good friend jessica and how awesome is there here by the way? You know, I was like jessica, I got to take a photo of you and so captured this photo and I wasn't really paying attention and her skin's all shiny doesn't look very good so I want to deal with blemishes I have already done in this document but then I want to look at shine and also look att advanced skin smoothing so that's what we're gonna kind of wrap up with all right? So here we go, so let me just the retouching here is already done a ce faras the little ones but it's all the stuff we've covered right? So just details and when I'm really doing retouching, I try to take details out in progression and you can kind of see I have three layers I'm not zoomed in everywhere, but I like to do that just so I kind of like work on something a little bit more and then a little bit more give yourself some space and that and that that kind of detail work is just getting up close. Small little tools next to shine shines a lit...
tle more complicated it's not going to look good at first but give me some space to finish it out and I'm gonna go into my shine folder emerge what I've done so far to the top because I need teo have all of that together we could flatten down but then I would lose those layers for demos I liketo have them so we can click through what's a shortcut to merge to the top it's the weirdest ones like punch your fist down and press keys you know shift option command and shift all control any windows so now emerged the top and one way that we can start to deal with shine is with patching and again you'll think I'm I've lost it here but what you can do is start with the patch tool use normal and just look teo last so up yeah a little area that needs some work and dragged to new source area and let go when you use patch on normal has to be on a layer not a blank layer that's why I had to merge to top and that's why we want guys to learn that shortcut so I'm gonna do a couple areas on dh patches really good when you're working with larger areas what tends to happen with it is the edges look a little bit funny so you almost have to go through patch over what you've already patch so doing that a few times and zoom in and it's not gonna look good but just give me some space here because what happened is it sort of lost shape it remove shine but then like the chins almost like inverted weird but we'll just lower a passing, so we're thinking of this almost like powder, and had there been a makeup artist there, they're just said, or had I been more clued into my lights, I would have used something a little less speculator, but I didn't I made a mistake, and and even that means said there's, tons of times where people just have shiny skin and this this helps out a lot. So now with that lower side and you guys start to see how that looks kind of cool, getting rid of that it's going to be two stages first one is is doing all this this work with our patch tool, and then the second one is going to be using curves and selectively adjusting these areas, and I made a mistake there, but that's okay? And what I'm what I'm trying to do is just really take the overall intensity out off of the shine as I'm doing this and you're watching it what you might think hopefully I'm doing a good job it's like chris, you're not doing that much, which is, which is good, right until you go. Oh yeah, look, there was all that shine, it didn't even sort of like that's what a good makeup artists will do like snidely get it to the good spot. Okay, so that's step one drop my past a little bit more just taking off the worst of it step two is going to be curves and what I'm gonna do is click on my curves just simply write gone what do you think happens if you click on curves adjustment? They're holding on the option key it just it opens up the name dialogue so just just some different, you know, try that option key it's a really important anyway. Okay, so open up curves and with this one so that you guys can see what's happening, I am going to maybe maybe all darken and I'm going to add a color and I'm going to add hideous color, but I need you to be able to see what we're going to do because eventually I want have an adjustment which is just on my highlights. So here we go double click the mask and gets me to my mass panel color range awesome selection tool what you can do is you can click and sample around and can you see how the areas I'm clicking like the hairs green right now on darker I want to go into my highlight and we can control how far the reaches ranges, how far out from where my first click wass if you look over here it's now all the way down to the hands right or range lower range it's just close in tow where first click fuzziness is is the reach in that area and the softness of the edges so what I'm going to try to do is actually that's pretty good I got lucky is have something which is just primarily targeting the highlights the edges look a little strange, right? Because they're kind of crumbling falling apart we'll deal with that click ok in order to apply that selection here let's go back to the adjustment let's reset it and just kind of look at how we can start to work on this and you can see how my edges are gonna need some work let me exaggerate for a moment one of the best ways to get good at photo shop is to try adjustments to high because you can see where they fall apart and then when you bring him back to normal range, I'll look even better and hear if we bring up our feather slider it's just going to soften out, you know I'm going to go really high, you can kind of see how it's softening that out what looked really crunchy isn't so crunchy all right back to what we actually want to do I want to darken this up so I'm gonna bring my midpoint down and also my highlight down a little bit so I'm just gonna look to add a little bit darkness there, I'm gonna have more feather on that doesn't need to be nice and soft and the great thing about doing this with curves as you can then work on color so color and it needs to be more read, so I'm gonna bring the little red also needs to be more yellow and I think my intensity it's too strong, but again, I think I'm trying to do it kind of high so you can see can you see where it is at least on dh? Then I'm gonna drop my my values down here a little bit to see where we're going and I'm hurrying, but can you see how this shines? Starting to go away? We get in there again, it's a delicate procedure, so if I were really in my zone, I would think I would finesse a little bit more, but that techniques amazing first part patching and when your patch and you're not gonna be satisfied, you're like, ok, I'm taking it back second part curves and the beauty of what we're doing here is bringing her dodging, but we're doing it with curves, right? We're darkening and we're doing that because then we have color control, so I went into the red channel and I went into yellow channel because when we darken or brighton invariably were affecting skin tone. You know, it's, getting changing based on my values that I have there.
Class Materials
bonus material with purchase
Ratings and Reviews
brad in glenwood
Not sure where all the criticism is coming from. It is a good source for a basic workflow to create realistic portrait retouching. Probably not for the advanced Photoshop user, but I consider myself an intermediate and picked up some very good tips that I will consider and definitely add some to my workflow.I think Chris gave some good philosophy for retouching in the short amount of time. If you want a more involved course with more info then I would recommend Lindsay adler's portrait retouching, but even then her course is given over THREE days! In under 1.5 hours for this lecture, did you really expect more for $19-29? By the way if you look in the upper left hand corner of Lightroom it says Adobe PHOTOSHOP Lightroom, so if you want to be technical he was using Photoshop for all of his retouching! Would you have felt better if he was in Camera Raw? It's the same thing!
Rebecca George
Chris is an amazing teacher -- and he's all about efficiency, which I LOVE. He knows ALL the shortcuts and he's so skilled at smoothly working in repetition as he's teaching, so by the end of the class I found that I had effortlessly learned so many important shortcuts and had shifted my editing into warp speed! Such a great class, as are all his classes
grrjr
Lots of good information here. I just wish there would have been more of a walkthrough with the main image that is used for this lesson. It would be useful to see how he manipulated the color in the portrait of his friend for a beginner like me. I like the side by side comparison, but would like to know what else was changed in that photo besides getting rid of shine and softening skin.
Student Work
Related Classes
Portrait Photography