Lesson Info
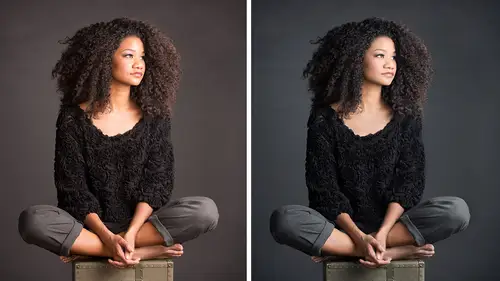
6. Retouching Eyes and Fly Aways
Lessons
Rethinking Retouching
10:36 2Basic Retouching Workflow in Lightroom
10:17 3Correcting Color Issues in Lightroom
07:56 4Small Blemishes in Lightroom
05:20 5Removing Distractions in Portraits
05:19 6Retouching Eyes and Fly Aways
20:42 7Reducing Shadows in Lightroom and Photoshop
08:56 8Liquify in Photoshop
03:32Lesson Info
Retouching Eyes and Fly Aways
So back in photo shop another kind of trick I think for my kind of photography for whatever its worth is what they're really shallot up the field that takes care of a lot of retouching too. So that's actually retouching choice on dh it does certain things obviously with skin because whatever falls out of focus that helps but it also does other things you know, like I know a lot of photographers dan winters for example who is very sensitive about that years and so he the way he lights images if you look at him the years are never bright on dh so he crafts his light in that way so anyway but shallow depth of field does that to it like you know it takes those things all right. So anyway in in footage up I have a shallow depth of field and his human teo one hundred just kind of see like you got good detail in the eyes which is lucky you know when you have that shallow it's like eyebrows were out eyes aaron but but I love that and I love that because that's how we kind of see the world if y...
ou think about let's just go with romance for some second might maybe my wedding day is my wife walked towards me I focused on her and the rest of words world of blur it it ends up that we can kind of see about about the surface area of our thumb at about arm's length, and the rest of the world just disappears so as we closer to things, and as you're going to bring your come closer, that depth of field is even shallower and shower like you guys are far away from you, so I can see all of you, but try that, hold your thumb up kind of interesting anyway, so I'm trying to replicate connection, closeness, and so I'm thinking about that I'm using lenses in that way, all right? Let's, then say, like, what do we want to do with this? What's the next step? Well, if we, you know, let's, say we get into where they're small little blemishes like this, can you guys even see those, like these little guys right here, let's say, we want to get rid of all these little, random, maybe variations that we see in part, the reasons why we get rid of variations and retouching is because you notice things, and still, I mean, is that you don't notice in life like with my face, if you took a close up of it, you would see all this crazy stuff that isn't there in real life, because we don't, you don't. You never stare at someone like that in that way and so we're trying to I think even bring back a little bit more natural look of a person a lot of ways so what I wanna do is just show a technique, do my background layer and call this, um this layer dust and I do the background layer by dragging it to the new layer icon. Another way to do that? If you're into shortcuts command j think j for jump on the mat control jan windows and I'm gonna go to my filter, pull them and you noise and dust and scratches. This filter came from the days of retouching film, and every time you'd scan film, there's dust all over it so you'd have dust all over a large area and using a little tool was just too painful. So this lets you work on a larger areas, so let me just show you how this this guy works radius one, threshold zero as we bring up the radius, I can exaggerate to shout just smudged everything together. What we're looking for is finding the sweet spot of where we're sort of smudging together our flemish whatever it is, maybe this one I don't four five or something like that and then the threshold I'm gonna just exaggerate for a moment that's bringing back on my texture brought everything back so these two work together and we'll use them to try to find the right values a little bit higher here and where what I'm trying to do is minimize all that stuff we can kind of see that stuff to go on right in that area. The problem is if we were to look at something that matters go back to my eye up here it's going to be giant um that looks horrible eyelashes look horrible no big deal we'll mask this in and this is what we used to do a film with scan says you would apply this to a large area and then paint in the removal to these areas you need let me show you what that looks like and let me sneak in a little a little tip so if I click on the adler mask, iconic creates a mask filled with white, which isn't what I want there is a way to create a mask filled with black by default it's by using the option key option or ault option is always a kid says do something different it's alternative it's like I want to try and just mess with me a little bit so when holding optional and click on the adler mask icon, I get a mask filled with black which in retouching is really helpful because we do things like this there's a lot of skin smoothing techniques out there that were used filters or different things that we then paint back in selectively so another way you could do this command I inverts the mask and then last but not least if you double click it you can always just hit invert here lots of ways to do the same thing all right um I was talking with bryan o'neal hughes is a product manager adobe and he was saying when someone applies for a job to be on the photo shop team that if they ever say they're an expert in photo shop there instantly not yet they turned down the rest of interviews over he's like there is no expert you know? And so with all of these things in all of these ways to do that no one knows them all and I've talked to some of the engineers and it's interesting when engineers like whoa I didn't know you could do that and they built the tool eso anyway because there's a whole team of people so if you feel like all these little short cuts are throwing you off relax it's okay it's not that big a deal okay let's get rid of small little area blemishes so I go in here brush tual beaky my brush tool when a paint with white white reveals on a mask black conceals with the brush up top in the options bar we remove all hardness khun change your brush size this little menu you can access on image just by holding on the control key, same exact menu, and then just click off on another menu area, so control clicking gives you your brush control lt's other ways, you know, we have to change brushes, there's a ton of them, but I'll leave it at that for, for starters, and so this one, I'm going to go ahead and just lower my opacity a little bit here, and I'm gonna paint over this and betters human, so you guys can see what that's going on and all that I'm doing. I know this is this is almost, like crazy to be assumed in this close, but what I'm doing is going over these little teeny blemish is here to show you my before and after, and can you kind of see, I'm dealing with all that stuff, I think of how hard that would have been to use, I don't know one of these tools spot healing or in light room, he e you know that, that yeah, but that that speeds it up. So this this, you know, retouching guys is harder than retouching girls usually, but this works well, look of a guy, maybe has a little stubble you want to get rid of, or if like in her case, it might even work I don't know if I have the right setting but these little white pieces of light that were coming through or or the hair on the edge up there were just a really nice subtle saw, you know, softening effect in a few little areas kind of taking out some of that texture just to touch it's not full on skin's moving also this is a technique I find that you often have to scale back, but I don't even know if you guys will be able to see this but you have to just trust me or you have to try it um in you can't see that. Can you, um can can anyone see that out there? Can you guys see that? Okay, what if he's human toe like a million percent um okay, there we go. You can kind of see it there and maybe one of the reasons why I want to do a smaller technique is the subtle techniques I start bigger and broader and they were getting in you were trying to throw in some of this more subtle stuff and then a lot of what I'm trying to do here is that extra ten you know, on dh sometimes it's photoshopped you do an extra fifty we've all been there, right? But sometimes it's just a little bit a couple other things while we're here, we have flyways so many different ways to deal with flyways I'll create a new layer and lots of ways to create a new layer um click on the new layer icon shift command and gives you a new layer gives you new layer with the ability to name it what's your guess if I press shift option command and it's like a new layer but different you just don't get to name it you know such if it and sometimes we worked like that as much as organized as we like to be but something you want to quickly and tested idea. So anyway, with this one spot healing brush is going to be a great tool on dh what we can try to do is just see if we get lucky, you know, go across it and in this case it does the spot healing brush works really well with power lines, but also flyaway hairs which are just small little power lines right and waken get get over those whoa, my brush was really bad right there look at that I knew command z but I got a little carried away the other thing too that I want to highlight with this is I mean just zoom into this this is manu sha but this portrait retouching is a lot about this little details occasionally when you want maybe a taper versus just it it dies shift option command and that's mac shift all to control and windows you could do that same technique you try to use a really small brush and then just drop capacity on dh that can just kind of give you that little bit of it it's not removing the blemish but it's reducing it the best rita cher's I know and and I've had a chance to sit down with some really amazing ones they're more reduction than they are removal or reducing and I've looked at their images and I know photo shop I think pretty well and I can't figure it out and that sort of you know the goal there's one guy rob car is amazing re toucher and he was telling me a story about this photograph he re touched for a famous celebrity and he gave the celebrity of print and she actually cried because it was one of her favorite photo she ever received I thought that's the goal you know I mean that like the rita it's not like oh yeah you you made me look better thanks. You know you're kind of embarrassed you ever had someone retouch your own photograph? I mean that's people retouch mind I'm like I look worse like just make me really you know, so if you could make people look really that really helps all right? So some you know, getting into those details let's do some work on eyes because I see a lot of fun and I'm gonna zoom in close because it's hard to know what everyone can see but mine as well so many different ways that we can improve eyes and let me just throw out a couple of techniques and that the trick is I think with photo shop is that sometimes people will say there's only one way or that way is wrong it's not true there's so many different ways to do this and the tools even built around that so with this image with my work flow right now, I have all of these layers where I've stacked up some progress albeit kind of small progress but it's nonetheless there a lot of times what we'll do in stages like this is need to emerge to top you don't really need to do it here, but I'm gonna do it anyway so it's shift option command and e and that's a shortcut regardless if you're layer visibility's turned on or off to merge everything from the bottom to the top we see that one again mac a shift option command and e windows shift all control any hang out with this layer here we could do a few things one we could just kind of remove or just focusing on the eyes or we you know we could we could do a lot but let's let's just keep the layer as is and only highlight one little technique which is high pass filter other and bypass probably heard of this one before um but what I found is most people actually do it a little bit wrong so with high pass we get this kind of it almost looks like a stamp on a piece of foil or something this kind of m boss look of the image and what we can do is use this value to try to bring in small little detail work really well when you want to bring out just little teeny details and images or do a lot of edge sharpening and the trick with it let me just bring it up do you notice how there's color in the image we can kind of see that image peeking through there we're the step that most people forget about is to remove the color so we find a value I'm just gonna guess here and the next up we want to do is image adjustments in de saturate our shift command you you want to get rid of all of that color otherwise you're adding color artifacts into your sharpening process on dh then we can take our blending mode to one of our options overlay soft light hard light soft lights perhaps the most commonly used and so what we're seeing is in this case just a little subtle snap there I want to create a mask filled with black I don't want it everywhere I want to sharpen all the skin that I worked on how do I do that? I hold them what key? And click on the mask icon what's the renegade shortcut key that's like do something different optional optional and then I'm gonna grab my brush tool and I'm just going to paint this in here and although I'm looking to do is kind of bring in a little bit and the reason why I want to show this technique show a couple others is what you can do with this with high passes you khun duplicate your layer remember I said the command j thing allows you to do that I'm exaggerating because that's what you have to do some time in demos here's before and after let me zoom out a little bit so you can kind of see it in context it doesn't look that bad even though I went that far with it you see how you can see how this little cool texture in there so command janna matt control jenna window build set up and it allows you to kind of say well here's level one level to whatever it is teo buildup, that effect and of course we could control rapacity as well and just is a nice way to add some definition or detail could we do something similar with smart sharp in? Sure. Yeah, hi passions gives a unique kind of small detail kind of sharp in effect. All right, another thing we could do with eyes his work on color, brightness and tone let's look at one way to start doing that I will grab or press cuchi cuchi is a shortcut key for quick select is going to look weird at first but roll with me when you enter in a quick select you can paint with black in order to create this red mask it with black toe too. You know, full black you have all that white, we'll get rid of it, so I am painting it in. If I make a mistake, I hit the x key, not flips it to white because I have white on black in there and my foreground background color and I'm just painting this in could I paint it in a little bit more selectively so it wasn't all equal? Yeah, totally so we could do stuff like that, but right now we have crazy red eyes top left bracket key make my brush smaller. I know some people are like, well, what about the other shortcuts to change brush size? I know those but just getting a few of them anyway, we pressed cuchi again, we exit quick, massive so quick mass is just a quick way to, like, paint it paint a mask because I cz aren't really circles right? And they're not lasso tool is going to work and I'm just gonna almost test my idea about the problem with quick mask is that our selection is the opposite of what we want right now, so you have to invert that select and inverse, and now I have just have the eyes here, and if I go to my curves, adjustment are different, any other kind of adjustment I can make an adjustment where I'm just getting into the eyes, right? Remember I said before we lost some blue so we could have gone in there and maybe brought in a little bit of blue back to that one image I was working on before maybe a little bit sigh into or or whatever it is, we could bring in some contrast and I'm just going to exaggerate for a moment realizing that's too intense, but again, you're seeing the effect in there. The other thing that we can do is once we have this, we can work on our mask, even mohr so with this mask, we realise it shouldn't be quite so uniform we could, we can kind of you're kind of mess with it a little bit in here, I'm just going to add a little very age a shin on that mask and all that that's doing is making it not be so, like blue everywhere in an equal way. And so that gives us, you know, the ability, ability to do that. We could combine these two. Right? So now I have my eye again. Is that look over the top. You guys back there? It does. Okay. Never know. Like what you see and what I see. You know, this looks awesome. Now, um, uh, let me scale back. The blue is crazy. I went crazy with that blue it's just a little bringing back some of the natural, you know, a little bit of color. I didn't a little color, um, point being eyes. What really helps his scharping them using very sharp being techniques smart, sharp it high pass sometimes what I know students who do beauty, and they do shots of justin. I even like paint in the sharpening from the middle of the eye out. So it follows the flow of the you not just I painted it roughly in a circle, but it depends upon the image how much you're bringing in and all those kind of things. Obviously, if you're going to one eye, we have to do the other but you guys get get where I'm going. All right? I'm going to jump to another image unless they're any questions on this stuff. Any questions from you or from you and before you ask questions media this to my speed. This is fine. Go faster. Go slower. So this is fine. Okay? I missed when you were talking about the high pass filter, you went to image adjustment, and then I missed the last. Yeah, great question. Sorry. So we did. We did emerge to top just because sometimes every touch, any of these other underlying things. And then we went to filter and then other in high pass, and this one will come back to us in a really advanced technique here in a little bit. So it's a good question, but and the others? Yeah. Yeah. I've got a question online from wendy talking about frightening the eyes. Do you write in that the white in the eyes too? Or is that taken care of by high pass? Or should we just not do it? Yeah. It's a great question. I mean, you know, to really get into eyes the brightest part of the eyes, always the furthest away from your light source, so we can kind of see in this image that this area is the brightest part so in theory we should actually be a little I should have been more selective on what I brighten and what I didn't so that's I know that's not to the whites but just thinking about the way brightness works in an eye catch lights in those things and then the white for techniques for doing that I will look at it we'll do like a teeth whitening thing but selectively working on that and usually what I find with eyes and most scenarios it's getting rid of something it's not whitening whitening eyes you usually see in low budget magazines were like, wow, those eyes and they're like white people don't look like that it's kind of scary, but but if you can reduce little red lines and so a lot of that detail work of cloning or healing and what I've found with eyes and I've seen a lot of people do stuff is there's no easy way except zooming in really close and just going hey, you know, so close this image I just want a quick ben harper story while we got him up here, okay? Yeah this's a great store so I was photographing him um how about is my original name it's not horrible but definitely didn't nail but anyway I was photographing and was really excited and I I had some other images I shot him with a four by five to but this lady came in and wanted a trophy shot, which is like me in the celebrity kind of thing, and so she butted into what we're doing, and ben obliged, the friend taking the picture wanted bend to smile, he's like the uber cool rock star, you know, I don't know if ben smiles, you know, and she was like, you know, ben smile, it's my own, he wouldn't do it and find this year's like ben say cheese, and he lost it. He was like, lady smile with eyes on, then they took the picture and left, and I always feel like in this image he is smiling with his eyes and that experience, I think that's one of the reasons I love portraiture is it opens us up to things you know, we think like, oh, yeah, smiles, mouth, but it really isn't. And when you see someone fake smile, it's usually has to do with the rest of their face on dh you can identify, speaks miles, they've done the studies where you don't even see the smile, you know, because the eyes are so expressive anyway. Interesting side note story from our buddy ben harper.
Class Materials
bonus material with purchase
Ratings and Reviews
brad in glenwood
Not sure where all the criticism is coming from. It is a good source for a basic workflow to create realistic portrait retouching. Probably not for the advanced Photoshop user, but I consider myself an intermediate and picked up some very good tips that I will consider and definitely add some to my workflow.I think Chris gave some good philosophy for retouching in the short amount of time. If you want a more involved course with more info then I would recommend Lindsay adler's portrait retouching, but even then her course is given over THREE days! In under 1.5 hours for this lecture, did you really expect more for $19-29? By the way if you look in the upper left hand corner of Lightroom it says Adobe PHOTOSHOP Lightroom, so if you want to be technical he was using Photoshop for all of his retouching! Would you have felt better if he was in Camera Raw? It's the same thing!
Rebecca George
Chris is an amazing teacher -- and he's all about efficiency, which I LOVE. He knows ALL the shortcuts and he's so skilled at smoothly working in repetition as he's teaching, so by the end of the class I found that I had effortlessly learned so many important shortcuts and had shifted my editing into warp speed! Such a great class, as are all his classes
grrjr
Lots of good information here. I just wish there would have been more of a walkthrough with the main image that is used for this lesson. It would be useful to see how he manipulated the color in the portrait of his friend for a beginner like me. I like the side by side comparison, but would like to know what else was changed in that photo besides getting rid of shine and softening skin.
Student Work
Related Classes
Portrait Photography