Shoot: Dramatic Vintage, D1 with Zoom Reflector
Lesson 8 from: Posing, Styling and Lighting for Beauty PhotographyLindsay Adler
Shoot: Dramatic Vintage, D1 with Zoom Reflector
Lesson 8 from: Posing, Styling and Lighting for Beauty PhotographyLindsay Adler
Lesson Info
8. Shoot: Dramatic Vintage, D1 with Zoom Reflector
Lessons
Lesson Info
Shoot: Dramatic Vintage, D1 with Zoom Reflector
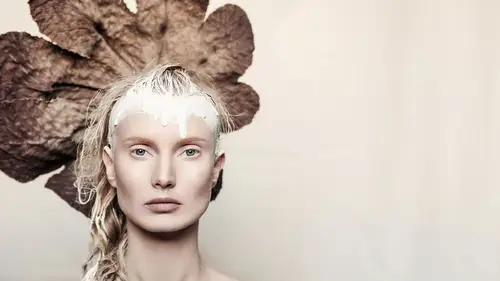
What we're gonna do is I'm gonna tweak a couple of these in Lightroom, and while I do that we're gonna switch the set, and we're also gonna have her change into the next look. And so the next look, we've decided, is going to be a bit more dramatic vintage 'cause we're going a little bit heavier here. And so I know I'm gonna shoot this in black and white, because I want it to be like, maybe a little Old Hollywood in feel, it doesn't exactly matter if it's straight Old Hollywood, and then I also have a headpiece that she can wear. So, you can take a seat. There you go. Let me get you the headpiece. It's actually this one. Okay, so this is the headpiece that I have for this set, and this was made by a designer friend of mine, Lory Sun. You can look up Lory Sun Artistry on Instagram if you want and so I will tell her ahead of time my concepts, and she'll custom design pieces, and then I'll be able to be inspired by her pieces, and the look of the model, and the makeup artists I'm collabora...
ting with, and so it's nice because not all the inspiration's on me. It's multiple people working together. All right, so I'm gonna give this to you for a second. And then we're gonna come over here, and John, can I have the zoom reflector on the main light, please. So, we have Old Hollywood, our old time light, I'm thinking Old Hollywood, they had those hard shadows, like the really hard light. And sometimes the paramount lighting was nice and flat, but it was sparkly and what was really nice about that light is when they shot it in black and white, they blow out the highlights. Skin, 'cause they were mostly all white, but skin would blow out, no retouching! Is what it would do is it would just give you pure white skin and dark shadows, and so it made them look flawless straight out of camera. So we're gonna do something like that, inspired by that idea. So while we switch this, let me come over, and play with this just a little bit. So I'm taking a look here in my histogram, and if I mouse over the top right-hand corner, the top triangle, it's telling me that all of that information is blown out white. It's overexposed white. If you haven't done this before, you might say, oh crap, that's wrong. No, I mean, I don't need my highlights there. Like, it's meant to be a pure white background, it's fine if it's blown out. So just so you know, if you're seeing the blinking highlights warning on the back of your camera, or you see this in Lightroom, it's supposed to be that way, so that's fine. But I also see that I don't really have anything in the black. See how I'm mousing over that histogram, I don't have a true black point. And that actually kinda makes sense, because I'm shooting into a light source and I have a lot of fill, so this might be an instance where I need to add a little contrast, maybe a little clarity, drag the black point and play around. I don't want it to get dark, but I want a little bit more black, so I'm gonna drag the black point over. And even there, it instantly gave me something in the black film, so that was fine. Um, let me see, maybe add a little bit of clarity, yeah, like that, I like the little pop of clarity there. And, oh, I forgot to take a picture. So something I forgot to do, but not a huge deal, do you have the color stick around? I usually take a picture of a gray card. And the reason I take a great picture of a gray card is in beauty photography, you better have those skin tones right, unless you're going for something creative. So what this does is this gives me a neutral point that I can use, use your, in develop module, the white balance eyedropper right here, you click on the gray point, and what it does is it sucks out any color capped in the scene, it gives you correct white balance. So when I'm doing beauty photography, I always get one of these, 'cause I'm looking at the skin right now, and it's okay, but I think maybe it could be a little bit warmer, and so this would be kind of my judge. But I can also, I can also do it to taste a little bit, so something in there I like a little bit better. Pop the whites. I'm feeling that, so here's the before and after. It's not huge, just a little more contrast, a little more warmth, looks pretty good. She has darker eyes, and I can also come in here, and I can also lighten them up a little bit. So I could use an adjustment brush, and just like lighten the eyes up a bit. Let's see. And I'm gonna increase the saturation so the eyes are a little bit more brown, a little more golden. So I think that's good. And then let's go back. A little brighter, okay. So I think that's the look and feel I'm going to go for, And now for this next shot, we'll go in the opposite direction. So John, will you remove that light for sure? I don't need the soft box. And what I'm gonna use on her is I'm gonna use a zoom reflector. So this is the light that like almost never, that 49 out of 50 times, more like 99 out of 100, you don't wanna use in portraits 'cause it's mean. Using a zoom reflector is super hard lighting, and what it does is it makes really bright highlights, really dark shadows, and emphasizes every texture. So for the portrait, you're emphasizing pimples and wrinkles and blemishes and all that stuff. But I know how I'm going to shoot it. I am shooting a model with good skin. Like, she has great skin, beautiful. But also I'm gonna be shooting it in black and white, and blowing out the highlights, so even if I had that texture, I don't have to worry about it. So I've been super duper feeling the vintage vibe recently, if you look at my Instagram you're gonna see a lot of that. So that's kind of the vibe that we'll go for here. And so, Nakoma, are you a good multitasker? Can you tell what you've done to make it more vintage? So we just darken the eyebrows, 'cause eyebrows were always the focus in vintage looks, popped on lashes, 'cause you get that sleepy Marilyn Monroe effect. And then we're going with a darker, kinda 40s, 50s inspired look. That's good, thank you. Perfect. All right, so. Let's see, and I'm gonna adjust this so it's not super painfully bright. I always block it so I don't blind my model 'cause it's super bright. All right, I gotta keep it a little bit bright so I can see in here. And I know I'm gonna want a little bit higher angle, I think that's just about done. Now, one more thing I'm gonna have her do, is when she's done with this, the makeup, I'm gonna have her put on the headpiece, and then probably this dress. What the dress can allow me to do is instead of having so much skin, 'cause I'm blowing out the skin, so it might be a lot of white, a lot of skin, is I can have her put this on and then just have it a little more open so you can see the details. But the reason I like this is because it was, I think, 16 dollars on Amazon, so it was very, very simple, but it's gonna fit over the top she already has, and it'll pull open the shoulders. Beautiful. Nice job, Nakoma. Thanks! I didn't introduce you and I feel like a jerk. Oh, gosh. So I was a little distracted. So when you're done, then I'll introduce you. Sorry. We've actually shot an editorial together, and it was beautiful, and glorious. If, I shot it here at the Seattle Public Library on my birthday, what, three years ago, I think? Yep. And it's all red, red dress, red background, red everything. Super like avant-garde and creative, it was a ton of fun. That was a very amusing shoot because while we were shooting we're in a public space, we had permission to be there, but we had a lot of amusing onlookers. A lot of people watching the action of the shoot. Sadly we got some interesting people. And so in the meantime, I'll have you put this on, you can just do whatever you've gotta do, but watch your lip 'cause it will, oh, good call, thanks, John. Whatever way it goes, and let me know if I need to help you. For beauty, what do you look for in terms of the catch lights? Are there any particular dos and don'ts? Sure, so, the traditional answer for catch lights is that you want them but not all beauty photography has it. Because there's sometimes where it's about the lip, and so sometimes the eyes will be kind of rolled back and you won't even see it, but that's okay, 'cause you're not supposed to look at the eyes, you're supposed to look at the lips. But in the, for the most part, I do. And the portrait rules, there used to be like, don't have too many catch lights. That's not a thing, that's not a thing in beauty photography. Like, you can have lots of catch lights. I will say more often than not, though, I see a ton of beauty photography done with one or two lights. It tends not to be a lot, 'cause it's more focused on like the makeup or the skin, and that might just be a thing right now, like that might be the style now, but it's pretty limited. Thank you, that's beautiful. Okay, now, let's, you can take a seat. All right, Nakoma, let's look at this. Like anything, like this kind of stuff. I think it goes that way. I don't know, this way, yeah, okay. Thanks. Okay, beautiful. All right, now I'm supposed to, I think in the past we've had it kind of like this. In the back? Or multiple times around, we did something like that. Okay, is that gonna reach? Just tie it in the back, that's fine, but I'm gonna raise it up a little bit so it makes like a, yeah. How do you feel? You okay, not choking you? No, I'm fine. Okay, good. Okay, beautiful. All right, so I know for this shot, it's gonna be super important for me to shoot tethered, because I'm gonna do a totally different effect, so I need to see if it converts well to black and white. So will you turn towards me, and can you pull the shirt top so it's like here, yeah, sorry, and then I'll put this here. Okay, good, great. I'm gonna pull this over just a little bit more. You feel okay? Yeah. All right, no, you're fine. Okay, just wanna make sure you don't feel like I'm exposing you. No, I'm good. Okay, good, great. Okay, one more inch this way. All right, now I switch to a different modifier. This is gonna be super, super hard. So, did I put that on the right way or the wrong way? It's okay? 'Cause I don't know. Can I pull this forward? I think it's supposed to cover, I feel like it's supposed to be a little bit further down on her forehead, not quite so far back. Okay, so we switch to a modifier, it's gonna be really hard light right now. Where do you wanna shoot at? I mean, I'm aiming for 11 or something. 14, okay, cool, thank you. All right, so let's take a look at what we've got now. And I can shoot at 100. All right. Yep, that's fine. I'll shoot at 100, and what are you at, at 14? Yeah Great. So, we're shooting at this light at the lowest power, and it's, this close, it's F-14. But that's because it's bright. That's because it's a zoom reflector. I also know I'm blowing out the skin, so I'm actually gonna shoot at 11, and overexpose the skin on purpose, so that's fine. So sit up real tall, and turn to your left. Great, and now tilt the top of your head back towards me. Beautiful, so let me test this. Oh, so pretty! Okay. Thank you. All right, so let's see. I'm gonna do my black and white conversion and figure out what I want here. All right, so, that looks pretty. Black and white, and I'm gonna break all the rules, and do something like hard, hard light, high contrast. But, I'm totally losing my background, so I can move her closer to the background. You guys know the inverse square law. If I put her a little further away from the light and them move everything closer to the background I'll get a little spill on the background, or I can add another light. I think we do both, okay. So can I have you take like three scoots back? Scoot being a very specific measure of distance here? Okay, that's great, that was a good scoot. A good scoot. So let's say here. All right, now, great. And then we'll see if I'm getting enough spill, probably not, probably have to do this. Let me do same as previous for a second. Where'd my tether go? Behind you. Thanks, John, see, I told you he knows everything. Okay, so let's test this. Okay, all right, I'm getting a little more spill on the background, but I will have you, let's see, okay. I will have you turn it on. And can I go a little lower-power than that? Let's see. I'll blow out these highlights like whoa. Also a very specific term. But see how the skin, when you blow it out like that, it doesn't need a retouching. So that's like a six-three, let me test this. Uh, and turn your, turn the head that way and shoulder up. Good. I think the placement's good. Okay, let's see. Okay, pretty. A little bright. I want it to be more subtle, though, behind her, not quite overpowering. And that makes her white skin look even paler, so chin that way again, and then the top of your head, beautiful. Okay, let's try it again. Maybe cut the difference, but let's see. Um, so I think, can I actually have it the tighter grid? So what degree is that one? This one is 10. Uh, I'm gonna put the five on. Yeah, I do. So what the grids do is the grids control how the light spread, and so the smaller numbers light a smaller area. So we had a 10 degree grid on, he's switching over to a five. I can bring it closer to the background, too, if I want some more focus. I think that's good. Let's test it. Okay, and then a little bit-- I went halfway to there. Perfect, great, okay perfect, right there. No, mouth open a little. And now try (sighs). Uh, but try with the other hand, pinky, yes, perfect! And now, give me a lot of emotion, perfect. Okay, let's test this. Good. Pretty. So that feels like kind of vintage Old Hollywood to me. I will, this whole time I'm shooting raw. So if I look at it and go, oh man, the highlights are a little too much for me, it's fine, I can fix it in two seconds. But I'm going more for mood, so then I can go oh yeah, the hand's exactly what I want it for this Hollywood whatever. So I'll shoot two more frames of this, and then we'll do our final switch, and it'll be perfect. Okay, so, let me just fix one more thing, and that's perfect, John, that looks great. I like the little pop. All right, so let me just pull this up just a bit. And can you, without falling out, pull down that shirt just a little? Like an inch, okay, great. (laughs) Thanks. Good, that looks good. Okay, so I'll shoot a few more. I'll do a few more of that. Looks beautiful, you look great. All right, so, that's perfect but take your front shoulder and turn it, so the reason I'm having her do that just a little bit, I'm trying to create more shape here. When she pulled it back, it'd be flatter. If she turns it away, then her clavicles catch more shadow. Good. And close your eyes. Perfect, now put your hand up to your neck this time. And chin away from me a little more to the right, uh, your left, sorry. Good. Mouth open. Good. Great. And now look at me straight on, good. Ah, pull the shoulder back over. Good. Perfect. Chin down and mouth open, and flare those fingers out just a little bit more. Little more shape. Pretty. Chin up. Now tilt your head back. And chin this way, good. Really long neck that way. Now, lengthen that shoulder, lower, lower, lower, lower, lower, yeah. And now we do one more closeup. So, drop it and just hard neck, as hard as possible, perfect. Great, perfect. Okay, so that's all the mood, that's exactly what I was going for. Old Hollywood vintage. The highlights are 100% completely blown out. It's fine. 'Cause if you look at fashion editorials, and you look at Vogue and you look at all that stuff, if it looks like it's on purpose wrong, and it's for a mood, then you're golden. If it looks like an accident, eh, that's where you gotta bring it back. So, Nakoma, I'm gonna bring you on for that final change, please. All right, so our final change is, I shot this as black and white. I love it, like look how pretty. I love this one, look at that. Ugh, so pretty! Probably what I'll do is I'll go in in post and add some grain. And make it look like old film. And then it actually, what's cool is even though the highlights are blown out, it adds a little bit of texture back to the skin, even though it's not texture, it's grain, it's noise.
Class Materials
Bonus Materials with Purchase
Ratings and Reviews
Margaret Lovell
I'm enrolled in a number of Lindsay's courses, and am moving slowly through them. Although I'm more of an outdoor photography, I am interested in fashion photography. I decided to take this course because of its focus on beauty photography, which I feel is a subset of fashion. Lindsay is an excellent instructor who gives plenty of easy-to-follow tips. She's extraordinarily passionate about fashion and beauty photography. I love that she'll set up shoots for classes so that you can watch how she applies her knowledge.
Alfonso Ruiz
Loved the course, Really good info in a fast and concise way
Stefan Legacy
Good course for someone new to photography and looking to learn how to pose and light their subjects. Very clear teaching style and easy to follow along.
Student Work
Related Classes
Lighting