Lessons
Lesson Info
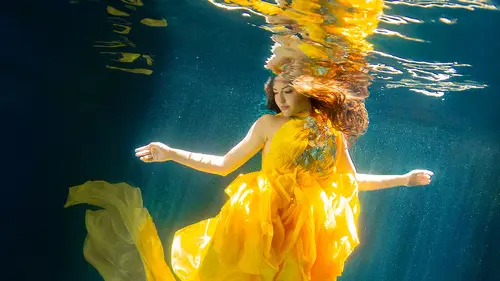
Particulate in the Water
I think one of the biggest problems, like the question that we just saw, is going to be about particulate in the water and how to get rid of it, and problems with backscatter, problems with dust, problems with all this junk. All this junk that we sometimes find in our images that needs to be taken care of. And so, for this, the way that I like to get rid of it is it's basically a take on frequency separation and anyone that was in my skin class earlier today is going to be familiar with this technique. It's a bit of the same. What we're going to be doing is we're going to be dividing the texture from the image, from the color of the image and then applying a blur to the color while still protecting the texture and then going from there. So skin retouching can sometimes help you even in other places. What we're going to do is we're going to dive right in. Did you get it? Dive right in. And we're going to create two duplicates of the background layer, and then we're going to select them ...
both by holding down shift and we're gonna put both of those in a group by hitting command or control plus G and then we're going to call this group Clean Up. Let's turn off our... Turn off our top layer, which is going to be our texture so double click texture, and this is tone, tone down there. Whenever I'm doing this technique on skin, I'm using Surface Blur, but for this specifically, I'm gonna be using a different type of blur which applies different math to the image and that's going to be Filter, Noise, Dust & Scratches. This specific filter was created for film. Back in the film days when we were dealing with negatives, if you had dust and scratches on your image you were going to have serious problems with the image as you are, as you were exposing it in the darkroom and as you were printing it, so this specific filter gets rid of anything that looks like a hair, or anything that looks like a piece of dust on your image. Good to know, because there are a lot of applications when you would be doing something where you would need to blur specific areas, like for example flyaway hairs. I have a whole action that gets rid of flyaway hairs around the back end, especially on backgrounds that are detailed. If it's a natural blurry background and you're trying to get rid of flyaway hairs, Dust & Scratches is the way to go. But I'm digressing again. Let's go ahead and add quite a significant amount of blur. As you can see, all of our little white specks are gone, so that's pretty good. We'll go ahead and press okay. And then we'll come to our texture layer and let's try and isolate out the texture of the image. So we're gonna do that the same way we did it this morning. Filter, Other, High Pass. And again, we're just looking for a medium filter that's going to show us that we do have some texture in the background. So that looks good. We're going to completely de-saturate the color from our texture, so hue saturation, I'm sorry, saturation all the way down. And we got there by hitting command or control plus U. And then we are going to change the blend mode from normal to soft light. Whoa, that looks cray! Disregard the turtle for a minute, but the background looks a heck of a lot better, yes? So now we just have to get to the point where we select the areas where we want the clean up layers to be visible and where we don't. So the way we're going to do that is we're going to, let's turn those off for just a moment. We're gonna go back to our background layer and then we're going to come to Select, Color Range, and we are going to make sure that our fuzziness is at and we want to make sure localized color clusters is activated. Of course we're not dealing with faces, or at least not human ones, or mammal. Oh, he is a mammal. Anyway, detect faces off please. And what we're going to do now is we're going to sample specific areas of color of our little specks. So we got a speck there. Now we're going to just add to this, so we're gonna hit our eye dropper with the plus sign and we're just gonna come around and we're going to sample the colors of these specific specks that we want to remove. Okay, so that looks good. Let's go ahead and press okay, and look at that. Now, do you want to be responsible for painting in every specific speck to get rid of it? No you don't, no you don't. So what we're going to do is we are going to come to our clean up layer group and we are going to add a mask to that layer group and then all of a sudden, all of those little speckles that we saw originally are now gone. But there's one last step. We need to just modify this mask. While this mask is 90% perfect for getting rid of those speckles and that particulate in the water, we need to expand a little bit all of these little white circles. So we'll come into our Select and Mask and we're gonna shift the edge of our mask a little bit wider to make sure that it encompasses all of those little speckles a little bit more. Whoa, that's too much. Okay, that looks about right. All right, so hold down option or alt, there you go and all of that can be actionable. You can write all of that into an action to get rid of speckles in your water, to get rid of particulate in the water. If there are any big ones, any big particulate areas, what I do in that situation is just use my spot healing brush and I make sure it is set to Replace and Content Aware and then you can just bloop, bloop, bloop and just go through the little ones, but nobody has time for the tiny little, for all that tiny little stuff, really. I mean, nobody has time to go through and sit and get rid of those, right? I'm just doing the corners, which I think is a little bit of a lens issue. Okay, so before, after. What do you guys think? Does it look better? And that was pretty fast. So we didn't go through and get rid of every specific one, every specific dot on its own. We just let Photoshop do it for us. Working smarter, not harder.
Ratings and Reviews
JennMercille
This class is SO COOL! I don't shoot underwater photography, but now I want to try. I especially appreciate that in addition to walking through the editing process, Kristina explained the how and why of each step in a way that can be applied in so many other creative and editing situations. Awesome class!
a Creativelive Student
Really great class! I would also like to see a class on underwater photography.
Simona Grigorescu
Usefull tips. I would like to see also from Kristina a class about underwater photography. :)