Alien Skin Exposure Overview
Lesson 40 from: Powerful Portraits using Mirrorless CamerasMiguel Quiles
Alien Skin Exposure Overview
Lesson 40 from: Powerful Portraits using Mirrorless CamerasMiguel Quiles
Lessons
Class Introduction
11:07 2What is a Mirrorless Camera?
06:30 3Mirrorless Camera Advantages
07:30 4Mirrorless Compatibility
13:12 5Live Shoot: Mirrorless vs. DSLR
07:56 6Live Shoot: A7R II, A6300 & A7ii
29:27 7Compare Mirrorless & DSLR Images
21:37 8Posing Techniques Overview
15:46Lens Choice for Mirrorless
10:59 10Savage Collapsable Backdrops Demo
11:36 11Client Portrait Shoot Overview
04:00 12Importance of Tethering While Shooting
12:40 13Lighting Set-up for Client Portrait Shoot
08:46 14Live Shoot: One-Light Client Portrait
11:58 15Live Shoot: Modifier Client Portrait
14:33 16Live Shoot: Side Lit Client Portrait
11:51 17Communication with Client
12:05 18Specific Portrait Techniques
03:43 19Fashion Beauty Shoot Overview
11:22 20Live Shoot: Beauty-Dish
23:09 21Live Shoot: Octabox
18:10 22Live Shoot: Umbrella
31:21 23One Light Set-Up for Male Portrait
07:33 24Live Shoot: One Light Male Portrait
15:50 25Live Shoot: Two Light Male Portrait
17:54 26Live Shoot: One Light with High-Speed Sync
16:29 27Live Shoot: Two Lights With High Speed Sync
17:39 28Retouching Workflow Overview
03:00 29Culling Images in Capture One
18:05 30Basic Alien Skin Exposure Workflow
17:57 31Image Editing in Alien Skin
12:56 32Add Grain to Images in Alien Skin
04:52 33Skin Retouching in Alien Skin
10:36 34Exporting Images in Alien Skin
06:42 35Cull Images in Capture One
22:51 36Skin Retouching in Photoshop
22:16 37Draw Hair in Photoshop
04:53 38Finish Skin in Photoshop
23:51 39Change Backdrop Color in Photoshop
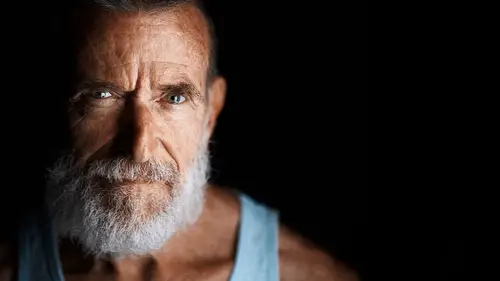
11:14 40Alien Skin Exposure Overview
15:20 41Sharpen & Add Grain in Alien Skin
09:05 42Exporting Images for Clients
06:09 43Mobile Workflow with Mirrorless
15:51Lesson Info
Alien Skin Exposure Overview
All right, so once we have all of these adjustments done, I'm gonna do Shift + Command + Option + E, and what that's gonna do is it's gonna create this new layer that basically is all of the adjustments that are below it all merged into one layer, all right? So everything, this new layer that's up here basically has everything that's below it, just on one single layer. So if I was to turn off all these under it, we still have the image with all of the adjustments. So you need to make sure you do this before you kick this out to Alien Skin, because if you tried going to this top layer and you go to export in Alien Skin, it's just gonna export that one layer, and you're gonna be like, what, there's no picture here, what is this? So just make sure that you do the Command + Option + Shift + E so you have this. Those are the merged layers. You go to Filter, Alien Skin, and Exposure x2, and that's gonna open up, so now you have Alien Skin Exposure that I showed you as a standalone program. I...
'm showing Alien Skin Exposure to you now as a plug-in for Photoshop. So this is where it differs a little bit. So here's what we're gonna do. We're gonna go to our presets. You're gonna be able to use my MQ's ASE2 presets, which, these are the ones that I use the most often on my portraits to basically do my retouching. So I'm gonna go to those first, 'cause I'm curious to see if any of those are gonna make this image look the way that I may want it to look. So... Not gonna lie, I kinda like color two. It's very drastic. Let's see, before and after. Kinda looks different. Let's see. Yeah, sometimes those are the kind of color adjustments that a lot of people will look at and be like, oh, it's too drastic. So I won't do that. So here's before and after on MQ preset color one. Let's use some of the ones that are already built into Alien Skin Exposure. We'll close out mine. And like I was telling you before, for the color options, I tend to use either Polaroid, Print, or Slide. The other one that I tend to use quite a bit, as well, even though they need adjustments, is lo-fi, 'cause these have some pretty cool color effects, as well. And so if you're looking at the shot, and this is where you have to kinda train your eyes a little bit, because some of these will make the adjustments kinda crazy where it has flares and colors and stuff like that that doesn't have to be there in the final image. So a lot of the times when I'm looking at these, I'm really just looking at the color overall, because I know that I can change just about everything else. So here's a before and after, and this is Kodak Portra 400 VC, which is a very popular film back in the days. And so I kinda like that, but it definitely needs to be adjusted a tiny bit. So we're gonna zoom in, and I'm actually gonna start from the very beginning here, so looking at the basic tab. So all of this stuff was stuff that I already adjusted in capture one, so I tend to skip over this section, because I really don't wanna, you know, go back in there and start making those adjustments again. But if you wanted to, if there was something here where maybe the preset is bumping up the highlights more than what you would want, you could customize this already made preset by basically just changing the slider and kinda playing around with the slider here. I like it as is, so we'll leave that alone. I may actually bump up the clarity just a tiny bit just to see. So maybe we'll go to, like, two. And so again, you have to kinda look at this, and it's doing it to the entire image, so maybe we won't do that. Let's go to zero. A lot of this you have to kinda play around with it to see, to get it the way you want it to look. I'm gonna go to vignette really quickly, 'cause I think, if I zoom out from this, I believe that it's actually adding a vignette. And it's very subtle. Do you guys see that around the edges? So it's adding a little bit of a vignette to this particular image. So if you wanna take that off, I'm just gonna click on that so I know that it's not adding a vignette to the corners. I'm gonna go to overlay. Same thing, I'm gonna turn that off. Because sometimes the preset has, like, a very soft, very subtle overlay, and you won't really see it, and later on you'll export it and be like, oh, I didn't mean for that to be there. So usually if I know that I don't want a vignette and I don't want overlays, I'll just go ahead and turn it off so that I don't make the mistake. Focus. So this is something that I use quite a bit for my beauty shots where I'll go to sharpen low radius 25. That's most of the time the only one that I use. There are certain occasions where I might use something different, but for all intents and purposes, I'll start with the 25. And if I zoom into this, you're gonna be like, oh my gosh, it is, like, it's gonna be a lot of detail. It's very, very sharp. It's a little bit much. So what you're able to do is you can go ahead and go to the amount, and you can drop this down a tiny bit. So maybe you might wanna go, like, seven and a half. Change the radius a tiny bit. Maybe go to 10? 9.25? Let's just type that in. Go to 10. So lets go back. I should not have hit Enter. Sorry. Let's go back. Doo doo doo. Live TV, guys. Gotta love it. I hit Enter, and it actually just went ahead and kicked that into Photoshop. So we'll carry on from there. So basically, that is the preset with the sharpening that was added to the image, right? So this is actually a pretty good thing that it did that. I didn't mean for that to happen, but it's actually a blessing in disguise. So if I... It created this brand new layer that's basically just that Exposure adjustment. So if I turn that off and on, you can see basically what the preset with the sharpening was able to do. And so the cool thing about this is if let's say that's too strong. Let's say that's, like, it's too intense. I can go ahead and go into the opacity, and I can go ahead and kinda blend the original image with that Alien Skin preset that we just did. So let's say if we drop it to, like, 70%. We still get some of that Alien Skin adjustment between the sharpness and the colors and all of that good stuff, and we're blending it with our original image to get something that doesn't look quite as intense. So you can see at 70% opacity, that adjustment actually looks quite decent. So let's do this. So we're gonna go ahead once again and I'm gonna take this layer that was just created by Alien Skin and I'm gonna go ahead and go back. We're gonna go back to Filter, Alien Skin, Exposure x2. So now it's gonna open the layer that was already previously open. It's making a new one, because like a newbie, I clicked Enter when I shouldn't. But here's what we're gonna do. So as soon as you go back in, if you notice now it's, like, really, really dark. What it'll do is whatever the last preset was that you used, it's applying it again. So this is, like, a two time Kodak Portra VC with the sharpening. It's, like, a double time preset here. If you hit reset, that will take you back to the original image that it just clicked or sent over. And what we're gonna do is we're actually gonna go ahead, we already changed the focus. The last thing that I didn't get a chance to change was the grain. And like I said before, I add grain to all of my images. Like, all of my studio stuff, I add grain in some way, shape, or form. And Alien Skin is the way to do it 'cause it has the most beautiful grain that you can add to an image. Lightroom has it. Somebody probably in the chat room's gonna say, well, Lightroom has grain. And it does have grain, but the grain looks more like noise, and I don't wanna add noise to the image. I wanna add, like, a real-looking film grain to the shot. So we can go ahead and there's all sorts of presets for the grain, as well. So you can add detail to blocked up shadows, you can add detail to blown highlights, add detail to shadows and highlights. Grain mostly in the shadows, so if you have a shot where the only area that you really wanna impact is just the shadows, there's a preset for it. You have regular grain 100%, 25, and 50, and you have all these other grain presets like super fat grain, where it's, like, almost looks like a newspaper type of grain. You have tri X salt and pepper. All of these grains that basically were meant to mimic the type of grain that you would find in old stock films. So usually what I'll end up doing is doing grain at 100%. And if I zoom into this shot, you're gonna see that that's a lotta grain. Like, that's more grain than what you really would want. So again, you can customize this. So you can customize the amount of overall grain, so I can kinda bring that down to something that doesn't look as intense. I can take the shadows. So if I wanna control the amount of grain in the shadow areas, click on the shadow slider, go ahead and bring that down. And typically, I think on the custom presets that you get with the class, they have my preferred numbers for grain. We'll call it, like, the Miguel Quiles grain for the photo. So, but you can customize it to your own, you know, purposes. So midtones. Usually for a beauty shot, I'll tend to... I want the grain, but I don't want it to be too grainy, 'cause grain on skin sometimes looks kinda weird. So I'll usually take the grain down on the midtones, 'cause that's where the skin resides. And same thing with the shadows. If you have 11.9 grain on the midtones, you don't wanna have more grain in the highlights, 'cause that doesn't make any sense. So highlights should have even less grain than that. And now if we go here, here's the before and the after on the grain, and it's very, very, very subtle. You have to actually look... See if we can get in close. 'Cause I can see it on mine, but I'm curious if you guys can see it on this big TV. So if we do before and after, it's very, very, very, very subtle. Maybe I'll increase it a touch here. And you can actually change the roughness of the grain, as well. So it's kinda hard to tell. I don't know if you can see that on your screens. As you're working on this, you'll be able to see it on your own and you can kind of tweak this to your taste. But for me, that's, like, a pretty decent amount of grain right there to where it still looks really nice and it's a pleasing look. And so once I have that, usually the grain is the last thing that I'll add to the image, and then I'll go ahead and just hit Apply. And again, it's gonna create a brand new layer which basically is that adjustment with the grain that's been added. So any questions at this point? 'Cause I wanna show you guys how I do selective sharpening to an image. Um-hum? Do you usually do much with the eyes, like, the white of the eyes? Yeah, good question. So actually, that's a really, really good question, because I see people that will go to the eyes, for example, and I do adjust the eyes, but what I don't wanna do is I don't wanna get rid of every single red vein in the eye, because what'll end up happening, and I'll see if I can do it here on a blank layer relatively quickly, 'cause I'll show you what people tend to do, and it looks scary. So what people will do is they'll go ahead, and this is, again, on a blank layer, the same technique that I showed you to clean up blemishes on the skin is the same thing that I'm doing to clean up the whites of the eyes. So I'm using the healing brush tool, I'm sampling the white area, and I'm brushing over the veins in the eye. So what people tend to do is they'll get rid of every single vein that's in this white area, and in this case, it's actually... You'll see it when I back out. Close up it's kinda hard to tell. But what you don't wanna do is to whiten the white part of the eye, because they will start to look like lizard people. They'll look like reptilians. It looks really, really scary to basically take all of the white part of the eye and basically make it unnaturally white. So I tend to basically, like, do what I'm doing right now, where I'm just kinda cleaning up some of it, but there's still some kind of, like, red parts to the eye. If I back out here. There it's not so terrible. And that's before and after. But usually if I get rid of all of the veins in the eye, what I'll end up doing is, again, I go to the opacity and I basically just start to bring it back a tiny bit. 'Cause I don't wanna... Again, I'm trying not to make it look retouched. The whites of people's eyes, unless you're having a really stellar day, you typically got some red vein action going on in there. So that's one of the dead giveaways, if I'm ever looking at an image and I want to decipher whether or not it's been retouched or not, the really poor retouches that I've seen, those whites of the eyes get boosted. Like, they'll go and they'll make the eye, like, super white, and then they end up looking like lizard people. So just be very careful. You could use something like this and basically just dip the opacity, so that way it's before and after. And that way when you see the image from far away, you know, it's not gonna draw your attention that the eyes are just mega, mega white. So, very good question. I'm actually gonna keep that layer, 'cause I like that. That looks good.
Class Materials
Bonus Materials with Purchase
Bonus Materials with RSVP
Ratings and Reviews
a Creativelive Student
I want to commend you for hosting Miguel Quiles. He is beyond competent and knowledgeable. Light is Light, but It is encouraging to see incredible minority photographers on your platform and to see diversity in the presenters. It is inspirational for minorities to see themselves on the center stage. I sincerely thank you for that. I am buying this course although I am not a mirrorless shooter because of my support of Miguel and the quality of his instruction of which benefits all photographers. He is a great addition to the Creative Live Family of Presenters that I have supported as well. Kudos Creative Live!
Danae Khan Jones
Wow! As a Newb and someone looking to get into portrait/studio photography, this course was perfect and comprehensive. SO MUCH GOOD CONTENT. Miguel is so approachable about questions, positive, and thorough in his explanations. This course broke down the gear and technical side very well. I recommend going to a class live. It was a great experience with food and beautiful facilities. The facility has a positive vibe and really encouraged me to be creative. Thank you for the experience and knowledge!
Sharon
WOW!!! I LOVED THIS CLASS!!! I learned so much. He made lighting soooo simple, I finally understood. I liked the way he explained the why of his camera settings and how to overcome ambient light. he explained and made everything simple!!! I liked the way he talked about connecting with your clients. I am so happy I purchased this class. I finally understood lighting What a great teacher!! Thank you!!
Student Work
Related Classes
Portrait Photography