Culling Images in Capture One
Lesson 29 from: Powerful Portraits using Mirrorless CamerasMiguel Quiles
Culling Images in Capture One
Lesson 29 from: Powerful Portraits using Mirrorless CamerasMiguel Quiles
Lessons
Class Introduction
11:07 2What is a Mirrorless Camera?
06:30 3Mirrorless Camera Advantages
07:30 4Mirrorless Compatibility
13:12 5Live Shoot: Mirrorless vs. DSLR
07:56 6Live Shoot: A7R II, A6300 & A7ii
29:27 7Compare Mirrorless & DSLR Images
21:37 8Posing Techniques Overview
15:46Lens Choice for Mirrorless
10:59 10Savage Collapsable Backdrops Demo
11:36 11Client Portrait Shoot Overview
04:00 12Importance of Tethering While Shooting
12:40 13Lighting Set-up for Client Portrait Shoot
08:46 14Live Shoot: One-Light Client Portrait
11:58 15Live Shoot: Modifier Client Portrait
14:33 16Live Shoot: Side Lit Client Portrait
11:51 17Communication with Client
12:05 18Specific Portrait Techniques
03:43 19Fashion Beauty Shoot Overview
11:22 20Live Shoot: Beauty-Dish
23:09 21Live Shoot: Octabox
18:10 22Live Shoot: Umbrella
31:21 23One Light Set-Up for Male Portrait
07:33 24Live Shoot: One Light Male Portrait
15:50 25Live Shoot: Two Light Male Portrait
17:54 26Live Shoot: One Light with High-Speed Sync
16:29 27Live Shoot: Two Lights With High Speed Sync
17:39 28Retouching Workflow Overview
03:00 29Culling Images in Capture One
18:05 30Basic Alien Skin Exposure Workflow
17:57 31Image Editing in Alien Skin
12:56 32Add Grain to Images in Alien Skin
04:52 33Skin Retouching in Alien Skin
10:36 34Exporting Images in Alien Skin
06:42 35Cull Images in Capture One
22:51 36Skin Retouching in Photoshop
22:16 37Draw Hair in Photoshop
04:53 38Finish Skin in Photoshop
23:51 39Change Backdrop Color in Photoshop
11:14 40Alien Skin Exposure Overview
15:20 41Sharpen & Add Grain in Alien Skin
09:05 42Exporting Images for Clients
06:09 43Mobile Workflow with Mirrorless
15:51Lesson Info
Culling Images in Capture One
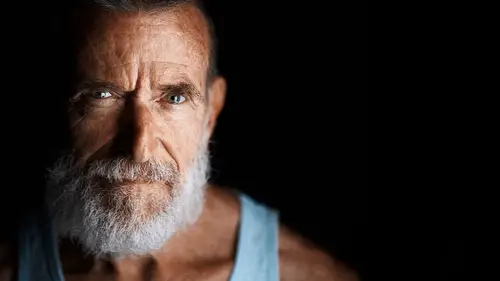
So, let's go to the beginning here, of the images that we shot, because this is usually where my culling process would begin. And typically what I'll do is I'll sit down and very quickly I will go through all of the images, so I'll basically tab, so I'm just hitting the arrow keys to go from one image to another, and I'll evaluate the picture for a brief moment and again, I'm trying to go for that 'scroll stopper' image. So if I look at the image and it doesn't capture me, then it's on to the next shot. So a lot of times what ends up happening is you'll end up with two or three or ten images that they all look very similar and they don't look very different from one another, so it makes it kind of difficult for you to figure out which one of these is going to be the one image that I put out. And I'll say this because one of the things that I had a hard time with, like my first creative life when I was the student, I had the issue where I would take a bunch of photographs and I couldn't...
tell which one was the great one, so I would spend my time retouching all of them. I'd have ten or fifteen of them where literally the one looks like this, and the second looks like that, third looks like this. And they all look good, but they all look very similar to one another and within those 15 there's probably that one shot where it best represents the other 15, it's the best version of that pose and expression and clothing and all that. And it took me a while to get basically get comfortable with the fact that I know which one it is to edit. Because I don't want to have to do shots. Although, using a program like this it's actually a little easier because I can make all the adjustments to one shot and if they're all done with the same exposure and color settings and all that I can actually just copy my changes from that one photo and apply it to all of the other photographs. So anyway, I digress, let us continue. So we're looking through these and I'm trying to find images where the expression looks good. And I'm not looking at it for focus because that's part of it where if go here up top to one-to-one, it actually will kind of zoom into the shot and I can go ahead and I can evaluate whether the eyes are in focus, but focus is something that I don't do at the first step in the retouching process. All I'm trying to do is to figure out is this even a shot that I should investigate further too look at it to see if it's any good. I'm actually going to go back to the beginning because I didn't know if any of these actually were good ones because I was talking. So I'm kind of looking at these and what I do is I give them a rating. So if you look down below, you have stars. What I'll end up doing is I'll give it a one-star, that's like my first initial pass over all of these images. I'll go ahead and any shots that catch my attention, I'll it a one-star type of rating. So looking at this, I'll give that a one-star. Go to the next one, and I do this every single time, and I apologize that this boring and monotonous, but it's like that for me when I'm at home too. I'll be looking through shots and I'm just like 'Uhh, okay." So I'll go through each of these shots, and any of them that I think might be a semi-interesting expression, I'll just go ahead and just tap the number one, and that will basically allow me, once I'm ready, and I go through every single one of these shots, it'll basically allow me to go back and only take a look at the images that I rated with a one-star rating. So, kind of going through all of these here, and again, what I'm trying to find are good expressions. Even though we were trying to go for a serious type of look, like a shot like this, I kind of like the smile and the warmth of this image, even though it's totally different than what I was really trying to capture, but it's a potential one, and so I'll rate that. Keep going, I don't know what that is...(laughs) or that... yeah, you know, it happens. And this is part of it, and you guys are actually getting to see the real process because I think there's this misunderstanding that every single frame you take as a professional is amazing and it's perfect, and truth be told, I have multiple hard drives full of images and the world has only seen maybe, maybe like one percent of the images that I've ever shot. And so this is something that's also kind of an eye-opener for a lot of people, because you think as a pro, especially when you look at all of your heroes that are out there, all the big famous photographers that are doing all these major campaigns and stuff, and you think every single one of their frames is, as my buddy Paul Girot says, he calls them "hot frames", you know, you think every shot is a "hot frame", and it's not a "hot frame'. There's a lot of them where they are duds. There are shots where it's, like I wouldn't necessarily call this shot a dud but it looks very forced, and it doesn't look natural, and it's kind of dud. But this happens, and it's all on that road to getting that one "hot frame" that one great shot. So we're working it, he's got deer-in-the-headlights, don't like it. Again, this is another shot, and I think I showed you guys this in capture one, but just to give you an example, in Alien Skin Exposure, you can take that exposure tab and you can raise that up as well, and you can bring back the detail in a shot that is severely underexposed. So, we're not going to do that for this one because we want images that are actually shot correctly, so not that one, now, hmm, okay I'm just going to hit one, one, one... A lot of these look similar right? I'm not looking at the focus because I can guarantee that out of those four there's probably only going to be a handful of them where they're sharp and completely in-focus. So, continuing to look through these, any of these shots where I know that I shot them at a wide open aperture, for example, you might be wondering why maybe you see this shot and you say, well, let's just pretend like you like the expression and it looks great, I know, because I'm shooting wide open, and I know because he had his head turned, I don't even need to evaluate the focus, I know that that shot is not going to be in focus, or if it is, one eye will be and the other isn't, so I just keep it moving. So a lot of these shots I basically wait until I get that exact expression where I know 100% it's in focus, so we'll rate that. And again, this is the, often times when I do this, like I'll shoot during the day, and I have a routine, so let's find the rest of the images from this session, so I'm just scrolling through the timeline below. I did some test shots with John earlier too, figured out Pete goes there. So, here we go, often times when I do my culling, which is this process of basically picking through all of the images that I shot, I typically do these late at night, so once I'm done for the day and it's ten, eleven o'clock at night, I'll basically sit down for an hour, an hour and a half and sit down with a nice glass of wine or whiskey, play some music, and just sit here and look through all of these images at my own leisure and my own pace because if you do it during the day and you have a lot of stuff to do, you'll start scan through this stuff real, real quickly and potentially you'll skip past images that are good shots. Continuing to scroll through these... And again, these are all raw files, so that's kind of an awesome thing. With a lot of other programs that are similar to this, you can't really do this with raw files, you have to basically use a .jpg file or a .tif file or a .png, this is real powerful because these are Sony raw files, and this works for Canon files, this works for Nikon files. For Sony it's kind of a big deal because even a program like Lightroom, for example, when I first went to Sony, I had Lightroom 4, and Lightroom 4 does not open Sony raw files at all. So it's probably another common question that, maybe if you guys are watching on the web, and you're still using Lightroom 4 because you have a DSLR, if you plan on coming over to the Sony side, just understand that if you have Lightroom 4 it's not going to work, so it's a perfect opportunity for you to pick up Alien Skin Exposure and basically be able to work with your files in the correct manner. So we'll keep going through these, I don't know what that was, and we'll do that... So going through each of these shots, we didn't shoot too many so it's not going to be as long as of process but obviously this could take a while. That's a good one. And it's funny because maybe it's like this for you guys who are watching here in the studio, or for the folks at home, but when you look at a bunch of these, sometimes the ones that are the really good ones, they really jump out. Like, sometimes you see it and you just want to stop right there and just be like, let me just go ahead and start retouching this because I already know this is going to be the one, but that's where I say do this late in the evening where you have the time, because I've times where I go through all of the images and then I say "Ooh, jeez, I thought that was really good one, but three files later, there was one that was even better". Maybe it was sharper, more in focus, more interesting, whatever the case might be. So, we went ahead and again we've selected our images, so I'm going to close this folders panel, and what I'm going to do is I'm going to go ahead basically filter the images that I rated with the one-star. And it's very easy because all you got to do is just click on one-star and it's only going to show you the images that you gave that one-star rating to. So now instead of looking at, there was 303 total images and I'm actually going to unstar these, because this was, last night I was kind of playing around with the software and I gave ratings to these, so if you accidentally gave a rating to an image, and you didn't mean to, you can just hit zero and that will take it out from the shots. So, really easily we went from 303 images, which sure as heck, I'm not delivering 303 images to the client, and we basically narrowed it down to, it looks like fifteen? Two, three, four, five, six, seven, eight, nine, ten, yep, so we've got 15 images. So now, I can go ahead and go through these fifteen and chose from these. So these are the ones that passed the first round of cuts, right? Now, I can look at these and I can go ahead and do further cuts. So if I want to take them out and bring them into the next stage of my process, now I can hit the number two on the keypad and give it two stars. Now, this is what I do with every single shot that I do. At this stage, this is where I will zoom into the image and I will check to make sure that they're in focus, because I don't want to bring a shot into the next stage and find out, "Ohh, it's out of focus". And then maybe there was one on the first star ratings that had better focus. So, this particular shot, it's okay, however, yeah... I don't know, we'll give that a two-star, that's not bad. So, let's go to the next one here. And again, if I hit one-to-one it'll zoom in very quickly. That is one that is nice and in-focus, and I like the expression, I like the look. I already know just after going through these, I knew as soon as I shot it. Sometimes you're actually shooting and you see the frame, and especially, again, I'm going to say it until I'm blue in the face but, when you're shooting with these mirrorless cameras you see that two-second exposure in the electronic viewfinder and so I see the shot and I already knew, "hot frame"! I technically could do the camera-drop if there was a pillow on the ground and just walk away and be done, but I still continue to keep shooting because maybe there's something else that I'm going to pull out of them. In this case, once again, I already knew that this was going to be the "hot frame", one of these in this particular series of shots, and so, it's really just a matter of trying to figure out which one of these is in focus. So like, this one is a good example where it is soft, and it's very soft on this side, so we are not going to use that, so I'm going to give that a zero. We go to the next one, this one is pretty sharp, we'll fit that onto our screen. That could be one, so I'll give that a two. Go to the next one, same thing. I'm trying to go for the variation of these images that basically has the best focus and the most detail and all that stuff because I don't want to spend all my time retouching an image that isn't crisp. So, go to these last ones, and these are cool, but you know, for the sake of this class I only want to work on the "hot frames". So let's look at these four, we've narrowed it down now from 303 to 15 to four, so here is where we're really going to have to look at this, because there's micro differences between each of these four shots. He moved just the slightest bit, so here I kind of like this frame better than this one. You might think otherwise, but you know, to each their own. So, I would say it's probably going to be between these, so I'm going to give this a three-star rating and give this one a three-star rating so I don't have to look at all of them. Now I'll click on three and I only have to choose between these two. Now part of the power of me doing this is that later on, let's say I deliver the one shot to the client and he comes back to me and says, "Hey Miguel, I did some smiling shots during our session, and do you think that you have one of those that maybe you could retouch for me?" Because, whenever they hire me to shoot their headshots, typically they just get the one shot, and if they want any additional images they pay to retouch each of those individual images. So they'll come back to me sometimes and say "Do you have another, like not this serious look, maybe a smiling look that you really like?" So, I can reopen this folder and go back into it and I can go back to the one-stars where I can look through those and say, "Okay, did I have any of them where maybe he was smiling and it was a pleasant shot? Okay, this was one." So, if that's one that I'm going to end up taking to retouch I give it a five-star rating. And so all of the five-star ratings are technically the images that are going to end up being images that I actually retouch. So, for example, we'll go ahead and we'll double-click here. So between these two images, basically we're looking in between these two shots, and this is where it gets a little bit harder because it's very, very similar and part of the whole process of capturing a powerful portrait is trying to figure out which is the good expression. Because this is one where the creative live Miguel of 2012, 2013 would have edited both of these photos and given him both and he would be like, "Okay, I've got two shots that look the same, he can't decide which one is the best so he gave me both." He might be thinking, "If he gave me two, there might be a third one, or a fourth one that maybe is better than these two." And then next thing you know you're going back to the drawing board to retouch another couple of images from that same series, so be decisive, this is very, very important to know as a photographer to be very decisive, just give them that one magic shot because anything above that is going to open you up to them having like a, "Well you're indecisive and you may have decided wrong, so let me see some more shots." And then you're in this position where you're retouching a bunch of images that you really don't need to. So, looking at these two, I kind of like the one, man, this is a tough one, but, I kind of like the one with the head down a little bit, because I feel like it's a little more engaging. Hmm. And this is why I do this late at night, by the way, because I'll literally sit here and just like, evaluate the image over and over, and before I actually go into the retouch part of it I always do this, I scan through the image, I try to make sure that anything that is important, if it's in focus. I think I'm just going to go ahead and go with this particular shot. So, alright, this is going to be our hero shot, we're going to hit the number five, so that again, whenever I go back into this program later on, I know any five-star images are the ones that I sent to be retouched, or that I got retouched here.
Class Materials
Bonus Materials with Purchase
Bonus Materials with RSVP
Ratings and Reviews
a Creativelive Student
I want to commend you for hosting Miguel Quiles. He is beyond competent and knowledgeable. Light is Light, but It is encouraging to see incredible minority photographers on your platform and to see diversity in the presenters. It is inspirational for minorities to see themselves on the center stage. I sincerely thank you for that. I am buying this course although I am not a mirrorless shooter because of my support of Miguel and the quality of his instruction of which benefits all photographers. He is a great addition to the Creative Live Family of Presenters that I have supported as well. Kudos Creative Live!
Danae Khan Jones
Wow! As a Newb and someone looking to get into portrait/studio photography, this course was perfect and comprehensive. SO MUCH GOOD CONTENT. Miguel is so approachable about questions, positive, and thorough in his explanations. This course broke down the gear and technical side very well. I recommend going to a class live. It was a great experience with food and beautiful facilities. The facility has a positive vibe and really encouraged me to be creative. Thank you for the experience and knowledge!
Sharon
WOW!!! I LOVED THIS CLASS!!! I learned so much. He made lighting soooo simple, I finally understood. I liked the way he explained the why of his camera settings and how to overcome ambient light. he explained and made everything simple!!! I liked the way he talked about connecting with your clients. I am so happy I purchased this class. I finally understood lighting What a great teacher!! Thank you!!
Student Work
Related Classes
Portrait Photography