Lesson Info
7. How To Do Local Color Correction
Lessons
Lesson Info
How To Do Local Color Correction
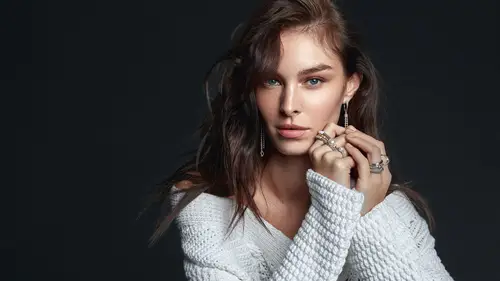
in the colors. What I do, I break down local and global global is basically I rarely use it global would be Let's bring like a cuffs just because we're in calves. Let's go into the rational and I'm just going to do that. So that's a global because everything is I know that with Georgian, Bernie was not that global, but with colors. My logic is that so We are not touching that right now. What we are doing right now is that we are looking at the face and trying to identify areas that need to be different in terms of color or saturation. And we are going to fix that or at least try to fix that with curves. And that's what you need to do. I really like the idea of thinking about these things rather than the techniques. I knew that many people prefer those tricks because they are like when they look good, they are flashy, but you really want to do a good job. Just just try Teoh, stay on the path of actually doing the leg work of thinking about this and putting in the practice. So now what I...
'm trying to notice. Here are are areas that are de saturated, oversaturated, different colored and stuff like that. What I can immediately see is that the neck is a bit, you know, oversaturated what I can. I can fix that very, very easily. The same thing grabbing the less it'll a free hand less it'll with a high feather. So it's not going to show up. You don't have to be that precise. What I do, I just I just, you know, like circle like problematic area again and creating a new cars layer. Now I could do this with a hue and saturation there. I could do this with so many other things, but let's go into, you know, let's set it to saturation because we're going to set saturation on the you can see like I can influence. I'm going to see him in just to show you about just from closer. This is the air I want to do, saturate just slightly. If I just drag it down, it's It's getting de centering right. If I drag it up, it's going. Teoh look a bit different because I'm using curves for saturation. And since curves work like highlights, Armento and shadows, darks, blacks, whatever it's affecting. So essentially you can do D saturation saturation on your image, using curves by having like different types of situations all over the image. So I could pull this down and then put this up and that would create. We're just on the second you see so somewhere we stayed like the same saturation. Other other places are like, you know, more saturated, which is like, I think it's a very nice adjustment because with, you know, human situation, you have to create, like a university mask or anything like that. Teoh work this way. So I just turned that down. I know it's it's again, not too visible, but just train your eyes and you are going to see this. The other thing that you could do is like, since it's saturated like it has too much like reds, you can just get away, get some reds out of the image. So again, just getting like the curves. And if you go back to go into the breads, I can just take away some of that and you can see immediately. It's almost like D saturation, because if I go too far it's not the situation, but if it's just a minute, it's just a very tiny bit. It's just like the same effect. So that's just how it works. So what I would say is that for this image, what else we could do when I what I usually do once we have the colors down, which is kind of we have. But we also don't we could just maybe do you like a selective color range and used like curves to color the whole image without the skin tones. You know, like you know, there's effects you have, like cinematic Qala, grading your facts or whatever is almost the same. But no s cheap as those are mean the blood buses, they do it right, but they work like 200,000 hours on this. What you do is just still you get up into color range and, as you can see, because most of the times I do the same thing, I'm just going to select with one fuzz nest and 100% range holding down my shift key. You can see that on the black and white stuff that it's it's grabbing more and more. I'm just trying to grab everything that's like, you know, skin tone or very similar to that, so that I have that also the hair Oh, no, it's too much. And if it's too much, I just go back and I just with the shift, I want the lips, too. You don't have to be very precise into to mask and you can go back. But let's say that we have this right now. I'm just going to hit, okay and we are going to have, like, a selection. So once again, with curves, what I can do create another cup. I have the mask here And if you don't believe me, here is the mosque and I would say like, Oh, this is to power from looking which is not, but kind of so what I can do is like, Well, let's give it more scion, Andi. That's why you go into these channels. So since this is more like an introduction to curves class, getting into the channels would take, like, at least a day, I guess. But this is, you know, the basics of it. We have read here and we have so I on the other side. So If I want to put more scion into this, I'm going Teoh dragging down. I have green, but I have once again green, magenta and green. So you have. You just have to learn these past. This is not rocket science. You don't have to know it, just drag it and you know, blue and yellow. That's it. It's like a very fast run through. And then what? You can dio. Since I have selected the skin, I can just go like command I to have the rest and then just grab it and make it like anymore Scion. And I think it's just getting to look more like what I do with most of my photos because many photographers who are like very good photographers, they think about styling and they think about what it would look like in terms of color. So they used, like certain Collett palates which, like work with skin tone, which is like orange is going to go well with with blue. But that's just like a basic thing. So now that we have that, this is how you do that with curves. Unfortunately, it's a bit jagged, but we can fix that. Yeah, by just going into Gaussian Blur and just not probably not 250 for like, I would say, like, 15 maybe. Yeah, something like that. And they're just going back on. You know, these are very tiny changes, but the important thing is that the whole thing changed so much because look at this. What you notice here is is like the shirt and you noticed, like, Okay, this is just a very General Kimmitt. What we did with the whole thing is like we brought it all together. We have a darker shirt. So you are your eye ghost, The face which is important, very, very important in this image. And also when your eye goes to the face, it's not going to stay there thinking about OK, it's too light because we fixed that with the help of cuts. And that's what I said. When you see anything like on those Internet circulating stuff, let's say like this is Oh, it's not showing up. Just wait a second hip like, Okay, last 10 here. That's the same thing, and you can apply it. So just if you go on Internet online and you try to experiment with these things. Look for these things. You could just see the same. Okay, this is just minus 10 again. And then you can do this before you do what I just showed you with curves. You can go in and do this to your image, and then you have the reminder of what to do. Basically, as I said, the problem here is that many people use other tools. You can do many things and curves. We just did, like color correcting. We've done like visual aid layers. We created perceptual black and white images which are, you know, actual working black and white images. We created like a you know, a unified equalized face skin tone. I think that's that's the gist of it. Like we saw. I hope some problems here. We're going to solve mawr later. Victor, do me a favor. Could you Could you merge all your layers together and have shows a little bit of a before and after? Yeah, I don't even have to Do you want me to marriage? It'll just do a before and after you before it after just so we can kind of take it. Let me just do it like this. Oh, yeah. There you may be just a second folk. Yeah. How about this? Great. So if you look at this, I think it's just more pleasing image. You can do many things with this. This is just the basics of how I start.
Ratings and Reviews
JIll C.
Viktor describes his method of organizing his Photoshop Layers for all the typical edits that he will apply to an edited portrait. He also clearly demonstrates the power of Curves Layers to make tiny, but useful edits to an image. This is definitely a class I will have to watch over and over to be able to take in all the subtleties of his process. On the sample image, each of the individual edits are hardly noticeable, but the cumulative effect is a dramatic improvement in what appeared to be a very good image to begin with. Mostly what I learned about high-end Retouching is that I have a lot to learn!
Mitch
Loved the class. Viktor teaches the why behind retouching techniques and encourages students to think about the image before applying techniques. One of the best online classes I've taken in a while.