Lesson Info
5. Channel Pulling For Color Correction
Lessons
Class Introduction
08:32 2Hue Saturation For Color Correction
12:35 3Gradient Map Color Correction
10:19 4Camera Raw For Color Correction
04:22 5Channel Pulling For Color Correction
12:08 6Painting & Rendering Fabric Effects
20:02 7Adding & Removing Detail
03:47 8Frequency Separation
08:44Lesson Info
Channel Pulling For Color Correction
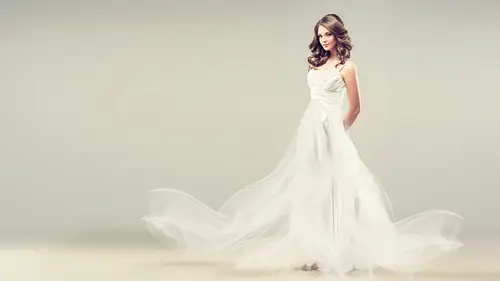
So now we're gonna move into channel pulling, my favorite, channel pulling. I'm gonna really ask you to bear with me in this process, it's worth the information, I know this can get a little challenging, but it'd be well worth the ride, I promise you. Real Life Job, I'm sure many of you've seen this show, it was on for ten years and what happens on network television shows, when you have stars, you have ten minutes. You get ten minutes with them, you get very quick shoots, turn around times are horrendous. Comps are made, decisions are made, she looks fantastic here's the dress they want it enhanced and then in two seconds later they said you know what we want a black dress maybe, we don't know. Did I mention there's a cast of five, by the way? And, what about a white dress? I don't know, hey can you give us a red dress? And this has to be done so quickly, this is a full on production kind of job so that arsenal I just gave you, I'd like you to keep in mind for this kind of job, howeve...
r, how are you gonna make a light dress a black dress? I'm gonna show you, okay, and we're gonna do it through channel pulling. But, I fully believe in practicality. I want you to understand why you're doing the things that I'm showing you and it's cause you have an assignment. Most of you guys when you're working it's not you're free forming and I feel like doing some artwork. Someone's paying you and they have a demand and you need to do it. I'm trying to give you some context so you remember the process. That's why I show you this stuff. So you can feel my pain a little bit. Just a little bit, alright so channel pulling and I've discussed this before. This file's a little big, I actually cleaned one up before, I'm sorry I'm gonna clean this up really quickly because this is mean. I'm just gonna merge all that down so you don't have to see any of that, we're gonna call that re-touch, forget you saw the gal behind. Alright, channel pulling, what the heck am I talking about? I'm talking about stored selections inside photoshop that are in the channels palette and what that means is these channels that make up the red and cyan, green and magenta, blue and yellow, are actually stored selections so you can use that to create another look. So, let's look at this first assignment and the first one I wanna do is white. So here's what we're gonna do. I wanna make her dress white so if I wanna make her dress white, I wanna look at the channels. These are the channels for this exact image. This is the red channel, this is the green channel, this is the blue channel. Well, which one's closer to white? The red channel, you feel me? So, what I'm gonna do is I'm gonna copy the red channel. Grab it by it's name, drag it down to the new channel icon and you'll see because I like to practice my demos, I've already copied one. You can just leave it there, you can do whatever you want with it, label it or not, sometimes you might wanna look at that and say, yeah that's a nice white dress, but I think I want some darker shadows on it, so Lisa says do some levels so I'm gonna do a levels move, Command L and I'm just gonna darken the three quarter tones and the shadows. Really dark, just slightly dark, you all with me? Awesome, now on that copy I would call that red adjusted and now I'm gonna do a Command A to select all, Command A or Control A, Command C to copy it and I'm gonna go back to my layers. This is the most important critical spot, this is where most people are gonna screw up. Please copy the channel, then click back on your layers, make sure you're on the RGB, red layers and Command V or Control V, paste. There's your red copy, now I've talked about this in other classes, there's some front end work, which is masking her out. This is not a masking class, this is gonna take some time. It took me a little while to make, ten minutes? I'm not gonna spend ten minutes doing now, I cut a mask in ten minutes, there are masking courses on Creative Live that'll help you, gonna throw that away. Please label your layers, red channel adjusted. Do you see my marching ants? You're happy, they're happy. There's her white dress, well that took two minutes, there's front end work, I had to path her out. Now, I'm gonna tell you for this job, I had to path her out anyway. There's other classes where I've done where I path out products even though it doesn't seem like you need to path it out, mask in the beginning, I'm telling you, cut yourself some slack, you're gonna need it. So, there's a white dress, well that was 30 seconds. Channel pull, no messing or, I had to edit my words there. No messing around with curves and trying to get levels and trying to pull it all the way back or all the way up and losing detail, it's a channel pull, it's already built in. I'm gonna move on to the next color, you guys okay? Well why don't I open the same file? Alright, black, black's a different story, I'm gonna go back to the keynote for just a second. Okay, white, red channel, copy the channel, paste it in layers, Bob's your uncle. Green channel, so same conversation only we're not using the red channel this time, we're gonna use the green channel. And do you realize the crazy thing about this? Do you remember I said channel's your stored selections? I'm not using this as a selection, I'm using the channel as a layer. Okay, so what you're gonna do if you come back to my screen for a second here, is and I apologize it's got all my copies, cause I like to, actually I'm not sorry, sorry not so sorry. This is me working it out, this is me pulling a green channel, maybe doing a levels move, this is me doing another levels move, this is me practicing, this is how your files should look, however, when you're done, when you're done, you know what delete these, because if I have to pass this file to somebody else, they're gonna be like well jeez which one did you use? So when you're done, delete it, but while you're working on it go ahead and have all your copies, cool? So just for giggles and being good production gal, I'm gonna go ahead and throw those away. So you don't know which channel to use? That's okay, I never do either that's why you just go look. There's the blue channel, there's the green channel, and there's the red channel. Now, someone in this room should have the question, why didn't you use the blue channel? Someone had it, I really appreciate this. Can I actually tell you that this was done in the ancient days when there were horse and buggies and there was film? This was actually shot on film. I'm showing my age so what happens with film is all the grain's in the blue channel. The artifacting, now with digital, do you guys notice that in, if you're channel pullers, you will notice that the blue channel actually takes some of the hit for the texture and what not? So, out of good production habits and I can't help myself and I'm old, if it's close, if it is close, I always pick the green channel. Make a copy of it and I'm gonna do something a little different here so don't let me lose you, I'm gonna Command A, Control A, copy, copy, go back to my layers, make sure I'm on my layers, Command V, ah I didn't save the mask, I'm gonna go backwards for a second gang. Did I mention I didn't wanna re-mask her out? Yes, so I wanna save that real quickly. Alright, green channel, we're happy. Command A, Control A, copy, go back to your layers. Command V to paste because you're smart and you held on to that mask, there she is. I didn't say a gray dress, did I? No, I said a black dress, easy-peasy lemon-squeezy. Your hand is up, it goes down on the option key, you go to levels, cause Lisa says levels and she says label your darn layers, please. You can tell I'm on a mission, right? I get a toaster for everybody who labels their layers, it comes in the mail so it's kinda my goal and what I just wanna do is darken it up. Well jeez, why didn't you just pick the blue channel? Why didn't you do this on the channel? I work in an environment where I have to be flexible and have you ever printed out something and went, oh my goodness all my shadows are blacked up? So, I would rather, because I know this. I know blacks bust up, especially on an Epson, it can get really funky chicken. I love Epson, but so that's why I'm doing it this way. Coolio, awesome, I'm gonna move on. And in fact, I'm way gonna move on. I think that's almost done, I'm just gonna go back to the keynote and show you one other thing. I'm not gonna do the red dress, cause we did the colorized thing, so I think you all have got that down. Okay, what in heaven's name is all this? Did I mention some bonus material? Why yes I did, here's the idea. When you have RGB channels, you saw the red, you saw the green, you saw the blue. You have a certain amount of choice. If you load the luminosity actions that I give you, well my heavens look what you have. You have highlights, brighter highlights, brightest highlights, shadows, darker shadows, deepest shadows, mid-tones, all these come at a click of a button. All these come at a click of a button and heck-fire I'm just gonna do it on this one. With the bonus material, you get this. You go to your actions, which are up, I just need to find them, hello my beauties, they're hiding, alright, oh hello, bonjour. Luminance mask, I'm gonna delete my channels I have, and just for clarity, I'm gonna go ahead and flatten this down. Click on the action called, oh, alright, let's go to dinner, there you go you're done, click on an action and I use these a lot. I will tell you in all honesty, on a job after I've done a luminosity mask because it is a button, I throw these away. I don't wanna have 75 layers channels, I just don't because you'll be scrolling and it gets very confusing. Use what you need, get rid of it, cool? What do you do with the luminosity mask? Okay, I do 110 things with luminosity mask. In this particular context, all I do with luminosity mask is just like a red channel or green channel I select all, I copy it and I paste it. So let's talk about this, we took the red channel for the white, right? We took the green channel for the black. If you run a luminosity mask, you might actually get a better tone and not, I don't even think it was two seconds was it, it just popped up, so for this context only I actually use luminosity mask just to make another dress color, just to colorize it. Can I really blow your mind? You use the channels, red, green, or blue, luminosity, you make your dress neutral, then you go put a gradient map on top of that later, just cause it's easier. Have you guys noticed if you have something that's colorized and colored and then you put another color on it, you've got the undertone and the overtone, and you get a little confused? Sometimes the key to retouching is make everything neutral and start over and that's often what I'll do also.
Class Materials
Bonus Materials with Purchase
Ratings and Reviews
Sean
Photoshop Lisa is the best teacher. She makes learning Photoshop fun. Great course. Lisa has a great teaching style. She mixes in a great speech cadence, great voice up and down and pausing, jokes, and is extremely knowledgeable and fun to watch. Awesome course. Learned that skills can apply to other projects, not just clothes. More tools for the toolbox.
Amy Vaughn
Fabric retouching presents some unique challenges and I appreciate finally getting a class devoted to it. The explanation about how to change from dark to light (or vice versa) was my favorite thing I learned from the class, and I appreciate the out of the box techniques like using frequency separation (it isn't just for faces!) and painting fabrics. The slides were outstanding, well organized and I appreciate how we get them all as downloads with the class for very fast visual reference when we're trying to remember how to do something from the class later.
Charlotte Madsen
Love this class! Lisa is so energetic in her way of presenting her knowledge and she has an amazing way of making complicated stuff sound simple and affordable. I find this class very motivating and can't wait to get started. Oh, and she has a great sense of humor as well!