Live Edit 2: Luminosity Masks, Channels and Curves
Lesson 3 from: Retouching for Interior Architectural PhotographyMike Kelley
Live Edit 2: Luminosity Masks, Channels and Curves
Lesson 3 from: Retouching for Interior Architectural PhotographyMike Kelley
Lesson Info
3. Live Edit 2: Luminosity Masks, Channels and Curves
Lessons
Lesson Info
Live Edit 2: Luminosity Masks, Channels and Curves
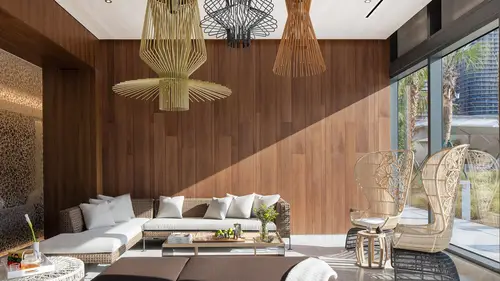
The next image that we're going to do, is a similar style of a shot, we have a long room with the window down on one end, but how do you do this if you don't have a flash, or you don't wanna use a flash, or you're maybe not comfortable yet using the flash and blending it together? Well this isn't any less complicated, but it's a different way of getting to a similar result. I personally enjoy using the flash, it's a very quick sort of repeatable method where I know what I'm going to get, but in this image I'm gonna show you how I use luminosity masking to sort of conquer the same kind of problems, so it's gonna be a similar outcome with a different approach. You just asked about luminosity masking, so in this particular case I will use luminosity mask and the pen tool, and all the different things to get to our final result. So in this situation we have a, I think this is a pretty cool room, dark woods, very bright exterior, this is again, one 200th, F11, whatever, and the interior is ...
half a second. Blown out window curtains, totally blown out patio furniture, we've got again, you mentioned, is there yellow, it's not yellow paint, but we have this yellow wood which is adding this kind of iffy color cast to the entire scene, we're gonna clean that up, we're gonna use luminosity masking to do so. So what I'm gonna do is I'm gonna take five bracketed exposures, I'm gonna make sure that these are all natural and totally reset to their sort of virgin, untouched state if you will. And I'm just gonna open this entire bracketed sequence, again this is what the camera thinks the proper exposure is, all the way up to two or three steps, two or three stops overexposed, and two or three stops underexposed. So this is the same thing but with no flash. I'm gonna right click, edit in, open as layers in Photoshop. Alright, so I'm gonna hit F and go into full screen here, And just like the last lesson, I'm gonna show you guys, if I wasn't going to use this sort of more complicated luminosity masking technique, it's kind of a mouth full, I'll start with my middle exposure here, and this is just quick and dirty to show you how we're gonna get to our final result. I could start using a brush to sort of paint in that really hot exterior. So I'll add a layer mask, take my brush. I can zoom in here, and I can try to start painting in that exterior, but what happens is immediately I get that burned sort of look on the top of the windows. I'm gonna have to start another one here, let's see, I'm gonna have to take my brush over here, and brush in each object sort of individually. Come back here, and start brushing in the for, and it just kinda looks a little fake, right? And it looks like there's fire damage in the ceiling, right? Like around the window it looks a little weird. So we're gonna do this the proper way. And it seems complicated but once you kinda wrap your head around it, it's pretty simple. I'm gonna arrange everything, let's say from bright to dark here, I'll call this, wow, darkest, sorry these are outta order. (clicking and typing) And these are just again, a way for me to keep track of everything as I edit. So this is mid dark, darkest, okay. So I have all my ducks in a row here, everything's named. The problems that I see immediately, we have this insane exterior, we have lost pretty much all detail in the curtains, and we have some pretty wild color casts going on. So I'm gonna start by creating a mask instead of using a soft brush to sort of blend everything together, I'm gonna use something called a luminosity mask, and a luminosity mask is basically a mask that is built on the brightness of the scene. I'm gonna, essentially break this image down into a black and white image, and using that black and white, obviously the white is brighter the black is darker, I will make my mask out of the luminosity of each part of the image instead of just going in by hand and doing it piece by piece. So in order to do that, I need to first identify where I wanna go. So what I wanna do here is I like the brightness of this interior. Obviously I wanna sort of tame this exterior, so I think what I'll need to do is bring in some of that darker exterior one little bit at a time. I think if I start with my middle bright exposure here, let's see, yeah, let's start with that. Everything that's blown out here, I want more detail in. So I'm gonna go over to the channels panel, channel panel, in my layers pallet, and I'm going to click through each channel, and there's a red channel, there's a green channel, there's a blue channel, and you can see that these sort of black and white versions of the color information in the picture, I can take these and extract the mask, where as instead of painting more mask, black will hide what's underneath it and white will reveal. So these brighter parts will be revealed, and if I put that on top of a darker frame, this bright mask, it's kind of counterintuitive, will reveal the darker frame below. So I'm essentially using my brush, or making a brush out of this scene, instead of going in with the brush and actually doing it by hand. So the way I'm gonna do that is I'm going to command click on this blue channel, and for every image it's different. Sometimes your red channel's gonna work perfectly, 'cause it's very high contrast. Sometimes your green channel, sometimes you can use the entire RGB thing, you really got experiment with this. It's taken my kinda years to see and get to this point, which is why sometimes it's easier to just go in with the flash and do it that way. (laughing) But I get tons of questions, how do you make your pictures feel so natural, and how do you use luminosity masking? I'm going to activate the marching ant selection lines, using my blue channel. And what Photoshop is doing, is it's basically seeing the brights and the darks, and making the mask based around how bright and how dark the scene is. What I'll then do is I'll click on this save selection as a channel button, and I'm gonna activate that and I'll turn the eyeball off of my blue channel, I'm gonna hit command D to deselect the marching ants. So essentially what I've done is here's my original image, here's my mask based on the luminosity values, hence luminosity masking of that particular image. So what I'm gonna do is I wanna make this a little bit more black and white. I want my whites to be white so that they reveal the darks below, and my blacks to be black so that they keep that bright sort of interior towards the camera, right? So, where there's white I wanna see something darker, where there's black, I wanna leave it alone. I'm going to hit command M. This is going to add a color adjustment to my luminosity mask. And I can move this out of the way, and I'm going to make the darks darker. Again, those will be hidden, and the brights brighter. This will be what is revealed, right? And I'm just gonna do this until I think I've got it where I want it, and again I want all of that bright exterior to be revealed via another frame and I want that dark black interior to sort of be left alone. That's looking pretty good, I'm gonna click okay. Here's my original mask, here's the one that I've made, which is a bit more contrasty, you can kinda see where I'm going with this I hope, right? I'm gonna hit command and then click to again activate that selection. Gonna turn all of my channels back on. Gonna go back to the layers pallet. Here is my, let's see, yeah, my middle bright frame. I'm gonna hit command D, hide that selection for now, and I'm going to alt click the add a layer mask to bring up a black layer mask on my middle bright exposure. I'm now going to hit shift command D, to reselect the mask I made in the channels pallet, if you've lost it or forget it, you can always go back and command click again on that alpha one mask, it'll activate it, it'll bring it back. So now that I have this selection, right? Instead of using the pen tool to make this sort of lasso, I essentially can start paining in that less bright exterior. So I'm gonna go here with my white brush, my selection will keep that mask constrained within those lines, I'm gonna hit command H to hide it. I'll zoom in, keep in mind the selection is still active, I'm just hiding it so I can see my work a little bit better, and with a big soft brush, I'm gonna start painting in that less bright scene, right? And immediately I start to get detail back, but I'm not really creating a fire damaged scene, right? We're bringing back in detail, it looks very natural, right? It doesn't feel like it's insanely overcooked or anything, 'cause everything is again constrained within that black and white mask. I think I went a little too far up there. Alright, so that's one step, we've gotten one step closer, right? I need to keep doing it and get progressively darker and darker and darker. The next thing I wanna do is I'm gonna come in D to D select get rid of that selection I made previously, I'm gonna go to the, let's see, the mid brightness frame, and I think I'm gonna do the same thing. Turn that on, go to my channels pallet, find a nice contrasty channel here, in this case again I think blue is perfect. Going to duplicate that, it'll be named blue copy. Command M to add curves, right? This time there's even less white, because I'm revealing a progressively brighter and brighter part of the scene. And I'm just building this layer by layer. Adding some brightness so that that is revealed, and shows my slightly darker frame. Hit okay. Add a black layer mask to my mid frame, go back, reselect that second mask, layers, command H to hide, select my brush B, start painting in that brighter exterior. Again, all that I'm doing is sort of chiseling out, progressively darker frames to reveal a more natural exterior. I don't need to go all the way with it, it can start to look a little muddy if you go too far. So you don't have to go and get every bit, just what you think is really hot and needs it. Alright, so something going on here, like this looks a little funky. In the flowers looks really muddy, right? So I think what I can do is sort of ease off some of that previous mask. And bring back some of that nice natural contrast. You've got 15 minutes. Perfect. So again, I'm just kind of improvising and eyeballing. Lastly I wanna get that really hot couch out there, so I think what I'm gonna do is just take this darkest layer I don't wanna make it look too dark out there, the interior should always obviously be brighter than the, sorry the exterior needs to be brighter than the interior, so what I'm gonna do is turn my eyeball on, go to my channels, pull out a channel with some nice contrast, so I select only that white couch. Duplicate it, and draw M, add curves. Bring those darks down, those brights up, so what I'm doing now is only making a selection of that couch. Layers, add a black layer mask, command click, and I'll go in, I'm gonna hide my marching ants selection, and again, start revealing, painting in the brightest part of that couch. And nothing else is really effected. I've got some on the door, I can paint that out, but can you imagine trying to pen tool around all these chairs to make it feel natural? Now, let me see how that's lookin'. Better to see it on a big screen then this tiny laptop up here. We're gettin' there, we're lookin' pretty good, okay. Just like I did in the last shot, and like I went on my spiel in the PowerPoint, sometimes it helps to group everything together so it doesn't feel so post processed, I'm just gonna bring the opacity down of all those layers, to something that it feels like it's more fluidly blended together, right? Let's see how that looks. That feels a bit more natural then the heavy handed luminosity mask, and if I turn that on and off you can see, right? It's very subtle, but I've just brought back some detail in the curtains, in the exterior, and I think pen tooling all that would be crazy. So I'm gonna deselect, I'm gonna go one step further, where I don't think I need it I'm gonna add a mask on to that entire group, with 30% opacity. I'll just sort of start painting out where I think I went too far. I like those curtains being bright, but I don't want them blown out. There's a very fine line to walk there. And I think we've got a pretty natural looking interior here. Now my next step is to color correct this, and like I said, we have a lot of light hitting a wooden, all that building cabinetry there, the TV hutch, so I need to suck out some of those yellows, and make the furniture look a bit more natural. Now one quick and easy way to do this is to add a curves adjustment layer, and we can use curves not only to change brightness and contrast, but to correct color as well, and this is a quick way, we'll see what we can do, this is one of my sort of go to color correction methods when I'm only using natural light and I can't rely on flash to clean things up. So these three eyedroppers here, white point, gray point, black point, it will automatically calculate what moves are required to make the white points white, and the blacks black and the grays a nice solid gray. So something that I think should be white, these curtains, right? They're pretty much pure white, and there's sunlight hitting them. Something that's a solid gray would be the ceiling, maybe it's a little warm, but it should be grayish. Let's find a good, maybe not the ceiling, how about like, this piece of, yeah, there we go. And then we need a black, which is going to be down here, that's probably the darkest part of the frame, like the shadows of this wood or the couch. And we can select that. Now, you can see these curves move, it's a little wild, right? It's a little overdone, but if I turn it on and off, you can see it really kinda cleans up some of the yellows, but it goes a little too far, so I'm gonna set the opacity here to like, maybe 50%. And I'm gonna change the blend mode to color, 'cause I don't really want it effecting luminosity, or the brightness and darkness, just the color. I don't know how that looks, let's see. It's a very subtle move to get rid of those yellows, but I think we're in the ballpark, and you can see that it's kind of, it's sucked out a lot of the reds from the wood, some of the blues and some of the greens, probably from that exterior, but I think we're getting there. The wood looks a bit more natural to me. The last thing I will do here is probably get a little more specific with my yellows and reds, this seems a little bit bright to me, so I'll bring them down just a bit. Yeah, and that feels pretty good. And lastly, I'm going to add a little bit of contrast, 'cause we're not using light, we gotta add something to add some contrast to this scene. So again, I'm just gonna cycle through my presets here, see how linear contrast looks, adds a bit of snap, there's still detail in our darkest shadows, and it looks like we have details in the brightest brights of the image. This is still a little blown out, I'm okay with that because it is so so bright out there, and it might look a little fake if I brought it all the way back. So I can hide everything, let's make a group here. All of our edits. And move this out of the way. And as you can see, instead of having to go in and pen tool, it's a bit of work, but it looks like a very natural window pull if you will, it's about one to two stops brighter than the interior, which feels pretty natural. We didn't have to deal with going in and pen tooling all of this stuff, I feel like if I wasn't narrating that, I could have done it a lot quicker. But once you begin to kind of see how you can use the luminosity of the image to make a mask, these things will blend together quite seamlessly. So let's see, I think, yeah, I think I'm pretty happy with that. It's tough to tell on this tiny little screen, but if I zoom in here there's no real like, grays or misaligned bits, the flowers look well masked, the exterior looks pretty good, I would say on the whole I'm pretty happy with that, I might pull out a little more yellows to taste, but that would be how I use luminosity masking to sort of bring in the exterior for an interior image without using flash. It's a little more complicated, a little more work, but if you don't have a flash that's one way to do it.
Ratings and Reviews
a Creativelive Student
Amazing class. Mike is a great artist - I've been following him for sometime already and he has a great eye not only for architectural photography but for all depth geometrical image capture. His commercial airplane posters are a delight.
Molly B
A MUST -- If you shoot interiors. I loved this class. I have been dabbling in some non-serious real estate shoots for some time now and have been asked to shoot some more professional spaces. While I have gotten away with "winging it" for some time now, I knew I was missing an entire block of information when it came to certain shooting and editing methods. I loved how short this series was too and did not even need a live shoot (taking up more class time) to get the concepts down. The only thing missing is that I would like to know what lens would be best for most interiors. Some wide lenses have distortion, etc. So this would be my ONLY question. Mike is easy to listen to, entertaining without trying too hard, doesn't deviate on random stories that have nothing to do with the class hah (as some instructors do). I am going to go dig up other classes by him. Thanks for such a well put together class.
a Creativelive Student
Great class... and just to be a smartass: The Quote is from Antoine de Saint-Exupery and goes like this: Perfection is achieved, not when there is nothing more to add, but when there is nothing left to take away...
Student Work
Related Classes
Architectural & Real Estate Photography