Combining Multiple Exposures for Accurate Product Representation
Lesson 1 from: Retouching Product PhotographyAaron Nace
Combining Multiple Exposures for Accurate Product Representation
Lesson 1 from: Retouching Product PhotographyAaron Nace
Lesson Info
1. Combining Multiple Exposures for Accurate Product Representation
Lessons
Lesson Info
Combining Multiple Exposures for Accurate Product Representation
All right. Welcome, Teoh. How to retouch product photography? I'm really excited about this class because product photography is one of those things we don't think about. Retouching is so many times thought about, you know, the face and removing pimples and fixing hair and things like that. And product photography is actually goes hand in hand with retouching and all of the product photographers that I know professional product photographers. They plan out the retouching, they plan out the compositing, they plan out everything that's gonna be happening in photo shop well, before the day of the actual photo shoot because they've become so integrated. Retouching is such a part of product photography, and that's why I wanted to teach it today. So we're gonna be going over a couple of different examples. Let's go through a keynote and then we're actually gonna be bringing up a couple of different image where, and we're gonna be tackling drop shadows that we're gonna be making from scratch.
And so many people have asked, How do I make a drop shot from scratch? They never look really. Shadows always look fake. When you do women photo shop, we're gonna show you guys how to make those look really? All right. So our product photographer, your main goal is to make products look as good as possible. So you're gonna be taking a lot of steps during the photo shoot to make sure that these actually that you like your image in the best possible way and a lot of the time that means using multiple photos, the light, your image and then combining those together later in photo shop. And we talked great length or taken during the shoot to eliminate distractions and toe light products to show their best. But even under the best conditions, product photos were gonna contain flaws, and they need to be fixed in photo shop. It's becoming intent, integral part of photography. And, uh, it's under consideration before the soup begins. I love when I type something that doesn't sound anywhere near natural. When you say it out loud like Okay, good. I'm glad I type that. So, yeah, most product photography actually shoot a lot of different versions of the same product because with product photography, very little moves, right? Your whatever your photograph. Let's they were photographing this cup. The camera's going to stay in the same place. The cup is going to stay in the same place. So if you change your lighting during the shoot you could combine those images after the fact. So that's the general idea. Most product photographers wind up taking many different photos of the same object, just lighting it a little bit different. And for instance, if you're gonna be photographing like a beer bottle or something like that, most people will photograph the bottle one way and then photographed. The label was slightly different lighting. Maybe they'll throw a reflector in so you can get detail on both and then they composite them together in a photo shop. Okay, so in this class, I'm gonna show you guys how to combine multiple exposures to create the best possible representation of a product. We're gonna show you how to create a realistic shadow in Photoshopped from scratch, and we're gonna show you how toe retouch product photos, eliminating flaws and enhancing details, and we're gonna show you color correct as well. So I'm excited. We're gonna go. We're gonna get into it. I am not a product photographer. I've done retouching for many high end product photographer clients, so I work primarily as a re toucher. So I know what they want. But I don't actually photographed products for a living. So the images that we're working on today are brought to you by two friends of mine who both happened. Be amazing photographers Ross Floyd and Tony Roslyn. And we're going to start off with Ross Floyd. He is a Here we go. We've actually got two images that we're going to be combining together here. So let's go ahead and open these up. We're going to open up both tips and we'll kind of explain a little bit about what is going on with both of these images. And then we're gonna work on combining them. All right, So Ross is a mid century modern, the doctor. He's photographed everything from, like Picasso's toe very, very important chairs. And he's also a really good friend of mine. So he wanted me to read this about this chair because it's an important share. So this is the egg chair. It was designed by Arne Jacobsen for a hotel in Denmark in 1958 and has endured a popular form for common folk and evil villains alike for over 50 years on. But he says he sits, and Ross's sat in pretty much every famous are well known, well designed chair ever made. He sits in every single chair. He photographs and photographs thousands and thousands of these beautiful products, and he said, This is his one of his favorite chairs to sit in. So not only is it beautiful, but it actually feels really good to sit in a swell. So here we go. A little bit of background information on this on. So these pictures, this is very common of what you would actually get from A from a product photographer standpoint. A lot of the time they're concerned with capturing the product as best they possibly can. And sometimes you're gonna have details in the background of the images that don't really matter so much. We can see we've got, like, reflectors and cardboard and things like that. We've got a reflector here is well and all these things convey be in the frame. But as long as they're not, you know, actually, in front of the object that we're that we're gonna be photographing and as long as they don't cover up too much or you have another photo that contains that detail. It's totally okay. So we're gonna be combining these two frames together and then working on this image just kind of go over some of the basic concepts and the ideas of things you would do for retouching product photography. All right, so the first thing I want to do is I need these two photos to kind of get together. So I'm gonna use my move tool. We're gonna hold the shift key and click and drag from one image to the other. There we go now. Cameras on a tripod here. There we go. Chair isn't moving. All we're doing is changing some lighting. So if I make this visible and invisible, we should see the difference that this makes. So this is a very common technique here. We wanted toe like the underside of the chair. And so there's a reflector, a civil reflector being brought in on both the left side and the right side toe actually like that up. This isn't sort of thing that you can do in photo shop if you needed to, but it's usually a much better idea to actually capture this sort of thing in camera. So most people try to capture as much as they can, especially with changes the lighting in camera, and then we can mask things together, back being photo shop. Okay, well, let's go ahead and start masking this in before I Before I put these layer masks into the image, I just want to make sure and it looks like everything is pretty much in the same place, but often times you're gonna get to images that are gonna be, like, slightly off. Maybe the tripod has moved just a tiny bit. So what we're gonna do, I'm gonna turn this background layer into a normal adjustment late sorry into normal layer by holding cult or option and double clicking on that. So now we've got to regular layers here. I'm gonna shift. Click on two of those were going to go toe edit, and I'm gonna go down to auto align layers, which is just gonna make sure the auto align them when you're choosing your options. Here. I found auto works out. Really? Just you know, I click on auto pretty much every time. So we hit OK there in this case, it's not really going to do much. Here we go. But we can see it helped out a little bit. You know what? I think it was actually better before. Um, sometimes auto align works. Sometimes Ottawa line doesn't work. Sometimes it's gonna align it on a part of the photo that you don't want it to auto line. So if it doesn't work out, you can always change the layer order and then try it again. So let's try this again. And if that works perfect. If not, we'll just go with the original one. All right, so we're gonna go with the original one, because I think that works out pretty well.
Class Materials
bonus material with purchase
Ratings and Reviews
a Creativelive Student
Great as always. Thank you Aaron
Nawalescape
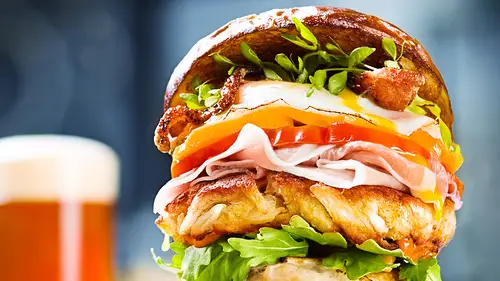
I am a big fan of Aaron Nace work, the class is definitely beneficial, but I was expecting a sample similar to the burger displayed.