How to Create the Best Mask
Lesson 3 from: Retouching Techniques for Hair in Photoshop CCLisa Carney
How to Create the Best Mask
Lesson 3 from: Retouching Techniques for Hair in Photoshop CCLisa Carney
Lessons
Class Introduction
04:33 2Demystifying How to Best Treat Hair for Compositing
02:46 3How to Create the Best Mask
10:55 4Methods for Removing Halo
15:56 5Add Hair by Painting
07:53 6Use Brushes to Create Hair
08:53 7Cleaning Up Cross Hairs
06:39 8Screen Mode to Paint Hair
05:17Lesson Info
How to Create the Best Mask
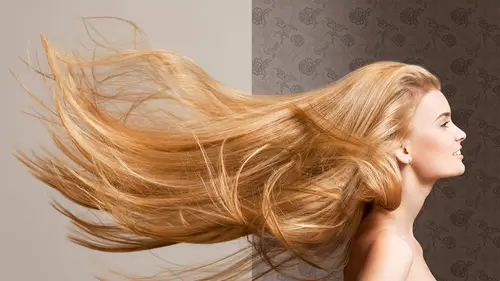
So, I'm gonna start. I'm gonna start with the quick select tool, magic wand. It kinda doesn't matter. I'm holding the Shift key down, and I'm just real quickly selecting. I often take my hands off the computer for a second and then start selecting again. I don't do it all at one time because sometimes you'll over select. Okay? Take your hands off the steering wheel, put 'em back on. I just like doing that. By the way, during this course I am not gonna worry at all about her. I'm masking out her. It's not what we're looking at, so if that's cropped don't worry about it. All right. Now, the other thing that I'd really like to impart on y'all is knowing where you're at at all times. What do I mean by that? I mean I've just made a selection. What have I selected? Have I selected her, or have I selected the background? And I find folks get confused. Ugh, they're looking around and they get confused and they don't know where they're at. Take your hands off the steering wheel, take a look. Wh...
ere are the marching ants? I'm on the background. So, I'm gonna start the masks, there's two different ways, well, there's, take that back, there's many different ways to do the same thing in Photoshop. That's the beauty of it. If your brain works one way or the other, so however you like to do this, it's up to you. I can click just click on the Add a Mask icon. Bada bing. Oh, it's not the hair, it's the opposite. We don't panic. We just Command + I and invert it. Or, if you don't like to do that, let me go back here in history for just a second. While I have the marching ants active, I can take my fingers, hold down the Option key, holding down the Option key, here, and click on the Create a Mask. It doesn't matter. However you wanna get there is how you get there. Now, again, I apologize for my computer selecting everything it can see, but it's excited and having a good time. All right, I'm on the mask. Now I could go to the Select a Mask function, which I think is fantastic in Photoshop, but I'm adding to the selection. The little controller tool, here, is on the Add button. If you hold the Option key, you can get the Subtract button. So, I'm just gonna do this, I hope you guys don't mind, really quick 'cause I kinda wanna get to the painting bit. Here's the other thing about masking, and a good friend told me about this before, was that often people spend so much time trying to get the mask perfect. And I feel a better approach, without spending hours and hours and trying to select every single hair, do a rougher mask where you cut more of the hair out and paint the hair back in. It's faster and it's often more effective, because you can be chasing your tail for a really long time trying to get the perfect mask. Does that make sense? Cool, so I've done this. I'm not gonna worry about her forehead, I'm gonna fix that in one second. Or the crown of her head. And I'm just gonna hit OK. All right, so I like to do this, I like to go Option + click to click on my mask, and I can see, okay, it's not perfect. I'm going to select the default colors. If you hit the letter D, you can see that the, you get the default colors black or white. And I can go in and paint. I wanna make sure my tools are set. At whatever, I like the matte. Now, I gotta tell you, as a general rule in Photoshop, I prefer to have my tools set at 100% opacity and pull back on the layer opacity while I'm working. Just the way I like to work. Again, it's not good, it's not bad. It's just a start point. The other thing you can consider when you wanna refine an edge is select the airbrush and make sure white is your foreground color, and you can paint like this. With hair, I'm just painting on the mask, nice and easy, with a soft halo. You definitely do not want a hard brush here. Hair like this, I believe you want a softy, not exacting hard-cut edge. I think you want it to be loose because, especially if you're masking, the ambient light coming in from the background, that's what you want, the translucency. And that's what makes your composite look a little more realistic. We're not gonna worry about this now. All right, hopefully no questions about that. I'm gonna just pull my layers up for a second, and I'm gonna throw that mask away. And I'm gonna do one that I spent a little more time on. Just for this demo, because, well, it'll just look better. All right? Okay, I'm gonna move it over. So that's a basic mask. Now we're gonna go ahead and start with the haloing and painting, okay? Basic mask. Again, if you could take anything away from this it would be, you can go ahead and use the quick mask, the quick select, excuse me, quick select tool, magic wand, and then do a select and refine around it, and channel pulling. In fact, you know what, why don't we take a second and discuss channel pulling while we're in this window. All right, channel pulling. I'm going to throw away a bunch of these channels just so this can be viewed. Channel pulling is one of my favorite techniques. It's kind of an old-school technique to use. And it's, you use Photoshop's channels to help you make a selection. In Photoshop on the channel, what's white is available, what's black is not, okay? White's available, black is not. Very important to know where you are at all times. I've already started this mask, right? You can see the background. For this demo and generally while I'm working, I will retouch mask paint with a gray background, not the scene. Let me repeat that. I retouch with a plain background, not the scene it's going in. There's a few reasons why I do that. First of all, I work in an industry where everybody changes their mind at every time. I mean, everything changes, and I find the scene distracting. So I prefer to work on a flat color. Oftentimes I'll work on a flat color that is the opposite of the color that the person was shot on. So, if she was shot on a red background I'd make it a green background, if she was shot on a blue background I'd make it yellow, so you can see your edges a little better Or neutral gray. It also keeps me calm and keeps me focused on what I'm doing. If you look at this and you're in here, and you're trying to figure out your hair, well, where's Big Ben and where's her hair? Do you understand what I'm saying? Is that a cloud or is that her hair? Is that my crapping masking or is that her hair? Or is that Big Ben, or is that a cloud? And so if you can keep your environment simple, then I think it's just easier. All right, channel pulling. The idea is we're gonna have Photoshop do the work. So pay attention here, gang. I'm gonna turn that mask off. I'm just gonna hold the Shift key and click. The idea here is I don't wanna see the mask. I wanna pull a channel on her hair. Channel pulling. You grab a channel that gives you the most contrast. Key point here is you're worried about the hair and the background. You're not worried about the middle of the hair. I don't care about in here. I'm really worried about the edging. So let's pull the red channel. Grab it by its name and pull it down to the Add a New Channel icon, okay? That's called pulling a channel. And my name is Lisa. Lisa says levels, Command + L. Do Command + L. Lisa says do levels, and what I wanna do is increase the contrast so I can see if I can separate her from the background. I'm gonna leave the whites where they are and I'ma just start pulling the mid-tones up a little and then pull the shadows. Now, what you'll find is you might get started and you might get something close. I'm not gonna get the bottom area with this, but I'll get some top area. Okay? And do you remember I said about retouching on channels? Retouching on the mask? A channel is a mask. A mask can be a channel. They're all, it's all, it lives all in this house here. When you're on this mask, here, for the gal, it shows up here in the channels. All masks live in the channels. So we're gonna retouch on this red copy for a second. And what I'm gonna do is I'm gonna grab the burn tool. Burn. And I'ma dodge and burn. I'm just painting. Can also dodge and burn by using the paintbrush on overlay mode. If you paint with black, make my brush a little bigger, I can also do a similar effect. It's a little... I find it to be a little harsher on 100 percent opacity, but if I make it 50 percent opacity, it's a little lighter. Hopefully you can see that on the screen. You may have to take my word for it and try it at home. And I'm just painting through. Make it 100%, what the heck. I'm using the numbers on the keyboard to increase my opacity. And as I said, we're not gonna be concerned about her right now, so I'm just gonna cut this out, fill it with black. Option + Delete fills with the foreground color. Command + Delete fills with the background color. Think of this. Commanders in war, they're in the back, right? So Command + Delete fills with the background color. That's no disparaging to our military service people, just commanders. All right, I'm gonna paint a little in here. So let's say I wanted to get a little more of these hair highlights that maybe the select and refine missed. I now have a kind of a loosey goosey selection here. Kinda just highlights. If I load that, Command + click on that channel, Command + click on the channel, or under Select, you can go Load Selection and navigate to it. Then I'm gonna go back to the mask. This is where I'd like to stress, know where you are. Where am I? Okay, I wanna fill it with white to reveal, oh, I need to make sure I'm on my layer mask. Do you understand what I'm saying? You wanna be really clear where you are at all times. Before I was on the channel. Now I'm on my layer mask. And not only am I on my layer, do you see that little black box around your channel? That's the paint layer. That's the pixel layer. This is kind of a pro level class. Maybe I shoulda mentioned this at the beginning. So I'm talking about commercial, pro techniques here that we use for work. If you're a consumer retoucher, it's not that you can't use this. It just might be a little startling. So I'm on my cha-, my mask. I'm gonna fill with white. Remember those commanders. They're in the background. I'm gonna Command + Delete. And what that will do is it'll fatten up my mask. Gonna undo that again and do it again here. Command + Delete. And if you get a little extra, ain't no big deal. You just paint it out.
Class Materials
Bonus Materials with Purchase
Bonus Materials
Ratings and Reviews
LindaK
This is a fantastic course. But is clearly intended for very experienced PS users and retouchers. This backup materials, especially the workbook, are first class. She does speak too quickly and is a little difficult to follow. I felt like the right amount of material was covered. I would have loved more. But it needed more time to do it justice. She just seemed so rushed. I would have payed more for a longer class. Overall, I would highly recommend to anyone interested in this type of work. I found it fascinating.
user-01901f
If you love Photoshop and are serious about retouching, this is one of the best classes from one of the BEST instructors I've ever seen. It is fast pasted, but well organized and completely to the point. I don't know about you, but I prefer an engaging instructor that is passionate about her field and wants to give you as much information in her course as possible. The bonus materials alone are worth their weight in gold and should help anyone having trouble following along with her advanced techniques. I hope CreativeLive brings her back soon!
Jennifer Funk
Absolutely love this class! I've owned it for a couple of years now and find myself coming back to it time and time again. Lisa is really easy to listen to with her clear and confident direction. I Own a few of her other classes too and truly enjoy watching her teach. Thank you for the amazing content!