Lesson Info
6. Sculpting With Light
Lessons
Lesson Info
Sculpting With Light
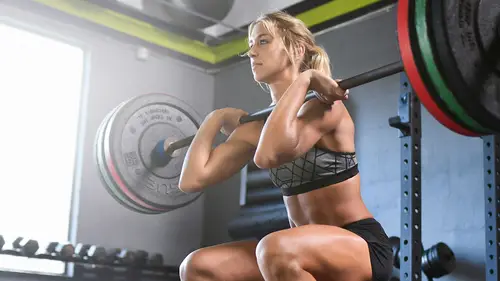
So we'll just do two strips on the back without the grids, and our five foot octo's getting retired. We got our subjects doing some pushups and stuff, I love it. Here's a little tip, honestly when you're photographing athletic subjects, I went down to Modell's or a sporting goods store, and I got just the resistance bands. And you can have them do like tricep exercises and curls and some pushups and sit ups to get that pump going, to get the blood flowing through your muscles. And then it reads on camera, that little more swelling that you get. So anyone into fitness photography or athletic photography, your subjects might be doing a little workout before you get them on camera, and that's gonna make all the difference in the world for the photographs. Also, don't eat a bunch of pasta the night before a fitness photo shoot, that's another thing to stay away from. Alright, so what we've made here, let's start talking about what we're doing. I've got a custom box here that we made, it's ...
our stage. So now we're gonna sculpt him out like a Greek sculpture, and what would be a sculpture without a pedestal, right? So this is just four apple boxes that we painted black and put together, and the reason that they're spray painted black is so they don't reflect or bounce light. We don't want this to act like an accidental reflect or fill light below our subject. And I've gone ahead and we've taped four of them together. And we taped four of them together because we want to be safe. I don't want him balancing on the edge of like one apple box here, so safety on set is always paramount. And also, we're getting him up high, just like I talked about we do sometimes for high-key eCom photography When he's up high I can get a light really down low below him. This might be too high, cause he's really tall, but we'll figure it out. Alright, so we're gonna do the same thing. We're gonna walk through with our key light first. So can I have you hop up on here? Let's see if this is indeed gonna be too tall. All the way up? Yup, all the way up, yup. Alright, this dude's tall. I got a tall light stand, we're gonna make this work. Alright, so my main light here is gonna be our Focus 110 umbrella again. Notice what I'm doing, I'm angling it down a little bit more. We're gonna get more extreme here, okay. We started with a portrait, very approachable. Then we went to the eCom, a little bit higher, a little more coverage. Now we're gonna go to sculpting, this is all about physique. So again, the farther I get away from my camera access, the more shadow I'm gonna get. So if I bring this high and down, we're gonna get some nice deep shadow from his nose and cheekbones, great pecks are gonna have deep shadows and we're gonna get a lot more definition. So I angled it down, and I'm gonna go up high again. And we're just missing the lights overhead, great. Now is that above your eye level? Yes. Yup? Perfect, okay, cool, thank you. I'm taking his word for it because he's now like 20 feet in the air. Alright, so we got that like that. I'm gonna lock these down. These rolling wheels, these castors, have little locks on them so it's always a good idea to lock those so that they don't start sliding away on you. And now, camera-wise I'm gonna have to get a little bit higher now so let's drop our legs back out. And I'm shooting on a Really Right Stuff Ball Head over here, gives me a lot of range of motion. I have to go a little bit higher still. Perfect. Cool, how are we on the strips? Their ready to go, alright. Oh you can keep them off for now, I'm just gonna dial this guy in. Oh man, you are fast dude. Incredible. Alright, so a little bit higher. What I'm looking for here, a couple considerations, is I don't wanna look too high up at him, but I still want to be a little bit lower than him with my camera angle. Cause that shooting up at your subject makes them look bigger and larger than life, so that's our goal there. Alright, perfect. Let's just get a test shot to begin with. Nice, pretty good. Our subject distance didn't change from the light much, he's the same distance from our light, so our exposure didn't change much. That's one good thing about going, flowing from this one look to the next. And now we've got, check that out, look at the detail in his cheek bones. By going up with our light, we now are getting longer, deeper shadows. So that's good if we wanna go ahead and define someone like this. Not so good if we were gonna try to like take a picture of our grandmother or something like that. So, closer to access, low contrast. Farther off camera or off the angle of your lens, the more contrast and more shadow. And then if I wanted to raise this, if I though it was too contrasty, I would just add a reflector, right? Or a fill light. Alright, so our main light is done. See I'm hovering over his chest here? And you're seeing the values on the top. These numbers represent the exposure, what you would see in the histogram. So 255 is pure white. the reason why red is registering higher than green and blue is because our skin tone has a lot of red hue to it. So I look at that and I'm like, okay, that's fairly bright but it's not over-exposed so that's kind of what I'm looking for with the highlight exposure. If I wanted to get more technical with it and more precise. And then I could also repeatedly go to different setups and be like hey, I want his highlights to be around 225. And then when I bring all my photos from the whole day into Photoshop, they're all at the perfect same exposure. And I'm not having to go into Lightroom and make one a little brighter, a little darker, a little brighter. So if you don't have a light meter, and you just have a computer, you can get some tethering software and do the same thing. Alright, so let's turn that off. Easier said than done, right? I'm tall! There we go. The next light we're gonna set up is our low light down here. And this is our Beauty Dish again. So our Beauty Dish is gonna be a little harder, softer light. Or, I'm sorry, yeah, harder and softer. But I have the grid on here because I don't want the light to fly everywhere. Again, I want my nice dark background like we have. And can you guys raise the black slightly, is that possible? That's it? Ah, don't worry about it, it's good to go. Alright, so I'm gonna go ahead and change the rigging on this a little bit cause I need to go down. Like that, perfect. Alright, so this is one of those times modeling lights really come in handy. So I have a very focused light here. Cause the grid is keeping it within like 40 degrees, so it's gonna be like a tube of light kind of coming forward. I wanna go ahead and up light him a little bit, so I'm gonna slide this over, alright. And our LED's are brighter than our modeling light here. Give me one more sandbag on that just to be safe. Alright, thank you. Alright perfect. And now I'm gonna do the thing I tell you never to do. The horror lighting, the under lighting. And what I'm doing with this is trying to get the up light on the peck, and the abs, and the arms. Now this is too bright, but you can already see how cool that looks. So let me turn it down two full stops, and take this photograph again. There we go, that's what I'm talking about. Awesome, now let me go ahead and turn our top light on again. Again, easier said than done. Thank you John, for holding that. There we go. And we'll put 'em together and see what we got. Nice. I Like it. You know what, the screens look a little bit brighter on screen, so let me turn that down a little bit. And then, just to get more contrast, cause the bottom light I now feel is just a little too bright still, and what it's doing is it's filling in a little too much of the shadow from our top light. So I turned down everything a little bit so it looks more accurate on the TV screen, and then I turned down the fill light a little bit more so that I would still get the nice definition in the abs and pecks, but it's not gonna overpower and fill the shadows completely from my top light. So I'm always thinking about direction and then contrast. If I flatten things out too much, I don't get the nice 3D pop. But if I leave my shadows too dark then it just looks too crunchy and too contrasty. Look at that difference here. Ready? No abs, abs. No abs, abs. You weren't flexing on the first one were you? (audience laughter) No, there you go, get someone to laugh and their abs look incredible. It's amazing. Awesome, look at that! Hell yeah! I mean heck yeah. We're alive. Okay. (audience laughter) I get excited when cool photos pop up on the screen, what can you do? I mean this is why we do this. So there we go, that is how we would get this awesome definition. Now we gotta finish this off, we're not done yet, right? So we've established some three dimensionality but we haven't established the depth, he's starting to fade away again. So let's go ahead and bring those rim lights in, guys. Let's bring them in and turn them on and aim them back. And while they do that, I'm just gonna pivot this stand around so it's out of my frame. We're gonna make it look easy even though we're dragging like 50 pounds of sand across the floor. There we go. There we go, perfect. And now this gives me some options. If I bring this in with the position like this, I can bring it in really close and it would be just like having the light straight overhead at high noon and getting those deep shadows. Being straight below it's shooting straight up, so I'm just gonna cup the underside of his peck and the underside of his arms. If I go ahead forward a little bit, it's now gonna feather passed him, which means it's gonna fill in a little bit more, it'll be less contrasty, but I'm gonna get a little more broader coverage to it. So, again, just how you set up your light stands and stuff can help you a lot and make life a lot easier as a photographer. So we have a 20 inch C-stand; and then a standard grip, head, and arm, that you would find on a 40 inch C-stand. So we have a 40 inch long arm, and a 20 inch stand, and these are perfect for getting these low lights set up. And as a photographer, I'm self taught. So I grew up and I was learning how to place lights and I was like man, this is a pain in the butt, like I am rigging all kinds of stuff. So learning your rigging and working as an assistant photographer for other photographers and other assistants is a great way to learn how to rig things and set things up quicker and easier. So, alright are those background lights on guys? Yes Cool. They're at six. Six? Alright. So let's turn these off. And we'll take another shot here. Alrighty, cool. There we go! I like the rim lights. Perfect exposure guys, amazing. They're just like back there, yeah, we do this every day. Okay, so this looks good. I am noticing some things though. What is this? It's like we have a specter appearing around him. See the like haze going on there? What do you think that is? That's lens flare. I have a lens hood on, I have a brand new lens that has great anti-flare coating, but I've somehow created flare because I fired two flashes directly into the front of my camera lens which is a no-no. So the lighting looks good on him, with just bare strips. but I'm lowering contrast and making a muddy image because I'm not controlling the spill. So this is where the grids come in. So let's put the grids on, and then we'll take this shot again. And just like one of our audience members brought up here, when you put a black modifier on, it's absorbing light, so it's actually gonna dim the lights in the background a little bit. So I'm gonna go ahead and turn them up from my transmitter here. One, two, three, four, five. Five tenths, or one half of a stop. And that should account for a little bit of the light loss going through our grids there. Perfect. Do you have glycerine? Glycerine? Oh, yeah let's do that! Thanks for remembering. Yeah Alright, so we have a nice little mix here, I've been working with an incredible makeup artist this week, and we put together a mix of water and glycerine, you don't wanna do 100% glycerine, but you can pick up glycerine from craft stores and it creates an awesome kind of mix of what will mimic sweat. So you can ask your subject to run a couple miles before the photo shoot, or you can mix some water and glycerine together, put it in a sprits bottle that you find at any makeup or hardware store, and then we get a nice fake kind of sheen going on. So I'll let you go ahead and, actually can you step down for a second, and let's go off, yeah. That consideration is too, when you do that, it looks like sweat but it's way slipperier, or more slippery. So you wanna make sure that you're not on any kind of hard wood floor or tile cause if that gets on the floor it's gonna turn the floor into an ice skating rink. So they stepped off camera, and they're gonna sprits that a little bit. And again, talk to your makeup artist. Makeup artists are masters at finding these weird concoctions and mixes to fake sheen, or get some highlights, or map things down, or add definition, or in this case, add fake sweat. So, the guys have our lights set back up. Got our grids on there. And we're pretty much good to go. So this next shot should be pretty awesome. (audience laughter) What's that? Want me to stand in? Yeah, hop in there yes, please, please do. Alright, let me lower this a little bit, that's down all the way. Just gonna keep this centered, yeah, there we go. Parabox is ready to go. Parabox? Perfect, thank you. Alright, let's have you hop back up there. The key is Dawn. Dawn dish soap cleans off little oil spill victim birds, and models covered in glycerine. So give them some dish soap with the grease cutting stuff in there and send them to the shower afterwards. So let's go ahead and get this shot again with the rim lights, alright. Excellent. There we go. Look at that, all the flare is gone. It's not super noticeable but it's there. See the flare? Also, look at how there's more light on his chest. You see that? Just that little bit of flare bounced off the walls in the studio and started illuminating his pecks. We want this as just rims. I don't want that light bouncing off the ceiling and filling in his pecks, that's why I have a fill light. So just keeping in mind that control, that even a little bit of spill can change the contrast in your photographs. So, let's go ahead and turn our key light, our low light back on. We've got our rims and everything dialed in perfectly. Alright, ready one, two. Excellent. And there is our final photograph. We have a Greek God of a model now in front of us and he's on his podium and everything. So that's how I would go ahead and start really going to the extreme. Starting slightly off camera with a hard light, and then going a little farther off camera with the hard light to get definition for a full body shot. And now going almost top down, up and down on him like a table top, to get even more definition and contrast. And it's all dependent on what I'm looking for. Here I wanted to just see muscles, so I wanna go extreme with my contrast and extreme with my direction of light. Earlier I wanted a portrait where I just wanted to show off that he had a great jaw. And then in the middle I wanted to go ahead and put all the details into the nice fabrics that we were gonna sell online. And we were able to get all of that definition through hard light, and then we were able to control it through a fill, through the background or through side boards from V-flats or a reflector. Or my favorite, actually having a second light. The second light fills incredible. This is really cool, if you don't have the budget for a hazer or a rental house nearby, or like a party store or something like that, you can order this Atmosphere In a Can. I have been told it's very flammable, so make sure you're not on like a set, it's butane, mineral oil, and propane, so make sure you don't have an open flame on set to do this. But we have very well contained lights. But basically it just gives you a little more atmosphere. And now you've sprayed it in front. Whoo! Way over there. Okay cool. Ken, grab that one. So they're gonna go ahead and spread this between the light and my subject. You don't wanna put this between the camera and your subject, because then this haze is gonna go ahead and be foggy, it's gonna lower the intensity. It'd be like a cloudy fish tank that you'd be photographing through. But if the light's behind, it's gonna catch all the cool light from those rim lights and create some nice big sense of atmosphere back there. So let's go ahead and light him up guys. Not him, the background. Let's light the background up. (laughs) (audience laughter) Perfect. Bad choice of words when we're talking about flammable aerosol. (audience laughter) Perfect. And what I'm gonna do here is this is gonna be a three quarter. So yeah, we'll let that kind of sit for a second. This is probably where our crop is gonna live, thereabouts. Alright, cool. Let's see what that shot looks like. Alright that should be good guys, we'll let it kind of dissipate a little bit, perfect. And for this, you can give me some different poses where you maybe bring your hips away from the camera. Awesome. And then bring your shoulders back towards me. And look at how that cuts out his mid section. If you want to see those V-cut lines, that's one way to do it. Men at home, if you're sending those selfies or anything like that, turn the hips and flex. (audience laughter) Women too, it narrows the midsection so it thins everything out. This is just posing basics but it works really well with a dude with abs like that. Excellent. Killer. Nice. So yeah, let's look at a couple of these. Oh my god! That last one is intense, right? It's incredible what you do. And all we're doing here is controlling contrast. So if we compare this to the one beforehand, we had a ton of contrast here cause we let the background go completely black. And just like we did with the photo of the girl on the rooftop, we had a slow shutter for a bright background, and we had low contrast. Now what we did is we did haze, so what we're seeing is this light refracting off the haze and bringing the exposure up of our background again and controlling contrast. So we go from high contrast to a little bit lower contrast while still keeping all that definition. So that's what I've got for you, that's my last trick to control contrast on set, is a very explosive can of haze. (audience laughter) So again, be careful with it but check it out. It's much safer just to rent a hazer or a fog machine from a party store, but you do have to plug that in so there are some considerations. But yeah, thank you very much guys.
Ratings and Reviews
Teddy Bear
I really enjoyed the light sculpting part which the explanation of the different types of modifiers and how he finally put it all together. Thanks you CreativeLive and Erik Valind for a nice and short class in light sculpting. Can someone refer another class that could be the next level of light from this call? @CreatLive @ Erik Valind or any students who seen this class and would like to share their knowledge on the next class? I'd appreciate it!
Shannon Ayres
He has good demeanor and there a few good tricks.
Travis Harvey
Good class, I like how he doesn't waste any time and moves through the course quickly, but covers the material needed.
Student Work
Related Classes
Lighting