Lesson Info
13. Complications
Lessons
Class Introduction
04:58 2Keywords and Terminology of Lighting
15:17 3Lighting Patterns
16:29 4The Science of Light
13:49 5Lighting Pattern Demos
27:53 6Study the Catchlights
17:42 7Study the Shadows
08:31 8Soft & Hard Shadows
28:57Lesson Info
Complications
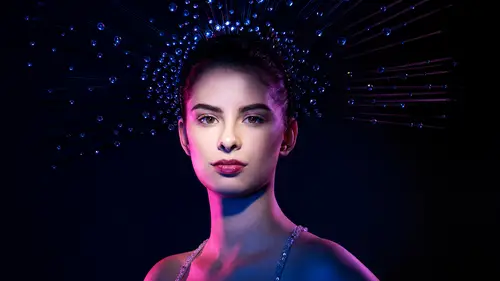
I wanna show you a complicated lighting set up where if, I mean I'm gonna build it for you, if you didn't know what was going on, you'd have no idea what's going on. So it's just to give you some tools here. Which one do you want it on? This one's good just pop off the grid. Yep, got it. All right. This one will go pretty well. So I talked about rim lights, created by reflectors, created by barn doors, created by strip soft boxes, but in this case, I'm gonna do one of my favorite lighting setups, if anyone's watched my other lighting tutorials, I love this one. What we're actually going to do is we're going to put a soft box behind my subject. And the soft box behind is going to light the background cause it is the background, and it's going to be rim lights, because it'll wrap around. If anyone wanted to try this, you can do this yourself, if you don't have a large soft box, you could take a bed sheet, or curtain, relatively transparent curtains and light it from behind. It's ...
the same concept as a soft box. Just the soft box is a little bit easier to use, or a lot easier but, if you're on a budget, make it work. All right, so what you'll see, is I'm gonna have you bring it really, really, really close to her guys, and I'm gonna switch over to light room tether, please. Yeah, it's gonna touch you, don't get freaked out. Can I have a 2-7-3, all right so, let's take a look. I do not have a main light on, no main light. And I'm just taking a shot. So I've got a couple of points to make with this photo. All right, so first of all, what you'll see, is you'll see that in this photo, I don't have a main light on, that back soft box is not only lighting the background but acting as two rim lights, so out of context, if you didn't know, and you put a main light on, I'm just gonna put a main light on her. You might think that there are two lights on the background to make it white, and two rim lights to give her that separation on the jaw. Can you lower the light a little bit? And I'll explain why in a minute, all right, beautiful. A little bit more, if it will. Ah, right there is good. Okay. Great, so let me test this. Okay. Do you have a lens cloth, John? Okay, my lens is super dirty. Okay, thank you. So let's take a look at this photo. If you saw this photo, and you've never seen this lighting setup, what I would say is okay, they've gotta have a couple lights on the background, and then that's a nice soft light wrapping around her jaw, it's probably two rim lights. So that's four lights, two lights in the background, two lights on her, but you can achieve it with one light. Part of the reason I'm cleaning my lens is it was filthy, and I don't know if anyone's ever shot into sunset with a filthy lens, and then it's just completely hazed over, well I'm shooting into a light source so it's the same thing as shooting into the sun, or another, it's going to give me that haze, so I'm cleaning off my lens so I won't have that. Okay, thanks John. All right, so, what I want you to pay attention to is, John can you bring that, I'm gonna take one picture real quick, so people can see this. All right, perfect, okay, and the haze is gone. All right so, here's right now with where the soft box is placed. Can you back it up four inches and then a foot? And now a foot? And now really far, right there. Okay. So, what you'll see in this instance, is the further back we put the soft box, the less the light wraps around. So this is when it was right up against her back. The soft box wraps around. Pull it back four inches, a foot, and really far, to the point where it's just barely touching her jaw. Whereas in the first one, it's even wrapping around her clavicles and the light is going from one side of the jaw to the other. So there may be instances on a high key background, right, we talked about high key, there may be instances where you see this and it's actually just one light, not four. But as long as you make it look like it, it doesn't matter. The reason that I like this set up is I can start to get the wrap around on the clavicle that you wouldn't just get from two background lights, two strip soft boxes wouldn't wrap around here. So will you bring that back up for me? Okay. Great. Take one more of these. Okay. All right so I'm going to do one more thing to make it confusing. All right, so there you go. This I look at, beauty dish, you can see in the catch lights it's a little bit further off to the left, cause it's not quite centered, and if I look at the shadow from the nose, it's a little bit to the right, so the set main light must be a tiny bit off to the left. I've got two rim lights on the jaw, it could be strip soft boxes, my other giveaway for her particular instance is the backlight on the ears, like that's my giveaway on this, cause the light's right behind her. Depending on how the hairstyle is, you won't have that giveaway. I look at the shadows and I say okay again, from the shadow from the, underneath the chin the light's a little bit further off to the left, and those are pretty dark shadows. I don't see any fill. And I see there's no extra catch lights for fill in her eyes. So, I wanna show you one more cool adjustment. We're making one addition, did you guys see how I had him change the height? The reason I did that is, in the first shot, I was troubleshooting my lens flare, because I had lens flare, and my first thought is lens is dirty and it was. That was the main problem. But the other reason you'll get sometimes, sometimes you'll get lens flare in this example is because the head of the strobe, if it's right here, it's pointed right back at your camera. It creates a hot spot. And the hot spot can create lens flare. So I had John angle it so it was hidden a little bit behind her back or behind her head. That's why I was having him change the angle. It cuts down on the possibility of lens flare, if you're shooting into a set like this. Thank you. All right, so let me do my one change. So if I wanted this setup, can I have a five? If I wanted this setup to be more high key, I've already got it as flattened and centered as possible. It's imparamount light. I've already got it high keyed because I've got the white background. I would add a reflector underneath. Get rid of even more shadows. That pushes it as far high key as possible. 20, I think you took the five-- I took it and put it some place-- Oh there it is. Because I'm bad, see this is why you can't let me touch anything. All right. Perfect, so to make this more complicated, remember early on I said this set up is high key and dramatic, how did they do it? That set up in the beginning was a soft box behind wrapping around and a grid. So you can have something that is high key because of the background, but also dramatic in creating shadows because of this main light. Let me take one shot of this. And I'll angle it down just a little. Okay. Sorry, you're slightly blinded. Let me test it. Perfect. So this is with beauty dish, but watch when I switch it to a grid. So now there's these like shadows that melt away on the side that turn back into highlights. So it's like this kind of stuff that always trips me up, these weird combinations of it's really bright, but then a spotlight in the center of the face. All right, so can I pop back over to my keynote please. And let me unblind you, great. All right, so this is an example of what this set up is. That was one of the shots I've done with it. Notice, I don't have the issues with the ears, cause where she's turned the hair's blocking it. And if she had her hair down it would be the same thing. So soft box behind, grid in front. Another one that i really like that kind of trips stuff up is gels, I love gels, and so we will play with them in this last segment. Let's take a look at this one. Ah, it's so pretty, I think it's pretty. So we've got that nice, what I love about gels is they're a great tool for the mood. They set the mood of the image, even more so than you could have already done with the styling and the composition, it's just, it's that little kisses of color. Or you can hit it over the head with color like I did here. Just the thing you wanna know about gels, is gels show up most in shadow areas. So if you see a photo, it is very possible if there's like color in the shadows, that they just took a regular zoom reflector with a gel, turned it down low power, pointed it at the scene, and just those shadows areas suck up that color. Or something like this where there's a ton of gels, and I'm not gonna go super into it, just like here's a behind the scenes, or of the setup, or a diagram. I've got a rim light, but it happens to be that my rim light is gelled, oh and I have a fill light, but it happens to be that my fill light is gelled. So I have a rim light and a fill light but they have color, oh and I've got dramatic light, kind of in a short light position, so if you really break it apart, here's my main light, so it's a short light Rembrandt, cause that shadow side is falling towards camera, and I've got the Rembrandt here. I've got a rim light of blue, but then all of these shadow areas have been filled in, it just happens to be purple. If you're a super beginner in studio, don't worry about it. This is a section called complications, like just know that there's more than what we talked about, but I wanted to start and build, so yeah, you can throw in gels, and you can throw in specialty modifiers, and you can add in grids, all of that stuff makes this not so obvious. So this right here, I did a Creative Studio Lighting Guide. This Guide came out earlier this year and I've got 30 different creative lighting setups, so some of those that I just showed you were contained therein. But the reason I've shown this is not just a promotion for something I've done, there're five completely free downloads at that link. So if you guys want to visit that link, you will be able to download those and it's got behind the scenes, I've got the diagrams, the distance of the light to the subject, the height of the light, the power of the light, the lens choice, you should be able to recreate it, but also, since you've taken this class, what I challenge you to do is go to those five setups that are free, don't look at the behind the scenes yet, don't look at the diagram, and these are creative, these are more advanced, so if you can figure out how those advanced lighting setups are done, you're well on your way to decoding what you see in magazines and apps. So give it a try, and then you'll have your answers right there, and you can try to recreate it at home. One more part of this complication, just letting you know these complications exist. Mixing constant light or mixing ambient light and studio strobe. The picture on the left, she's backlit by the sun, but then on the right hand side, I've a got a beauty dish. So you can see the sun is what gives her the separation from the background, and the beauty dish, I can take a look and figure out where it's placed cause I can see the shadow on the left hand side of her nose, so I know that the beauty dish has to be to the right, and look at the shadow of her jaw. That's how I know where it is. For knowing that it's a beauty dish, it looks a little bit too crisp to be an octabox for me, but it's not really that hard, so that would be my guess, is that it's a beauty dish. I also took the picture so I know. I'm cheating. Over here, this is a backlit scene, this is actually, I put down a bed sheet on my mother's picnic table and I had the model stand on the top of my mom's picnic table, and it was about, it was a cloudy day and it looked like it was going to rain so we didn't want to go out and shoot. So I'm shooting low, and against, that's an actual dark sky. But she's lit by a beauty dish to the left, so I'm using the light and the background just for the background, and then you can see the beauty dish giving her Rembrandt light but dramatic, almost split light on her face. So it's like, it wasn't composited and it was there, and then like here, you've got rim light on either side. Getting my point? Start with these tools, challenge yourself, do watch behind the scenes videos, so you can change, you can start to see how things were done, but always check the highlights, the room, lights and shadows. You could piece apart these. There's also tricky catch lights. So if you looked at this shot, I told you to look at the catch lights, so can you see what the shape of the catch lights are here? It's round, so it's a beauty dish. Like you can see the circle within a circle. But this picture wasn't lit by a beauty dish, cause I tricked you all. Cause here's why. Remember how I told you how you could put that shadow across the face? To put that shadow across the face, you need to have a high contrast modifier. A beauty dish I told you is kind of in between, right? It wouldn't do that. So actually, taking a look here, the main light source is completely centered. Cause you can see it by the shadow on the nose. Right, that shadow is completely centered. But then look at the beauty dish in the eye. It's low and to the left, so what it actually is, it's a grid centered, with that flag in the way, and then I put a beauty dish to the side just to give a catch light. So know that sometimes catch lights could be tricking you. And when I look in really high end magazines sometimes I'll see that. So these are my like, warnings to you. Usually they don't, usually they don't trick you. Usually it is pretty straightforward. So the last one in the section, that can totally throw you off is retouching. Because with retouching, they can cut people in and out of environments, they can change the direction of light, they can light the dark and things, they can create Rembrandt light where Rembrandt light didn't exist. Because they can lighten here and darken around it. Just kind of trying to figure out and train your eye to see when something's been composited, or heavily retouched. So let's take a look at this example. This to me, this is a shot that I did, you can tell that, I mean, I think you can tell it's been composited. Doesn't look real. So I mean, if you didn't know any better, you might like at and be like, oh, maybe there's a door to the left with light coming in from the outside, cause I've got that highlight, I want that. And maybe say on the other side, there's a little bit of highlight, maybe it's an overhead, but it's I mean, this is how it's shot. They're shot in a studio. Shot on a tripod. And I shot one after the other individually, and they all got composited together. So here was the lighting setup. Two bare bulbs, one on either side, and then I had a little bit of a grid on the background. Main light on the face, beauty dish and a grid. But then it's heavily photoshopped. So it's kind of tricky, you just have to recognize that, but here's one more that I wanna let you know. I love this hair shot that I did. Hair looks amazing, the contrast looks amazing, that light on her face, it looks like I am the most amazing person at lighting hair, ever. But it's retouching, like retouching. Like retouching made a massive deal, right, like, if you actually look at the original image, it's not really that incredible lighting. If I look up close at the catch lights, you know there's one light source, off to the right. I can also tell that by the shadow on the nose. Shadow on the nose goes to the left, so I know the light source is to the right, and I see another catch light below that second catch light, and its an irregular shape, so I think it's a silver reflector. Can't actually tell what that main light is, but what it actually is, it's actually a beauty dish but her hair was cutting it off, so you couldn't actually see the whole thing. So my point is, this is just a beauty dish with a silver reflector. But I think it looks like a lot more complicated lighting than that on the left. Like it looks like I'm doing something incredible. It's just really good retouching. That can throw you off as well. Like the picture on the picnic table, when you're envisioning a shoot, when you're planning it, do you plan the lighting along with your vision, or does it come in later, or at what point do you plan how the lighting's gonna work on something that stylized? That is an excellent question. So I can give you the regular answer and then the answer for that shoot. For that shoot, I did not plan on doing like that. I did plan on shooting against the sky and doing something dramatic, but the reason I had to do that is I wanted us to be two feet away from my mom's door, I did this at her house, cause it was about to pour. And she had really expensive clothing on. So I'm like, let's set it up on the picnic table, everything else looks ugly, so I'm gonna get down low and shoot against the sky. Cause I had wanted to go shoot out like in the woods, and like have dramatic stuff, so that was just because it was gonna rain. So that was lucky, cause I think it looks good anyway. Usually what I do is when I start to shoot, I ask myself what is the purpose of the shoot, what's the idea behind it? Is it meant to be like waif-like ethereal alien girl? With white clothes, cause I feel like that's, I feel like that's what she looks like. So if that was my concept, I've thought, oh alien, you'd pull the hair back, right, you know you wouldn't have a sexy stylized hair for aliens. And I want like no brows, I want it to be like super really really pale. And then the clothing, I want it to be all completely white because it's sterile, so I'd like pick what's the idea, what's my concept, and then I'd go, okay what hair works well with that, what makeup looks, okay, now what kind of clothing can we get to fit that theme. Now that I've got those, what kind of environment, would this work better in the studio or on location? Now that I've got that, what light, whether I'm in the studio or location, showcases those themes, so I could do that in the studio where it was white on white on white, just super pale, almost like she's floating. I could shoot through a prism, so it's like broken up and kind of like aliens were, I'm making this stuff up okay? Like aliens were operating on you and you wake up in some multivision, I mean, there's never an exact answer, it's just like, I figure out what am I trying to say, and then how can I build so all of it works together. And that does actually bring me to a relevant point. Okay, so, I taught a class to some college kids, and I said, okay guys, the assignment today is we're all going to bring in, I want everyone to bring in a photo where they love the light, and we're going to piece it apart. I would do that here, but for copyright reasons, I can't use other people's photos, but this is what I did for the assignment. We all brought it in, we all hung it up on the wall. And I went through and I would ask them, how do think it's lit, break it apart. Exactly what we're doing here. So there was this one photo that the girl put up on the wall. And she's like, "I love this light, I just can't figure out how it was done," and it was a photo of Daniel Craig. And I looked at it, and there's a window to the left hand side of the frame and that's it. Sometimes if you really love a picture and you think the lighting's amazing, it might just be a hot dude? Or a really pretty woman, like, you know what I mean? Really the point I'm making is when I see a fashion editorial, it might be an incredible headpiece, and beautiful makeup, and it could just be one light, and nice post processing. And so sometimes we're wowed by other things, but we think it's the lighting, so just know, it's the hair and the makeup, and the lighting, and all of it together, so you're job when you're looking at something, trying to decode it is to try to step outside and try to figure out, okay, all things aside, if I'm not impressed by the styling or the celebrity, where's that shadow going, how many highlights are there, are the shadows filled in, is there a rim light, instead of all the rest of it.
Class Materials
Bonus Materials with Purchase
Ratings and Reviews
Kaltham Ali
Wow wow wow- I finished the entire class in a day! I feel like owning and buy right away all her trainings... this is what a real trainer is al about.. I went from zero in light understanding to really looking to lights/shadows etc.. awesome thanks Lindsay .. the best purchase ever
Warren Gedye
Lindsay, you're an absolute genius!! Such a terrific teacher. You are so talented- not only as an out-of-this-world exceptional photographer, but also as a person who clearly is so passionate about her craft and has that very rare ability to teach your art in such a unique and structured manner! I have learned so much from you previous courses too, Lighting Bootcamp 101, I think was one of them. I look forward to more of your tutorials. On a side note- John in the background is such a stand-up guy! I love the rapport you have with him. I've seen him in on a few Creative Live courses now and he's a kind of guy I just want sit down and have a coffee with, and pick his very informative brain! Such a cool fella!
a Creativelive Student
Lindsay is a talented teacher. She is very knowledgable of what she teaches, but also can teach it well (which is not something all talented people are gifted with, whatever the field). She is humble, dynamic and her courses are interesting to study. The one small improvement I would have liked would have been a little more emphasis and theory on the shaping part. However, this not being the most important, it is better that more emphasis was put on seeing (if you can't see it, you can't make it). Finally, I will say that to study and understand this course, or Lindsay's methodology, you are then equipped with an understanding—you could even say partly knowing the language—of light, which gives you a huge set of tools and advantage, allowing you to progress quite substantially with your studio or out-of-studio photography.
Student Work
Related Classes
Lighting