Lesson Info
17. Creative Lighting Set-up
Lessons
Class Introduction
04:58 2Keywords and Terminology of Lighting
15:17 3Lighting Patterns
16:29 4The Science of Light
13:49 5Lighting Pattern Demos
27:53 6Study the Catchlights
17:42 7Study the Shadows
08:31 8Soft & Hard Shadows
28:57Lesson Info
Creative Lighting Set-up
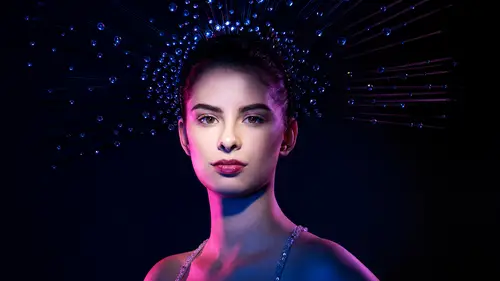
The reason that I wanted to end on kind of a fancy look is because I wanted to prove that point of, you know, the whole time they've been in T-shirts and jeans and, you know, plain hair, but it, you know, it makes a difference when you style them, and you make the whole shoot have a purpose or have an idea in mind and there's not a right or wrong purpose, I mean, everybody, whatever concept you have, it's just make it all work together. So if you've got hard light, right? Rembrandt light, no fill. You've got a barn door, carving subjects out from the background but then you've got flowers in the hair and soft hands on the lip. Like does it, does that necessarily make sense? Or if you've got... super flat glowing light. Maybe you have an octobox in the front, a softbox in the back, a reflector underneath, so super, super, super glowy and high-key, and then you've got dark black eyebrows painted on and like an intense lip piercing thing. I mean, it might work for that person but like if ...
this was a creative concept, maybe not. Like, it just depends and maybe I wouldn't go with a screaming at camera with that one. Pretty, right? (laughs) I'm gonna die, that was good. I love that one. (audience laughs) By the way, when you're looking, the headpiece, a friend of mine made and her brand's name is Lory Sun, so if you look her up online, she does headpieces and dresses, and she's awesome. Very talented woman out of Boston. I have a dress rental company called Dream Shoot Rental, so, in the United States, you can rent pieces like that, as well. Lemme just hear, if you've got a couple, yeah. So, somebody in the UK says, wow, gels. Five degree spot, key on face, red gel on softbox, camera left. Steph says, a snoot with two barn doors and gels. Waldo says, this is a hard one. (laughs) I saved the hardest for last. Three light, another person said, three lights. A snoot, two side lights with barn doors. Photo guy Mike says, gels. Focus light on the face. Pink gel on the left, blue gel on the right. Three lights total. Okay, should I talk through it? You know what I'm saying? I think you should talk through it, we have some good guesses. What I wanna lead up to on this is this is supposed to be hard and I started off really simple, where it was. I had an octobox with a rim light and some fill. The things that we should really be able to break apart what we did but this is including the things I said that complicate everything, this is going to be including grids, and gels, and all of that stuff, and multiple lights, going more than two, then more than three, so if you didn't get it, it's not like, oh crap, I didn't learn anything. No, this is, the more that you start lighting, the more you do it, you start to figure it out and then, if you wanna ask me, who taught me this lighting setup? I was looking online at other work and I said, oh, how do they do this? And then I went and I tried it, and so I didn't get it just like theirs because I found something I liked better in the meantime. So that's what it's all about, right? You're like, I discovered, oh this color and this position actually looks much better than what they even had, and then I've been using this all the time. So, lemme pop over here and point some things out. Actually, I can point it out from my computer. Don't have to be in front of it. Okay, so the first thing I ask myself is, alright, let's see if we can see any catch lights. Probably with a shot like this, far away, the catch lights aren't gonna do you any good. So, alright, let's just try to break apart that main light. The main light on her face, also known as the key light. The key light, if I really look at it, it's just right there. It's only in a small, focused area, so what is small and focused as a light? Would be grids or a snoot. I, personally, tend to work more with grids to control light and I can also tell, by the shadow on her nose, that it is centered to her face. Look, I'm seeing another light, here. So it's telling me, look I'm seeing something over here, so I'm seeing some more catch lights going on here. So I've got a grid on the face, centered to her face. Alright, so let's go to the next part of this. Alright, well I can obviously see some big pink light, here. I see it on the left hand side. I know from experience, it is gelling softboxes, it is very difficult to get it to hold color. I mean, have you ever even done it successfully? Yeah, no. It barely works. I've only ever used it for color temperature changes. So I just know that that's not going to work. So it's either going to be, for me, it's going to be barn doors or it's going to be a zoom reflector, maybe with some cinefoil, something like that to gel. Softboxes don't hold that color, you can't manipulate it as well. So I see, it's from the back-left but not too far back-left because, look, it's wrapping around, it's wrapping around her chest and around her arm, so it's a little bit further around and she's also turned that direction, and then, of course, if I look at my rim lights, I've got one, here, but I've also got one on this side because I've got a little bit of separation on her arm, and so I can see that, and it's crisp, again, so it could be, I see purple, see the color there? It could be barn doors but it could just be a zoom reflector, you know, it could be either. Whatever makes that work. I could have cinefoil to close it down. So, so far I've got three lights. Some sort of grid or focus light on her face, centered to her face. Probably quite close to keep it nice and focused. Then, on the left hand side, I've got a magenta light source. Probably barn doors. On the opposite side, I've got a purple set of barn doors or a zoom reflector but here's the one that I also thought people would miss. There's one more light. See how her arm is blue? From what everyone was thinking and describing, there's nothing to explain why her arm would be blue because the main light on her face isn't lighting it. This magenta gel isn't. This rim light from behind, if it was lighting the front, it wouldn't be crisp and so there's gotta actually be four lights and this one is toning the shadow. That's the reason, as well, that the dress has a sparkle, here. So let's just take a look at what the setup is, so you can see. Talking through it one more time. So main light on the face and actually, I'm gonna turn you back the way you're posed. So go back this way, keep going, and then bring your hands back over here. So this is exactly how she was posed and so we've got a five degree grid on the face. I've got my magenta but notice, like I said, not as far from behind. It's a little bit more to the side. That's why it rakes across and it's a wider rim light like we talked about. That purple gel, if you look, it's actually on the top of her arm and it's not more on the bottom of her body, so that would give you the hint that it's higher up but then the last one is this one and this is a blue gel. You can see that it lights her body. One of the things you can also look at is, I told you that gels or one of the things I mentioned is gels pick up most in shadow areas. Look underneath her chin. See how it's blue? Gels pick up most in shadow areas. So this is a shadow cast by the main light. There was no other light source illuminating it. So when this blue gel hit it, it sucked up all of that color and that's why all of this really absorbs the blue. One more tip that I wanted to show you is because grids are such focused light, can you guys get a shot of her face, real quick? If you take a look at her face, if she leans. Lean a foot to your left, keep going. She's out of the light completely. Like that light is not even remotely on her face. So that's just something, if you guys try this and you're struggling, and you've got someone posing and moving, it's not a setup that you can do that. You've got a box of this much that you can actually move the head, side by side. So bring your head back into the light. Perfect, just like that. To kind of round this all out. I ended with a more complicated setup, a four light setup. You know, and really, honestly, all truthfulness, I seldom do four lights. Most people don't do four lights. Most portraits are done with one or two lights. At most, three and they're not usually using unusual things like grids, and spot projection, and gels, and so that's why when you start to learn the essentials, you'll see them over and over again, and you'll be able to recognize them, and looking at this setup, I'd seen a photo that I liked the use of gels. I started to piece it apart. I did exactly what I told you to do. Looking at the catch lights, looking at the rim lights, the highlights, the shadows, all of that, and I'm playing around in the studio and exactly what happened is I didn't recreate what they did, I got to a point where I go, this is beautiful, the same reaction you had when you saw the photo. So no one taught me, I taught myself but that's not because I'm like anything special. It's because I've been practicing. Every time I look at a movie poster. Every time I look at an ad in a magazine. Every time that I look at an editorial. Every time I look at another photographer's website, I'm piecing apart the light the entire time, so I'm constantly teaching myself and exposing myself to new techniques. That is my gold for all of you. Constantly be teaching yourself new lighting setups.
Class Materials
Bonus Materials with Purchase
Ratings and Reviews
Kaltham Ali
Wow wow wow- I finished the entire class in a day! I feel like owning and buy right away all her trainings... this is what a real trainer is al about.. I went from zero in light understanding to really looking to lights/shadows etc.. awesome thanks Lindsay .. the best purchase ever
Warren Gedye
Lindsay, you're an absolute genius!! Such a terrific teacher. You are so talented- not only as an out-of-this-world exceptional photographer, but also as a person who clearly is so passionate about her craft and has that very rare ability to teach your art in such a unique and structured manner! I have learned so much from you previous courses too, Lighting Bootcamp 101, I think was one of them. I look forward to more of your tutorials. On a side note- John in the background is such a stand-up guy! I love the rapport you have with him. I've seen him in on a few Creative Live courses now and he's a kind of guy I just want sit down and have a coffee with, and pick his very informative brain! Such a cool fella!
a Creativelive Student
Lindsay is a talented teacher. She is very knowledgable of what she teaches, but also can teach it well (which is not something all talented people are gifted with, whatever the field). She is humble, dynamic and her courses are interesting to study. The one small improvement I would have liked would have been a little more emphasis and theory on the shaping part. However, this not being the most important, it is better that more emphasis was put on seeing (if you can't see it, you can't make it). Finally, I will say that to study and understand this course, or Lindsay's methodology, you are then equipped with an understanding—you could even say partly knowing the language—of light, which gives you a huge set of tools and advantage, allowing you to progress quite substantially with your studio or out-of-studio photography.
Student Work
Related Classes
Lighting