Lesson Info
2. Keywords and Terminology of Lighting
Lessons
Class Introduction
04:58 2Keywords and Terminology of Lighting
15:17 3Lighting Patterns
16:29 4The Science of Light
13:49 5Lighting Pattern Demos
27:53 6Study the Catchlights
17:42 7Study the Shadows
08:31 8Soft & Hard Shadows
28:57Lesson Info
Keywords and Terminology of Lighting
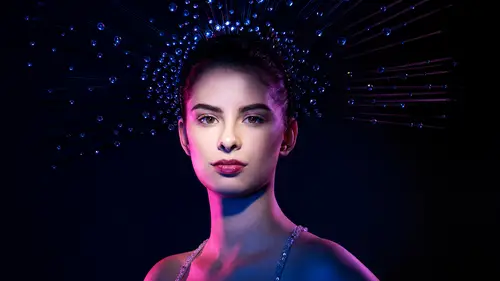
So we're going to talk about terms that are used to describe light. I see photographers trying to be all fancy, and they'll use all these terms, and they're still not necessarily good photographers. Knowing the terms is not what makes you a good photographer. But, as we move forward, if I can look at the movie poster and go, okay, so the light was in Rembrandt, and there was a kicker on the, like it's those words I can remember it, and then also, when you watch other tutorials for photographers explaining their lighting setups. So I think we have to get all on the same page to start off, so we can understand these terms, and then as you're looking at my setups, you go, okay, so that's Rembrandt light. Okay, there is a kicker. And it starts to give you a checklist of describing your lights. So we're going to start off by talking about that terminology, so just know, doesn't make you a better photographer, but it gives you tools to be able to remember and describe what you're seeing. So ...
let's start in the very beginning. So, the main light in this photo, another word for it would be key light, and the key light is the main source of illumination in a photograph. Now, this can be tricky, in some photos, there's multiple key lights, but in this one it's, there's one light. It's the main illumination. What we're going to do, is as we break apart the photos, a question I will ask is, what is the key light. What is the main light in this photo. What is that main source of light. So, I get why, kind of talk about the terminology, so we can be all on the same page. All right, so the next word, is your fill light. What a fill light is used for, is to control the lightness or darkness or quality of the shadows. A fill light, can be a reflector, it could be another light source, or it could even be light that's bouncing off of a wall, and it happens to fill in. It's anything that's affecting that shadow area. It's not the main light, it's the one affecting the shadows. So, if you compare that, let's flip on to the next one, rim light. Another word for a rim light, is also a kicker. It's like that, it kicks them out, it cuts them out from the background, and gives them separation. That's the point of a rim light. Is it separates the subject from the background, or gives definition. A rim light could be a hair light, so maybe there's a rim light higher above that catches the hair a little bit, but it is that other light used for separation, and we're going to talk about modifiers that are commonly used as rim lights. The reason you wanna know this, is if there are a set of three or four common rim lights, when you look at a photo, you can guess probably what modifier it might be, especially if you know the differences between those different rim lights. Next one down the line would be, background light. Background light is a light pointed at the background, to create separation. In this photograph, if the background were completely dark, and there's a lot of shadow on the face on the side of the body, she would just blend into the background. So let's say you're looking at a photo where there's the dark background, but there's, you can see the subject. Somehow they're separated out. It's usually one of these two things. It is either that rim light, so it's light pointed back at the subject, or it's a light on the background. Both of them serve the same purpose, but do it in different ways. And so we'll take a look at this in-depth. The next word they'll talk about is catchlight. So I have an entire segment all about catchlights, and catchlights are those specular highlights in the eyes. And they're usually created by whatever light sources are hitting your subject's face. Now in this instance, I'll talk about this later on, this catchlight is a beauty dish. But, you can have one catchlight, two catchlights, 10 catchlights, 20 catchlights, it could be a lot of different things, when you're in the studio, they're usually very sharp, and very defined. However, when you go outside, all bets are off, it could be anything. Because you could have a catchlight from a reflection, from that building 20 feet away, that just shows up in the eye. Or, it could be, a catchlight reflecting off of the ground, or it could be a reflection of just the sky hitting the eye, so, kind of changes, and all the secrets hidden within catchlights, are a little bit more obvious, when you're dealing with studio light, but they're still there with natural light. Next one. This is one that I've heard a lot, and I didn't know kind of what it meant in the beginning, specular highlights. So usually what that is, is kind of the brightest highlight in a photo, and it is actually the reflection of the light source, so that you see that the specular highlights are these near-white highlights here, on the rings, on the glasses. Sometimes, you'll get a specular highlight on the forehead. It's like that bright. And it's what it is, is look at the highlight on the forehead. It's from that main light. The highlight on the rings, highlight on the glasses. So, the specular highlights can give you secrets because, when you study them, depending on if they're soft or hard, you can have an idea of what light source was used. Or, sometimes you can see the shape, like in a ring or in the glasses, you can actually see the shape of the modifier, so that reflection of the main light can give you quite a few insights as well. So, next terminology, we have to talk about, which is related to specular highlights, is this question of quality of light. Basically, is the light hard, or is it soft. And we're going to talk about how we get hard light, soft light, but then there's everything in between, the hard light and soft light, and then there's hard light with soft fill, like there's combinations. What we're going to look at to figure out these differences, we're gonna look at the edges of the shadows, and if they are sharp, there's not a transition. It goes from highlight to shadow, and it is a sharp carved-out line. That's hard light. If however, there's a transition, it goes from the highlight on the cheek, and it slow-transitions over to the shadow, it's going to be soft light. It's a softer transition. So, we're also going to look at the highlights as well. When the highlights are really sharp, and there's a lot of texture to them, usually it means it was a hard light. If it's much more blended and smooth, it means it was a softer light. So I can show you this in action. So if you take a look at the hard light example here. Look at the line on her neck. When you see that, there's not really much of a transition. It goes from shadow to highlight immediately. So what that's going to tell me, is that's going to tell me, that my modifier or the light that I'm using, it's a hard modifier, or a hard light source, which later on, I'll tell you which ones give you that light. So you'll be able to go, okay. So it's gonna be something in this category. And then the other thing you'll see, see how on her forehead, you're seeing some more texture, highlights are brighter, there's just more texture to it, a harder light is going to give you more definition. And the way you can think of it is this. In a harder light, if somebody has wrinkles, the wrinkles will be more defined. And the reason that they'll be more defined, is there's not a subtle transition, it's that solid line, right, from highlight to shadow, so, the solid lines show up under the wrinkles, or under the blemishes, or under whatever texture there is on the face. Whereas when it's a soft transition, that transition, it kind of fills in the shadows. And it wraps more smoothly around the texture of the skin. For portrait photography, we're more often shooting with soft light. And so you see that example, as I flip back and forth, watch even right next to the eye, right underneath the eye on the left, you're looking at that triangle of light underneath, as we flip between the two, in this one, it is carved out, there is no, there's no gradient. It's abrupt. Whereas in the next one, it's much more smooth. Typically in portrait photography, we tend a lot more towards soft light, because it's more forgiving. But for me in fashion photography, I use hard light all the time, because I can carve out cheekbones, I can give her a razor-sharp jawline, and a lot of drama. And it's everything in between. You'll see all of it. So I'll tell you about the modifiers that we're using. And you can even see them here, but we'll be talking about that, a little bit later. Next term, that you need to be familiar with, is something called short light. There's two terms, one thing's called broad light, and one thing's called short light, here's how I remember the difference between the two. Let's say I'm you're subject. And I'm turned to the side. Broad light means, the word broad means wider or bigger. It's a bigger light. So if I'm lit from the front, more of me is illuminated. It is broader. But if I take the light around to the side, or to the back, what actually happens, is I get light here, and then maybe just a little bit of light close to the camera, so the shadow side of the face is towards the camera, so, it is a shorter area it that is lit. So it's short light. That's the terminology. When you're looking at a photo, the main light might be in short light position, which means there's a lot of shadows towards you. So let's just take a look at kind of what that means. Both of these pictures, we'll talk about position of light. Both of these pictures, are in Rembrandt, we're getting there, but if you look, picture on the left, there's just a lot more area of light illuminated. It's just much broader. Whereas on the righthand side, it's shorter. So if I say to you, okay, we are going to put this light in short light position, it means in some way I'm gonna move the light off to the side so shadows are towards the camera. You will see that several times over. But if you look, basically the triangle of light changes, and in the picture on the left, a lot more is lit, picture on the right, it's much smaller. All right, so. There's broad, there's short, you guys get the idea, and I will demonstrate this for you as well. So, so far, all of these terms, have been more related to what I'm describing, a photograph. And that's kind of what I wanna build up here. And here's an example of something, that the main light is in short light position. This is a shot that I did for a project I shot for Canon, I was shooting for their printer series, and what they wanted me to do is, they wanted me to create a dramatic image, because I wanted to be able to show that the printer could show detail in shadows. Cause some printers it all blocks up in the shadows, so when I hear drama, shadows, my mind goes towards short light, to create more shadows. So even though we're talking about how to look at photos and recreate them, one of the biggest things I think separates an okay and a good photographer from a great photographer, is in every single photo that you take or you create, asking yourself, what is the point of this photograph. What am I trying to say. So in this photo, if the point was, dark and shadows and mysterious, I know I can go, oh, short light. Shadows towards camera, helps me achieve that. So, this is why, it's all registered in your head. Next word, and this is kind of a nice transition, is I said, okay, short light shadows towards camera, I want a lot of drama, oh, maybe a low key photo would be appropriate. A low key photograph, is when a majority of the tones in the picture, predominant tones in the picture, are mostly dark, they're darker tones. Whereas on the other side, that'd be low key, high key, is when most of the tones are brighter. And in the lighter edge of the spectrum. So, if you were looking at a histogram, low key, most of it would be in the darker area, high key, most of it would be in the lighter area of the histogram. But it doesn't have to be super extreme, I mean, it can be kind of an in-between of these two, taking the picture on the left. It is predominantly lower key, but it's not a dark photograph, it's not underexposed, it's just mostly darker. And in the picture on the right, you see the exact opposite. There pictures were taken ten minutes apart. It's the same girl, ten minutes apart, we switched the makeup a little bit. But they're completely different moods. And I can look at these, and I know exactly what tools were used to light these. Just you know, typically higher key, filled-in shadows. Flatter light. More centered light. Bright. White background. These are all words that I associate with high key. Whereas, on the other end of the spectrum, lower key, the dark shadows, lots of shadows, definition, and then, oh by the way, there's everything in between. There's higher key, and then there's high key and dramatic, so, there's more than just the basics. And so here's some examples of low key photographs. Mostly predominant tones, doesn't mean they're underexposed, there's still a bright highlight, and then here's the extreme. Picture on the left, that is as low key as you can get. It is all dark tones, it is a silhouette, for those of you that are curious, this was a fine-art nude, done with two back barn doors. And we're gonna take a look at barn doors later, but barn doors allow me to narrow a beam of light to a sliver. So it almost looks like I drew on the outline. Whereas I know, other common back rim lights, they have a much wider spread of light, and so I wouldn't be able to get that razor edge. So, as you learn to see these, you can say, oh. Razor edge, it's gotta be this modifier. Oh, it wraps around more. It's probably one of these. So this is our low key, and then the picture on the right is just underexposed. Underexposed is not low key, it just means you didn't set your photo correctly. Not the same thing. One other thing is I, back up real quick, is contrast, and these are not the extreme, but a low contrast image, means most of the tones are kind of in the middle. Nothing super super bright, nothing super super dark, everything just roughly in the middle of the tones. Whereas high contrast means, you'll have dark shadows and bright highlights. So, in the picture on the left, I mean it's, if the background was a neutral gray, it would just all be right in the middle of your histogram. Nothing really bright, nothing really dark. Whereas on the left, that highlight she's got on her face, you're gonna see that spike on the histogram, and the blacks in the background, were in the shadows, underneath her neck, you'll see that spike on the histogram. So if you look at images on your histogram, low contrast just means its, it all kind of sits in the middle, whereas high contrast, you have spikes on the edges. You're gonna have dark and light tones.
Class Materials
Bonus Materials with Purchase
Ratings and Reviews
Kaltham Ali
Wow wow wow- I finished the entire class in a day! I feel like owning and buy right away all her trainings... this is what a real trainer is al about.. I went from zero in light understanding to really looking to lights/shadows etc.. awesome thanks Lindsay .. the best purchase ever
Warren Gedye
Lindsay, you're an absolute genius!! Such a terrific teacher. You are so talented- not only as an out-of-this-world exceptional photographer, but also as a person who clearly is so passionate about her craft and has that very rare ability to teach your art in such a unique and structured manner! I have learned so much from you previous courses too, Lighting Bootcamp 101, I think was one of them. I look forward to more of your tutorials. On a side note- John in the background is such a stand-up guy! I love the rapport you have with him. I've seen him in on a few Creative Live courses now and he's a kind of guy I just want sit down and have a coffee with, and pick his very informative brain! Such a cool fella!
a Creativelive Student
Lindsay is a talented teacher. She is very knowledgable of what she teaches, but also can teach it well (which is not something all talented people are gifted with, whatever the field). She is humble, dynamic and her courses are interesting to study. The one small improvement I would have liked would have been a little more emphasis and theory on the shaping part. However, this not being the most important, it is better that more emphasis was put on seeing (if you can't see it, you can't make it). Finally, I will say that to study and understand this course, or Lindsay's methodology, you are then equipped with an understanding—you could even say partly knowing the language—of light, which gives you a huge set of tools and advantage, allowing you to progress quite substantially with your studio or out-of-studio photography.
Student Work
Related Classes
Lighting