Lesson Info
10. Rim Lights Demos
Lessons
Class Introduction
04:58 2Keywords and Terminology of Lighting
15:17 3Lighting Patterns
16:29 4The Science of Light
13:49 5Lighting Pattern Demos
27:53 6Study the Catchlights
17:42 7Study the Shadows
08:31 8Soft & Hard Shadows
28:57Lesson Info
Rim Lights Demos
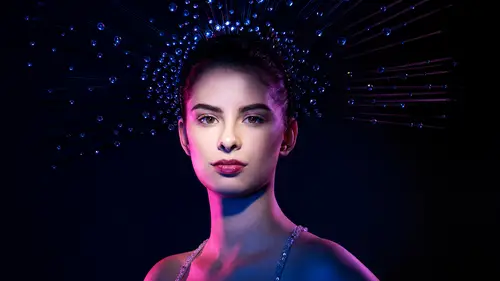
The most common rim light modifiers, we talked about rim light in Section 1, would be light on the jaw, on the shoulder, or the side of the arm, light on the hair. Something that separate them out from the background. Most common modifiers would be some sort of strip soft box or whoops, barndoors. Other options would just be a plain old zoom reflector, but these are quite common. We talked about the differences between the two. First of all, it is possible in a photo, that they would look very similar. Depending on how it's used and the placements, they could look similar, but I'll tell you about the qualities that make them different. Okay, strip soft boxes. They come in a variety of different sizes, 1x3, 1x4, 1x6. and what they do, is it is giving you softer quality of light that wraps around a little bit more, because it's behaving like a soft box. What happens is, is the head of the strobe hits the front of diffusion panel and spreads out until it gives you a larger light source. S...
o, the larger the light source is relative to the subject, the softer the light, that's why. That's why it's giving you a softer light source. The light will wrap around a little bit more and the reason it's really nice, is it tends to be just a little bit more forgiving on the skin, and it tends to be more even. I have found, that with barndoors, what ends up happening is whatever is closest to that barndoor, the height of it, you get like a hotspot on the temple or on the side of the face and then it will get a little a bit darker and then it falls off quickly. Strip soft boxes will just give you much more even illumination and so that's quite nice. Honestly, they're just easier to use, if you're getting started and you just want a nice rim light that looks good. Sometimes, as well with barndoors, because it is silver, it is small. That moves us in this direction, right? The harder light sources. When you do that, it shows up more textured. So, if somebody's got, I mean honestly, with the hair on the face shows up more with the barndoors or if somebody has little pox or whatever, the texture, it shows up more with the barndoors. So, I'm giving you all of these notes for why strip soft boxes are better and easier to used, but I use barndoors more often. The reason that I use Barndoors more often is because, when I'm using the barndoors, I can narrow the doors in the front down to a slit and give me tons of control. Where I can have the narrowest highlight on the side of the jaw and the face to just etch someone out of the background. And I like that contrast, I like it when it looks like I drew on the highlight on the arm. If you wanted a little more focus and control over the strip soft box, they have grids as well. So you can actually use a grid, it's fabric in a honeycomb shape in a (mumble) shape on the front. And, just focus the light, it doesn't spread out as much, keeps it a little bit of a narrower beam. You can do that as well, but it kind of all depends. But, when you're looking at a photo behind the scenes or you're looking at that photo and trying to analyze it, if it's softer and more even head to toe, it's probably a strip soft box. If it's just razor sharp or really, really bright would just be really contrasty, it would just the plain old zoom reflector. But it's really narrow and sharp, it would be barndoors or do-it-yourself barndoors. And, the do-it-yourself barndoors, if any of you are like, ah yeah, I wanna recreate that look and I want control over the light, you can use what we talked about before which was Cinefoil. Since Cinefoil is that black tinfoil, that's intended for this purpose, you gaffer's tape and tinfoil. You can cut out squares, tape it on the side, and you have those barndoors. One of the reasons why I like that as well, is because it's more portable. So if I'm traveling, I mean, barndoors is just one more thing to take with me, whereas I could just roll up that tinfoil and use it easily. I did see that there were some questions. I just wanted to get this out of the way about the gear that I'm using. All of the strobes that I'm using are all Profoto D1 Air 500W/s. So, the 500W of power, they're mono blocks which means there's no pack, it's all self-contained. Alright, so everything you need, you plug in the wall, it's good to go. The reason I wanna bring it up is everything single thing that I'm talking about is relevant regardless of what light you have. It's actually more, the placement of the light in the modifiers, the actual light you have, it totally doesn't matter to the concepts we're discussing. But, if you wanted to know what I had up here. So, what I wanna talk about, is when you're looking at a photo. First of all, comparing which rim light do you think it might be, and granted it could be other things as well, so I'm gonna give you some options of what it can be. And then also, figuring out where it's placed, up and down and also, front to back. So may I have my lovely model? Oh, poor, poor girl. Alright, let me get this started. Okay John, I'm gonna bring you out here 'cause I'm gonna break something. I'm just like tethered here. First, I'm gonna do reflectors. Alright, so, perfect. I have a beauty dish with a grid on it and the reason I have a grid, is right now, how grids work, is the light will not reach the background. Grids give you faster fall-off of light. My studio 101 class that I taught, explains fall-off of light better. I want that background to be solid black, so you guys will be able to see the definition. However, it gives us a little issue because, this is for all your knowledge, we put a grid on there, so what will happen, is that it reaches her face and it gets dark quickly. One of the ways that you can create rim lights in a photo, I've demonstrated already, we did it together, is with a reflector. You can use a silver reflector or a white reflector. So let's say you decided, okay, I want a grid and I think it might be a reflector. Because the light falls hits her and falls off so quickly, there's not enough light here to actually give separation. So that might be a problem that you would run into if you're using grids. And it's not just beauty dish grids or anything that's gridded, the light will fall off more quickly. What I'm gonna do for this one, is that I will just pop it off, and we'll put it back on momentarily. And let's make sure (mumbles) looks good. Oh, can we bring down the overhead lights please so we can see the modeling lights a little bit better and it also helps John and I, figure out where that rim light looks best. Let me take one shot here. Let's see what I do with my settings. Alright. Let's give this a test. (camera clicks) Oh, I gotta turn on my trigger. It falls asleep. That was a quite little smile (laughes). Okay, so, with a silver reflector, you saw before, that I can have a ton of separation on the side of the face or you have something really, really narrow. If you're using your modeling lights, you can actually see what the difference would be. The further behind he goes this direction, the narrower that highlight will be. 'Cause basically her body's blocking it. The more he comes out to the side with that reflector on this angle, it will start to wrap around a bit more. So let's try one with white and you might have to be right in the frame. White is very hard to get much of separation, but I'm gonna do one with John and then one without. So here's one with. Okay, now will you drop it for me, perfect. Usually, it's just such a super subtle separation, that you see very minimal. You see that? It's nice and subtle and then nothing. Silver is more contrast, harder lines, less gradient between highlight and shadow. You see more texture. The white, much softer, wraps around more, as white does, and then, nothing. So you can absolutely, if you have one light, and you wanna create separation between your subjects and the background, you can do it with a reflector. And even if you don't have a reflector. A white piece of foam core or a cake pan. You know, a shiny, silver cake pan will allow you to do that. But let's take a look at the light modifiers I use more often. So, I'm gonna turn on one of each. We're gonna turn on one barndoor and one strip soft box. I'm gonna put my main light in paramount position so it's even on her face, so you can evenly see the rim lights. So you can turn them both on. And I wanna make sure that I'm not getting the hot edges of this beauty dish (mumbles) Um, I think it's probably if I not. Okay. You look great. What are the numbers on both of those? This one is 5.2, that one is a little lower. Can you put that one on? This one here? Can you put it on 6 and the other one on 7.2. I'm making it up, but it'll work great, I'm sure. Thank you and then, John can you move it in this way a little bit. So, we're just gonna compare these two modifiers side by side, so you can see. And then just back that way just a little bit. I'm gonna try to make it harder. Okay. Let's take a look at these two. I may need to adjust power. [John} (Mumbles) The reason I'm doing that is because I'm calculating the powers based on the distance in the modifiers. I shoot with these a lot. Pat myself on the back. So my point is, if you look at these two, can you tell the difference? Like, you kinda can but it's not a huge difference in this particular shot. So my point is, you can be tricked. It can be a little confusing. Right now, I got the barndoors a bit open wider, if I narrow it down, I can make it be much of a beam. And based upon where I place it. So, it's relatively similar. What I can actually see, is if I zoom in to her temple, I'll see a little more texture there, compared to over here. It's like just a little bit softer. It's minimaly. So let's take a look now, though at placement of the light. John, will you turn off the barndoors for me? And, what I'm gonna have you do is, can you lower that strip soft box as low as possible. Okay. So, when you're looking at a photograph. One of the things you wanna analyze is if there is in fact a rim light. What is it lighting? Is it lighting just the arm and the side of the face? Is it getting the top of the neck line? Or is it also getting part of the hair? Because this is how you can figure out how high up it is. If the light, the rim light, is not lighting this part, the shoulder, then that means that that light is lower than shoulder level. The body is blocking it so you will not have separation here. When it's about even or a little higher, you'll start to get that separation. And then, eventually the higher up that you put it, you'll start to get separation and light on the hair. So, let's start low. Great, she's gonna get a little separation on the shoulders. Minimal. Let's take a look. So what I'm looking at, is on this shoulder, see how right here, it's not quite getting the high light. It doesn't matter so much because I flat-lit her. But if I go head and I put her in Rembrandt. Try to move the light, on that side. Now what ends up happening (camera clicks), is that it will blend in just a little bit more. Still not too bad. We still got a little bit of light. But basically, if you not seeing that light there, right now, if you're looking, the center of the light is about even with her shoulder. If it ends up being lower, you miss that highlight. So, if there's no highlight on the arm, you know the light was lower or if you're shooting, and you like, man I wanted that separation, you gotta bring the light up. So help me bring it up a little bit? Right there, that's perfect. And can you do one more as super as high as it goes? Okay (camera clicks). Perfect, thank you. So, watch between these. So you got a little bit of light on the shoulder on the first one where the light was low. You raise up, see how that highlight starts to wrap around now. You're actually getting definition. And you raise it much higher up and that's when you start getting light on the hair. So that's what you're looking for. Another sort of remind, is the hair light. A hair light, typically, would be another boom arm, out over top of the subject, or slightly behind, usually. Not like, right over the top. And it can be a strip soft box, it can be a beauty dish, it can be lots of things. John what do you use for hair lights. Strip lights. Strip lights. There's not really a right of wrong. Strip lights is good for multiple people 'cause you can keep the hair light even. I seldom use hair lights, I guess I'm just afraid of putting stuff on top of people's heads. I don't use them that often either. Yeah, I don't use them too often, but where I do see it, I see it a lot when people are going for a cinematic look. When they want it to look like a still out of a movie. There'll just be like a little glow from above, emulating over head light, something to that effect. Usually, what I do is if I want light on the hair, I just raise that light up a little bit more. It wraps around enough to give me separation. It usually dark hair on a dark background. If it's really blending in, that's when I might have to go in, but seldom. Especially, if you're working in a small studio with low ceilings. Yeah, exactly. Do you often change the angles of your rim lights? Yes, so, let's talk about angles of rim lights. That's a beautiful segue, okay. Alright, so here is the next part of this, it's the further back behind the subject you go, the narrower that highlight is. The more we bring it out to the side, it starts wrapping 'round the face and becoming broader. So what I'm doing, is I'm bringing back and in to make it narrow, and out to the side and front, to wrap it around the face more. So let's do, can I take maybe like four pictures? So, I'll have you go all the way back first. Great, okay. Let's do, okay that's one. Here's another. Keep it coming. And one more. Great, thank you. I will put these all up, so you can see them in sequential order. But you will see that rim light on (mumbles) get wider and wider, as we move it to the side, until the point that it becomes a side fill light. It's no longer a rim light, it's actually filling in shadows. So let me go back and show you this. So here's when we started all the way back behind. It is quite a narrow highlight. It's not wrapping around the face very much. Bring it out to the side, it gets wider. Bring it out a little more, it gets wider. And then it's filling in that side of the face. First of all, I don't think this is flattering. This is something called cross light. There's a light coming from one side of the face and then another, and so it happens that the shadows go opposite directions and it flattens it out. So, I also recommend, if you're first starting, I did this and totally 100% guilty. My first studio lighting setup is at about this angle, I had a silver umbrella and then at about this angle, I had another silver umbrella. Because it would fill in all of the shadows and the thing I was concerned about is, I didn't want to have to worry them posing in the wrong direction and having shadows and it not looking good for the portraits. But what ends up happening, is you eliminate all shadows which you can do purposely, but mine was just for the sake of it. And so it gives no dimension, it's very, very flat. And then I've got shadow on the nose going either direction. And then I've got, you often get shadows, like on the inside of the eyes, 'cause the lights are from outside. So the center actually gets, doesn't have the sparkle anymore. Which is what we would like to have. So, my recommendation is, if you worrying about shadows more, you're probably better off using a soft box and a fill card, then having two crossing light sources. It's usually just not as flattering. There are alternatives with two lights and doing fill light. You just gotta do it carefully. So, when I am moving my rim light out or to the side, what I watch for personally, is I don't like when a light gets to about here. When it starts getting any further because what ends up happening is that I get these highlights on the nose that are very bright and distracting. And, your eye goes to several places in a photo. One of the places it goes, is to areas of contrast. That is now an area of contrast because it is a highlight against the shadow. And, your eye goes to the brightest part of the picture. It's the brightest part of the picture 'cause it's in a dark area. So, my eye will keep looking at her nose instead of connecting with her eyes. So that's why I'm very careful about that and often, if you are shooting in a room with a lot of light and you're not using modeling lights, you can't even see what that rim light is doing. So a lot of people just place it and then all of sudden, it don't look so good but you don't realize until you look at the pictures later. So that's why you wanna use your modeling lights and what I would do very often, is I will completely turn off the main light of my setup. So I can really pay attention to if I like those rim lights. So here, I think it looks good, but you wanna be careful of with rim lights as well is, can you turn your head to the left? Now, the rim lights are doing something totally different. Its not necessarily bad, its' just back to that point of when you're analyzing light, as soon as the subject changes their head or body, it's different light. So you have to keep that part into consideration. Any thoughts? I saw you look like you were gonna say something. No, I was just wondering on your question on angles, were you talking about tilt? Yeah, you have a good memory. For the tilting, I will tilt it this way 'cause that top part of the light is being wasted, 'cause right now, it's just kicking out that way. So if we tilted down, it's gonna point it a little bit more on the top of the head and gives it a little bit more control. You can even, if you want, if there's lights spilling around. I've seen people add Cinefoil barndoors, on the side of their strip soft boxes, so the light does spill where they don't want it. So, that's also a consideration. I usually just use black foam core on my walls to control spill rather than add those tinfoils. And, let's take a look at the barndoors. This time, I'm going to have you do, can you close those barndoors way down, to like almost nothing and then bring it back way behind her. Yeah, so it's hard for you guys to see over there, but as he did it, I can see that, that light got so much more narrower as he brought it around behind. Can you close it even a tiny bit more? Let's just see, what I can do here. Right there and angle it towards her that way. Okay, good, let's test that. And I don't have my main light on now. (camera clicks) Let's see. Can you turn the power up? Because I blocked out all the light. There's hardly anything. (mumbles) Okay, cool. (camera clicks) Great. So, taking a look at this next shot, this is what I can do with barndoors. Like, it's like pencil thin and it's very, very crisp. But notice, that you are getting all that texture. You didn't have that same about of texture when you were using a strip soft box and also a little bit more to the side. But, it's just so perfect. So that fine art nude that I had, where the girl, was carved out, that's what that technique is. And then using her pose, barndoor on either side. Yes? Using the Cinefoil on the soft box, and you make it as narrow as those barndoors, would it be as harsh effectively? The reason it won't be as harsh is because it is a larger light source, so it needs a little bit more contrast. It'll still have a gentler highlight to shadow transition. Even if you blocked it off, so it just doesn't let it spread as much, but the quality is still a little more similar. It just makes it a narrower beam. So, it helps you but you'll never get there because it's bigger and diffused. But it will help. If you ever seen, I don't know what brands do, would it have the lip? Like the lip on the soft box? Some of thing have it, so that the outside of the black sets out, sets out further. And so, what that does is, it's kind of acting like the barndoor, so when you get that the diffusion, right now the light pours out in all directions. And that lip, having it set back a little bit, forces it out in one direction. The thing you really can't feather one that has a lip because when you turn it on, suddenly the lips are blocking the light. I tend to like flat front. And sometimes when you use like it on a background too, you get a sharp line. So it's harder to make it, like, it see the gradient. So that's why I'll rather just put on Cinefoil. Tape it. Okay, how bout over here. Doing pretty good. We have a question, can a strip light be simulated by flagging off a standard soft box to narrow the beam? Is that what you was just talking about? Yep. Totally. You can get very similar to that and the same thing, if you don't wanna use a bunch of Cinefoil. If you have the two pieces of foam core or V-Flats, you put one in front of the other and it would simulate it. So, that's actually what I did forever, in my first studio, because I had one strip soft box and if I wanted to do a setup with two, I would do that. And then also, you can make it a narrower soft box should you want. And the narrower you make it, like you said, blocking it off, gives you an even smaller highlight to wrap around. So that is a very good idea and you can definitely do that.
Class Materials
Bonus Materials with Purchase
Ratings and Reviews
Kaltham Ali
Wow wow wow- I finished the entire class in a day! I feel like owning and buy right away all her trainings... this is what a real trainer is al about.. I went from zero in light understanding to really looking to lights/shadows etc.. awesome thanks Lindsay .. the best purchase ever
Warren Gedye
Lindsay, you're an absolute genius!! Such a terrific teacher. You are so talented- not only as an out-of-this-world exceptional photographer, but also as a person who clearly is so passionate about her craft and has that very rare ability to teach your art in such a unique and structured manner! I have learned so much from you previous courses too, Lighting Bootcamp 101, I think was one of them. I look forward to more of your tutorials. On a side note- John in the background is such a stand-up guy! I love the rapport you have with him. I've seen him in on a few Creative Live courses now and he's a kind of guy I just want sit down and have a coffee with, and pick his very informative brain! Such a cool fella!
a Creativelive Student
Lindsay is a talented teacher. She is very knowledgable of what she teaches, but also can teach it well (which is not something all talented people are gifted with, whatever the field). She is humble, dynamic and her courses are interesting to study. The one small improvement I would have liked would have been a little more emphasis and theory on the shaping part. However, this not being the most important, it is better that more emphasis was put on seeing (if you can't see it, you can't make it). Finally, I will say that to study and understand this course, or Lindsay's methodology, you are then equipped with an understanding—you could even say partly knowing the language—of light, which gives you a huge set of tools and advantage, allowing you to progress quite substantially with your studio or out-of-studio photography.
Student Work
Related Classes
Lighting