Lessons
Day 1
1Day 1 Pre-Show
10:04 29:00 am - Why Does this Class Matter?
39:15 3What Do You Want From This Class?
29:46 4Getting the Word Out
29:31 5Aggressive Marketing
25:49 6Marketing on a Budget
20:34 7My Pricing Strategy
30:19Pricing Catalogs
34:35 9Pricing Q&A
18:27 10Radical Pricing and Most Successful Advertising
20:26 11Pricing Phone Call Example
32:59 12The $2000 Average
23:04 13Day 1 Wrap-Up
04:21Day 2
14Day 2 Pre-Show
10:58 15Equipment and Indoor Lighting
30:27 16Outdoor Lighting
14:52 17Posing Indoors and Outdoors
33:51 18Indoor Shoot: Senior Girl, Lexi
27:31 19Indoor Shoot: Senior Boy, Shawn
18:37 20Indoor Shoot: Senior Girl, Raven
19:53 21Shoot: Outdoor Rooftop
34:49 22Scratching Things off the Board
28:56 23Underwater Photography
52:57 24Review of the Day
07:09 25Day 2 Wrap-Up
04:17Day 3
26Day 3 Pre-Show
10:17 27What's Left on the Board
15:06 28Speeding up Your Workflow
35:13 29Workflow Q&A
23:38 30Overview of Adobe Bridge
45:05 31Camera RAW Workflow
30:22 32Perfecting the Eyes and Proof Building
45:54 33Sharpening, Album, and Action Building
35:20 34Thanks + Credits
03:29 35Colors and Backgrounds
34:13 36Liquify Tricks
21:59 37Day 3 Wrap-Up
08:39Lesson Info
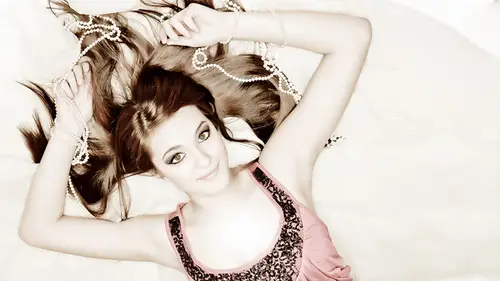
Colors and Backgrounds
I wanted to talk before we get into a few tricks just really fast about the creative lives, favorite word logistics of maybe working through that work through workflow that we kind of talked about. So you at your studio. Let's say you like me. You have a separate location from your home and you really like we said, We want to get home, We want to get home and I don't know You got 10 images left And you know that American Idol's about the start. I don't know you just what you want to get home. No problem. Let's go, Let's get home. And if there was some sort of way, I could just work these at home. Sure, you could put on a jump drive or whatever, and you could go home and you could work and they could bring him back to the studio. Here's a little thing that I do. Whenever that happens, I take what's left, and I put it into a folder that's part of my Dropbox, and I call it my work on folder, All right, and when they go into the Dropbox, it starts upload and off to the whole Dropbox cloud ...
somewhere. Drive home and I don't live that far away by time. I get home maybe 5 10 minutes to get home. I get home, I'm kissed the wife. We have a little something to eat. We do, You know, a couple of things you don't instantly get to the thing and buy time. I'm there. I open up my computer at home and boom, There's those 10 images in the drop box. Okay, as I worked them, I have the Dropbox. That is the folder that I'm looking at on the bottom, which is a part of the mini bridge. Like I just showed you in the last segment as I worked the image and I do something to it and I love it. And okay, it's great. Save close. Do you want to save? Yes, as it and it saves it off. It's being saved. That hot folder that work on folder starts upload into the Dropbox right then and there work on the next one, upload into the dropbox work on the next one uploaded to the Dropbox. So when I get back to the studio the next day, there's all my work files ready to go. I just move them right. Boot back into the customers folder. And we're just like that. We're all set. Makes sense. So that might or might not save you a little bit of time or hassle. So is to, you know, part of that logistics of going through the workflow only had 10 left. And instead of just go in and staying at the studio doing it go their their work. Um, go back to the studio. Don't. So I don't know just a thought. Maybe it'll help somebody out there. Okay. Next. I wanted to do some tricks and a couple of these tricks. What kind of dead? We're going to do him again just as part of a review. So the 1st 1 I want to dio is a levels trick. I showed you this trick. And yes, if you haven't tried it. Ah, highly recommend. Like I said earlier, taken image that you're really proud of and do this to it. Control of command l opens up levels. Hold down your out key. Everything is going to go white when you barely see the eyes. Stop back off when you come over to the right side slider. Everything goes black. When you see red in the skin, Stop back off And there you go. A perfect levels adjustment before, after before, after click. OK, and just like that done it, adds Kant. That's what I'm doing. I'm adding contrast. But the thing with levels and curves and all these things that adjust exposure in various ways to what you're doing is you're throwing away pixels to make this happen. You're trashing the image. Every time you do something like this, you're trashing your image. Well, the most important part of the image is right here, right there, because that's where everybody's got their attention focused right there on the face. So by holding down that bulky, it gives you a graphical display of exactly which pixel is being trashed makes sense helpful. So there you go. We're not going to say that, but it just kind of gives you, you know, a review on that. I really want you to go try it. If you try and nothing else, try that. I showed you this a little bit in part of the raw conversion, but this is this is one of those Denny backgrounds that I just absolutely love. I love it. I think it's called Purple Rain or something like that. And I purposely love it because look at all the blue sea, the blue And that looks pretty good. This image looks pretty nice. It kind of goes nice little blues with the color in her dress But I had promised this girl when I took the picture that don't worry about all that blue bay. It's gonna b'more like the color of your dress. So to do that, watch this control you opens up hue saturation Now inside Hue saturation. This master is all these channels combined. Well, I just want to start playing with blue now just to show you that if you accidentally choose red it's not that big of a deal because watch watch this channel red When I come over here and click on Blue It changed the blue It knows so all you have to do is get it off of Master because if it's on master and you click right here, it just Nothing happens. You have to change it off of Master. You can literally click anything and then you want to go over here and make sure you click on the area you want to change, so I want to change this blue. Now, I want you to take note of this bottom line where I clicked right here. It's saying this top line, this is where you are. The bottom line is where you will become. Well, right now it's all exactly how they all the colors lineup. Okay, inside of this area, this darker grey area we're going to affect pixel by pixel across the board. So every color from here to here is going to be one on one changed. Well, I know from experience there is no blue in skin skin, no matter what. What race you are is somewhere in this range red and yellow. So we want to stay away from red and yellow. But we can grow that gray area by clicking in the light gray area. When we get really close to read, we stop in this lighter gray area. This is the gradual, fading transition of pixels being affected till we get right here and now none of these pixels are being affected. So we're gonna grow this area over here and extended on this. I'm we get right up against the yellow, we're going to stop So none of these red and yellow pixels are gonna be affected. But all of these pixels, all these blues and greens and all those are going to be affected. Now watch what happens when we slide the hue. Slider? Look what happens to our background. Noticed her skin. Notice what's happening to her skin. Her skin isn't doing anything staying the same so you can buy one blue background. And with this trick, have how many backgrounds unlimited backgrounds you want a lighter blue? How about a green about a yellowish? How about a really stop, as far as we go, can get any more hurried to the other side. How about a reddish background? How about I'm starting to dig that? That's kind of close to the color for dress gay. Add a little in here. Little lightness. Change it just a little bit getting close to the dress. How about that? But notice the big deal is I did not do anything to the skin. It's a very fast, fast, fast way to change the background without messing with the skin. It also works on green because there's no green in the skin. Okay. Follow click. OK, And just like that, we went from this to this. Well, the dress is in this case, Watch control you. The dress is in. This was so let's find out where the dresses the dress is in this range right here. And when I was doing it, I know it's in that range. So in here is where I sort of stopped right at the edge of the dress. You call that experience? That's from me doing it so much. Okay, So if I would have if I don't win a little bit further now, use. Look what's happening to the dress, You know, getting that. Yeah, that That's kind of cool. Yeah, that's gonna work. And so yeah, a few weeks ago, it was it, I think somewhere on my Facebook page, um, not the personal page, but the card vocal in photography page. I had posted a picture of a girl and she had paint dripping off of her face. It's gonna come up here in a few minutes. Yes, it will come up here in a few minutes. Towards the end. Anyway, it was a pink a pink colored paint dripping off her face, and I thought, Wow, that's really neat. But I want if I could shift it. And I did this trick with the pink and turned it blue and all kinds of crazy colors. And and she even said that I was like, I didn't I don't remember doing that color paint like No, it's a computer thing, you know? And so yeah, just like Pablo said, Hey, that dress looked kind of neat green, You know? Why not? You could do that, too, if you have that kind of customer. So that, to me, is a really, really neat trick trick and really save you some some craziness and and more importantly, what is it about seeing your portrait? If you ain't learned anything, what is it? What do they want? One word. What would it be? Different friends different. So senior a comes in, you do it on the blue background. Senior B comes in, you go shifted green background Senior C comes in shifted reddish background and you can have no to you if you really want to get radical. No. Two seniors air ever photographed on the same background Wow. What kind of PR would that get you? You have to have 11 heck of a good brain to keep track of all that. But theoretically, you could make that kind of a statement and shift those colors of the background all over the place. Cool. Okay, moving on. Here's one of those actions I just told you about. That is in here, is it? Let me go find a greenish greenest, greenest, greenish removed green outside. I haven't set to the F one key. All right, so what? I'm a press f one and it ran. Did you see what just happened? I'm oppressive twice to really make a point. And then I'm ago before and after before and after before. See the green? It's kind of looks green. It's actually not grain. It's yellow. And it's caused from the light filtering through green trees. And I have that I have this huge canopy, its a year old tree in my backyard. Um, not that you need to know that, but it's insured against loss of income because it makes so much money because of the fact that this tree creates this nice overhang and shade. But anyway, it hangs out over. But a lot of light filters through that goes through the green trees creates this greenish effect. I'll do it again. Watch F one F one. I did twice. It takes it away for the wedding shooters out there. If you do any weddings with whatsoever and you sort of blend the way I do, I blend the light coming off of my flash with the existing light that's in the room. You get this weird yellow greenish effect. Ah, lot That single action for the wedding world to get rid of that yellowy weirdness is worth the price of admission. It really is that need. And if you are just like you know what, card? Thank you very much. But I wish you would just show me how to make it cause I'm gonna make my own. You got it. I'll show you watch. It's quite simple. Look, all I did was create a hue and saturation layer and I pulled out all those All the numbers. I pulled out 15% of the yellow watch. I'll just do it. I'll undo it. Image. I just control you creating. I showed you how to make an action. And so now the actions recording Right now open up Hue and saturation Change the master Channel to yellow. Take the saturation down 15%. There you go before, after before after. Okay, and that's it. That's all the action does. I mean, is that retarded? Simple or what? Very simple. But if you just don't want to make the action, it is one of the actions in that action. Palate. 30 15 15 15. Well, it took 15 off, and then at this time is gonna take 15 off the next one. Not 30 not 30 because, you know, and not altogether 30 cause it's 15% of what you've took taken now. So it's not quite 30. See what I mean? So make sense. 15 15 15 15 Here one last time. Here we go. F one F one. I'm doing only doing it twice because it on the screen it's more. It's more visible. Doing it twice. I mostly, only warmly would need it once. OK, on the print, but on the screen to screen a little contrast. It looks. It makes the point better showing it to you twice cool and that saves a few people a little bit of time. The fun, Um let me see if there is before I move off of this 11 Let me see if there was another action. Seems like there was this one. Action. Let's see. Infrared. Yeah, this was one of them. That was Let's see for how it does haven't run this one in a while. This one's also in their works, best with a lot of green. I know. Let's see. Yeah, there you go. This is an action that is also in that set of actions that when you buy the creative life thing, this segment, this excuse me three days, you get this action for free and so I don't know. It's kind of weird on her, but if it's a scene that has a lot of green, this action before and after makes it look infrared. It isn't a perfect infrared, and nearly as cool is if you have your camera converted. The photograph infrared. It sort of simulates what really is happening, but it's still a lot faster. It's kind of a need effect for certain things anyway. That's in there, too. Figured I just show you another one. There's a bunch in there, so try it out. Okay. Where are we owe this one again? I'll just sort of make the point again to show you again. That saturation tool. And here we owe sponge tool saturate mode 100% on the flow for this particular image, though, because I've done this image several times. I know that if I uncheck the vibrant, it is going to give me this nice pretty orange right in there. It's also going to give me this nice pretty blue. And I have this little piece of orange right through here that I like the way it looks. Then I checked the vibrant checks box and I go out on the edges and then I rub down underneath in through here, picking up a few pieces of blue one fast pass on the blue jeans and their before and after before, after before half. And you saw how long it took. It looks. It looks like it took longer before after before after pretty, pretty slick. And just to drive the point home one more time. Stay off of the skin. Okay, you get on the skin It really gets weird. Nobody wants to look like the girl looks right now. Cool. Save somebody a little bit of time, I think. Right. Okay. This one also kind of part of the growth thing that we talked about, but a little bit more. If you have ever purchased the background, you have often times had this go through your mind. Do I get the big background? Are Do I get a little background? Do I get the big background? Do I get the little? How much is the big one? I don't know how much again That has happened to you at one time or another. Okay, Yes. So he end up going, I'm I get the little one. Okay. Right. Take it home. Put it out. Put the subject on it and you go. Oh, man. Should I got the big one? Anybody? I know the Internet world that's happened at least once. Hope there's 12 Okay, three. Good. Here's what you could do. Just get the little one. Then select that little background. Stay off the hairs he have. I've selected the hair. Don't do that. Don't select the hair control T growth background. Yes, Yeah, and redo that. Undo that and redo that pretty, like. All right, close Don't save. So that's just kind of a neat thing. I just You know, I love that kind of stuff. Let me open up texture. So the girl comes in, she says, Oh, Mr Card going to do something really cool. We're different. We do. This picture right here is anything we do. I saw you that picture, my friend, by this wall. Is there anything anything that you can do to make it different than heard? But I love that. Well, I just want the same thing, but different. Okay? I want the same thing, but different. Yeah. Oh, yeah. Sure that. No problem. How about this? While you their photograph in this, You look around, you see a nice little piece of concrete, little crack in it. Take a picture of it. Okay. Take that little piece of concrete. Drag it over. Don't just drop it, okay? I want you to hold down your shift key and then drop that makes it snapped right down the middle. Okay. You can close that now. Get rid of it. So now we have a customer and we have Rocky Wall, one on top. The other these up here are called blending modes Normal, Dissolved Dark and Bubba Bubba Bubba. Okay, the most common. The one that's gonna be used the most is overlay a soft light and hard light. When doing textures, all of them work. I welcome you to play with all of them, but you're gonna find you gravitate to overlay or soft light. Or probably, in this case, hard light. Okay, so what it does is it allows parts of the image that's on top to blend in with the image that's on the bottom one blends into the other. Okay? Huh? No, no, I'm show you that next. So it allows that blending Teoh happen. Now, of course, that that's really need is for is what is doing to the background. But the problem is, she has leprosy. Okay, So to get rid of that effect on her, I want you to come down here to this little palate across the bottom of the square with the plus in it. And I want you to paint with your paintbrush black paint black, and wherever you paint with black, it's going to erase now make a mistake. Come way out over here. Oh, no problem. Hit X and now you notice my color swapped. And now where of you paint with white? You're putting it back. So there is no messing up paint with black when the race, all of that texture off of her. And I'm going fast and sloppy because I can because we just looking for some texture. But we don't want it on her. And we don't want it on her clothes. We wanted to be like that. Okay, watch before. After before. After. Pretty. Yes. OK, so the very next senior comes in. And that senior says I saw what you did to my friends was killed when that wall was so cool. And my friend Jeanne Jeanne, she came in. It was so wonderful. All it was great. You did the same thing with her, but it was different. Would you do the same gang, but different for May? Yeah, man, you could while you're there, get another snapshot of another piece of the wall you could Who? There's nobody on the planet. Says you can't put one texture on top of another texture, so you could put multiple textures. Keep going. You could have 567 textures, all one blending into the next, blending into the next. Here's a very cool fast speed trick. If you just simply grab this overlay that you did and drag it to the one above it moves it. But if you want to copy it, hold down your old key, then move it now. It just would be raced off of her. You see what I'm saying? Because it made a copy of that overlay. So now it erased off of both of them. So we have this texture doing this, and we now have this texture doing that. The list of things that you can do goes on and on and on. Now, the words that you talked about, the way you do that, you take your paintbrush and there are tons of these brushes out on the Internet world tons and tons and tons of tons and tons of all kinds of crazy wiggly lines and brushes. This is one of them that I really like. Where is it about? We use this one and we take about that big, and we make a new layer paint with black. We don't stroke it. We just touch it, Touch it, touch it, touch it. Okay, But it's on her. So you then take our erase tool. But we have a new layer. Remember that last segment? I said, I don't make layers. Here's where I make layers. So they're technically Russian. Just brushes. Yep. It's just a brush. So this is without the words. That's with words. Letting it down and done fun. Yes. So if you wouldn't have flattened it and you did the words, you could have pulled the little thing up again. Yes, I could have. Yeah, I sure could have taken it right off her. Can I make you hate me? Don't ask me. Do that again. Are you going to give that to us? Give you what? The brush The brushes. Brushes are on the pro form. Yes. Thank you. I want to say that because it makes it sound like I'm trying to sell. You know, not but everything I do, everything I don't I don't really have stuff for sale. I just put it all on the pro for I don't know people in home, but like for me, at least when I see a a teacher like you, is it? And what? Why? I have to go. Go, Go and fight And you already give it to us. So I try to trade it all in one place. Thank you very much. Okay. So how about this crazy radical idea? Crazy radical idea. I want to do a double exposure. Remember, double exposures. How do you do? A double exposure in digital now there are some cameras out there. Have a double expose your button in case you going. Wait. I have an X y Z camera and I have a double exposure button. I'm great with that. Okay, but the canon one DX does not have a double exposure, but not that I know of. Soon as I said that, I thought, Oh, some mines finding it, I can hear him. Think I have one. You have to go to custom function number 925. Well, not haven't found it yet. How about that? But it can be done easily. Easily Info shop using those blending modes. All right. Just to show you what I'm talking about, there are some scenarios where I'm show you how this can become very practical. So you photograph a high school senior in this pose. Then she goes change clothes. And now you have her in that pose in that outfit, By the way, that my daughter. Okay. And you want to have this image sitting right here on the side of her Now some people, would you? What they will do is they will didn't take their little, you know, lasso tool. And they will, in the last so little s o and draw the last. So all around I'm too bored with that. And so now we've lassoed are are subject. Then they copy it. They come over here and then they paste it and they clean up on the edges and somebody out there I know somebody out there says, Yeah, I did that yesterday was so fun. Okay, well, what if would have crazy, crazy me? What if we took this image? Dragged it over to this image? Hold down the shift key. Let go. Boom. It drops one on top. The other closed that down. All right, so now I have girl on the left, girl on the right, girl in the last girl on the right now, There are some people at this point that I love it when they go. Uh, I do. Here's what he was his with you that layer mask thing that you just said and you draw layer mask and you take the paintbrush and you take the paintbrush in the black and you paint with black. And when you do, you erase the girl through. Uh huh. I knew what to do. And then you have one girl next, the other girl, right? That's one way to do it. And like Like I said earlier, there's literally hundreds of different ways to do things in photo shop. How about this crazy radical idea? What if What if we take? And we were somehow able to tell the top image to disregard White and allow the image underneath to come through. So take the top image. Change it from normal to darken. Gone. Go ahead. I know you want to say it. You want to say it's so bad. Do that. Do that. Do that again. Do that again. I love this. I love doing this one again because it's fast. Okay, here is the image on top image on the bottom top. Bottom. Top bottom. Okay? And all they do is change it from normal to darken. Done. Good. The next question Internet asking is what if it's a black background? I'm glad you asked. Okay, so let's take the top image. Let's put it back to where it waas top image. And already I can feel them going. Wait, wait. I know control. I control I. So now we have a black background. I know it's a negative, but it's fast. Way to make a black background. All right, so take the top image changes from normal to is was the opposite of darkened. Yeah. Done. Cool. All right. That was almost fun. I like dark. 8%. So there is just one thing for the real techie techie folks out there who go. Yeah, right. But what happens when she touches? Oh, look what's happening to her hair in the arm. Right there. So you have to decide which which girl you want in the front and which girl you want in the back. All right. And then what you can dio is at this point, you just layer mask one. I'm just going to do this sloppy, So you can just kind of see it. You could layer mass that arm, just this part of the arm so that this arm is in the front and she's in the back. You have to get in real tight and go real nice and clean up against the edges. But there you go. That's how you could do. And that is I'm doing a sloppy job. But there you go. What I'm getting at. So you went active layer mask the whole thing. But just with one little piece to make one look like it's sitting in front of the other. Gotta be fine. Gotta be in somebody's having fun, Right? Okay, here's Here's something you never, ever do. Never trust me with photo shop because I will mess you up. All right, here we go. Do not trust me with Photoshopped. Show you how badly I can mess you up. I can really miss you. Wait. Now, wait. Was that that guy? Yeah, that's him. Okay, that just happened. Did that really just came out here? Ryan, The next room going, Clark. Really? Just super quick question surface change about the changes. They're reflective. What did you use to get that reflective eyes all kinds of ways to do that. But in this particular case, where does it come back up? In this particular case, you go to Lowe's or Home Depot, and there's a bathroom board that you can purchase. You know, the bathroom material that has the little squares, you know, and you put it up in your shower. And then, you know, you caulk the corners and it has squares and it's shiny. Okay, well, they also sell one that is straight has no squares. It's just shining. Go buy that comes in a sheet of four by eight. Okay? And you put that on top of your white paper, have your subjects stand on it, and it gives that need little reflection if you get your high key perfect behind the subject. And I do not hardly ever get my high key perfect. But right about here is where it ends, and if you get it absolute perfect, because the way it goes away from you, it don't show up. But if it does show up, it's just a pretty quick swipe of the Dodge tool to make it disappear. And that's it. Now, that is the way you do it in the camera to get that reflection. There is a way to do it in photo shopped to. Okay, so let's let's say this all pretend for just 1/2 a moment that this reflection is not there. Okay? The reflection is not there. You could do this. Layer control T. Well, we're gonna blend it through. Well, we're not gonna blend it through. We're just going to erase everything from below the feet on that layer. Delete. Okay, then we're going to patrol T, and we're going to reverse her like that. Did you see that? I went from here, pulled it straight down and then flipped to the other side. Okay, So apply. So now I have the feet underneath the feet. I then go to filter, blur, motion blur. And I want to blur straight up and down, and I want to blur it about Oh, I don't know. Let's see in this case, maybe 58 58 pixels. And there and now if it's too bright, you go. I wish it was just a little bit darker. No problem. Take that opacity or pay city hire you want to say it down Maybe 50% before, after I mean and boom just like that. That was another way that you can make that reflection and I do that a lot with the shoes. That was a shot. A few days is that yesterday or day before must have been day before the first day. It was a whole line of shoes, you know, and the shoes. It does sort of good with that board. But I like to be a little more vibrant. And so I will do this little trick that you just saw and asked about and with the shoes are flip him drag on, give him a little blur and then light them up a little bit, and it makes that neat little reflection.
Class Materials
bonus material with purchase
Ratings and Reviews
a Creativelive Student
Enjoyed the course from start to finish especially all the marketing, advertising opportunities and pricing ideas. My wife and I spent Labor Day re-watching the marketing and pricing section and came away again with so many great ideas. Workflow and shooting the pics is more my responsibility of my business and his posing, lighting and workflow is awesome...In the beginning of the course I was disappointed in the actions as freebies but the more I got into the course and especially the last day with workflow, I broke down and used the Pro4um coupon from the swag bag and joined. That's what really made the actions more valuable because when you join the Pro4um, you get the entire setup for Kirk's workflow. The bridge setup, the scripts etc...I greatly appreciate what Kirk taught in this course and his passion for this line of business because it's helping WHP in every area from start to finish with our buisness!...Thanks Kirk and Thanks creativeLIVE for having Kirk do this Senior Photography course!
Leroy Tademydandp
If you want to take you photography to the next level you need to buy this course. Great content with an experienced passionate instructor who is also quite entertaining. Kirk's knowledge of marketing, cameras, and workflow are second to none. I urge you to do yourself and your photography a huge favor go to the top click the green button that says BUY! If you don't your missing out.
a Creativelive Student
His work is amazing and he has been a big font of inspiration for me... I wish I could be there to be part of it, live... :-)
Student Work
Related Classes
Portrait Photography