Location Shoot: Outdoor Lighting
Lesson 31 from: Editorial Portrait Photography for High School SeniorsDan Brouillette
Location Shoot: Outdoor Lighting
Lesson 31 from: Editorial Portrait Photography for High School SeniorsDan Brouillette
Lessons
Class Introduction
15:18 2How to Make Senior Photos Stand Out
05:48 3What is Lighting in Layers?
16:49 4Build a Lighting Foundation
18:28 5Layer One: Main Light
06:17 6Layer Two: Fill Light
08:29 7Layer Three: Accent Light
04:29 8Layer Four: Additional Light
11:46Outdoor Lighting Examples
15:56 10Outdoor Lighting Equipment
03:34 11Outdoor Lighting Camera Settings
09:31 12Outdoor Camera Settings Examples
14:32 13Outdoor Lighting Q&A
12:44 14Live Shoot: In-Studio Lighting
20:52 15Live Shoot: Metering
04:17 16Live Shoot: Large Soft Light Setups
12:13 17Live Shoot: On Camera Flash
14:07 18Live Shoot: 2 Light Set-up
16:29 19Live Shoot: Accent Light
05:06 20Live Shoot: Hard Light
11:30 21Live Shoot: Create White Backdrop
08:32 22Introduction to Direction
28:42 23Live Shoot: Photo Booth Direction
11:13 24Live Shoot: Basics of Direction
19:34 25Live Shoot: Beauty Dish Close Up
08:22 26Live Shoot: Subtle Cues through Direction
19:33 27Location Shoot: Senior Introduction to Shoot
11:33 28Location Shoot: Use Location to Your Advantage
29:43 29Location Shoot: Create Scenarios
19:50 30Location Shoot: The Walk Plus Variations
10:50 31Location Shoot: Outdoor Lighting
15:18 32Pre-Session Consultation
12:35 33Prep Clients for Purchase
06:47 34Get to Know the Client before Session
08:04 35Decide Clothing Options Prior to Session
13:14 36Client Interaction
09:14 37Pre Session Consult Q&A
12:35 38Image Workflow Overview
15:41 39RAW Editing Workflow
27:29 40Basic Photoshop Editing
13:58 41AlienSkin Exposure Color Toning
26:27 42Marketing to Seniors Overview
05:18 43Marketing to Seniors
16:24 44Alternative Income in Any Market
03:57 45High School Posters as Marketing
10:38 46Seeing Moments Differently
17:27Lesson Info
Location Shoot: Outdoor Lighting
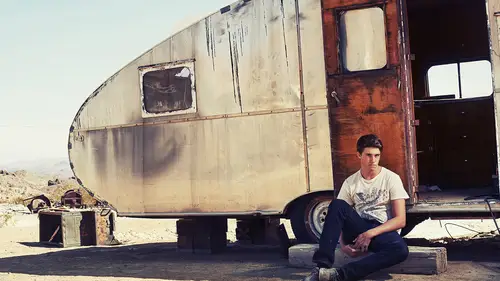
The final video from the pre shoot is of Noah. It also involves lighting and a little direction. I just had him walking along this bench. It was kind of concrete curb type bench. And I wanted him to basically be moving naturally and giving him settle cues with his feet and his jacket. From zipping up his jacket to taking it off and putting it on. And as you see, I kept him looking towards the light 'cause we wanted flattering light. I just wanted to catch him doing something candid, but still be within the light. So, let's take a look at that. All right, so now we moved outside. We're using the strobe outside again with Anna. She is our brave model here on the log in her Full Toe Shoes. So, we've already metered and done the whole setup, so I'm just gonna go ahead and shoot. We've framed it up so we have all these logs going down the beach with trees behind her. I'm gonna shoot from a low angle to try and keep some of the people in the background out. And we're at a two hundredth of a ...
second, ISO 100 at F11. And I really wanna make the background nice and dramatic, so we've gone all the way up to F11, which is about a stop over the ambient. So, Anna, I'm gonna have you look right here. One test shot, just looking this way. In fact, I'm just gonna get down. So, I framed it up just so we have all these logs. One, two, three. Okay, so I'm gonna have you almost turn back, so you're looking towards the building. Yep, and then looking back towards me. So, turn a little bit more this way with your shoulders, open up. Yep, shoulders towards me. So, is there a certain pose you would do right here? I know you're on a log. It's not your normal dance area but-- Okay, anything you can do where your head ends up facing from me or that way, okay. All right, one, two, three. Awesome, yep, right there. One, two, three. Yeah, this looks great. I'm gonna stand up just a little bit. All right, one, two, three. One more just like that. One, two, three. Now can you do some where you almost end up looking off that way? So, even if you turn around so you're facing this way. And then, whatever you would do that your head ends up almost looking back towards the light a little bit. Yeah, that's perfect right there. This is the best one, one, two, three. One, two, three. One, two, three. I'm gonna switch lenses, we're using the 50. I'm gonna switch to the 70 to 100. Just to really get the compression going on with the background. With that, I need to scoot back just a little bit. So, that's good right there. Do the same ones where your hands were up and you were looking off this way. Oh, yeah, this is great, one, two, three. One, two, three. I like both hands up, do that one more time. One, two, three. Now, looking right towards me. Yep, one, two, three. Last one, one, two. Open up a little more. Just so this arm isn't blocking the light. Just have this arm down. There you go, whatever you would do like this, yeah. One, two, three. Last one, one, two, three. Okay, perfect. Okay, so now we've moved back outside with Noah. We're gonna keep going with using the studio strobes outside. We've put the silver Profoto Umbrella back on, just to get a little bit more edge to the light. It'll have a little more specular quality than the white beauty dish we were using. What I wanna do is really capture his personality. So, we have him wearing his coat. He's got his boots on, jeans. Just kind of dressed a little more urban look. So, we moved outside at the concrete. What I'm gonna have him do is, I'll give him a series of directions as we're up here. We've made kind of a sweet spot, where he's standing, where the light will hit. So, he has free range to move around that whole area. And the light will always look good. So, I've already balanced it out and metered everything. I'm at a one 1/60th of a second, F9 at ISO 100. It's about a third of a stop over ambient. So, the background will appear a little bit darker than it actually is. And he should really pop because our light's set for that exposure. So, let's go ahead and start shooting. I'm gonna frame it up. I really love all of the trees, and grass, and everything behind. And he's on this cement block. So, I'm gonna frame it up so we have all that in the shot. So, Noah, what I'm gonna do is, I'm gonna have you just kind of walk back and forth within that spot. Generally, you'll just be looking back towards the light, or at me. And I'm gonna have you start just kind of how you are. So, kind of walk back, and then, do a full turn and go back. I'm just gonna keep shooting. Yep, head back that way. Almost look down toward your feet once. Yep, now turn, right there. Walk back this way, but almost look over your shoulder like someone's coming out that door, yep. Eyes right here. All right, now I'm gonna have you stand right in the middle of those two spots. And you can kind of be on the edge. You know, cross your feet up, whatever is comfortable. Yeah, come forward a little bit. And just kind of like swing one foot off the front just a little bit. Like you're looking at what you're doing, yeah. Now, I'm gonna have you take your hands out of your pockets and almost zip up your coat. So, kind of pay attention to what you're doing. Look up here, awesome. Yep, almost look out there, like someone you know is walking up here, "Oh, hey." (laughs) That's good. Do the same thing but back towards the light. So, turn this way. I'm gonna have you unzip and zip your coat again. And kind of look back towards the door, midway through. All right, so look right-- Yep, yep, so start zipping up that jacket. Turn out towards the parking lot here. Actually turn this way to start. And now, stay right there, zipping your coat. And just look back over your shoulder, as you're doing it. Yep, that's perfect. All right, unzip it all the way, just full speed. There you go. Looking right here. All right, now what I'm gonna have you do is, I'm gonna switch lenses. And actually put on a longer lens. I'm gonna go from the 50 to the 70 to 100. That up here. So, we have the 70 to 100. Again, we're at one 1/60th at F9. I'm gonna scoot back a little bit. And what I'm gonna have you do this time, you just kind of walking back and forth with your jacket in that hand. And you'll be either looking towards the door again, where the light's coming from, or at me. So, as you're walking this way, you'll be looking at me. And as you're walking back this way, you'll be looking over your shoulder towards the door. All right, so we'll do a back and forth, like three or four times. And I'll just keep shooting it at the 70 to 100. All right, perfect. Yep, there you go. Yeah, turn around. Now kind of look back over your shoulder. Eyes right here once. One more time just like that. Perfect, yeah, there you go. Look down once, just kind of. Yep, last time, look right at the door. Now, down over your shoulder. Eyes right here. Perfect, all right, that's great. So, that's kind of one of the things we'll do. Now, I'm gonna have you switch. You can take the jacket, just set it down. I'm actually gonna have you grab a seat on that bench. I'm gonna switch back to a wider lens, and I'm gonna get much closer. So, I'm gonna go to a 35. We'll move in quite a bit closer. So, now I have Noah seated. We're still using the same area. Because he sat down, he is now, about three feet shorter than he was. So, I need to lower my light by approximately the same amount. Everything will meter the same 'cause the distance didn't change. So, what I'm gonna have you do now is, just kind of leaning forward. I know earlier we had you do some things with sleeves and all that. I'm actually gonna have you do that again. But we're gonna use the lights now. So, yeah, just kind of like fixing your sleeve there. And since I'm using the 35, it's just a much different feel with the lens. Let me get one look at this. Oh, yeah, that looks great, yep. Don't even look at me. Just kind of looking up towards the door again. All right, now I'm gonna have you just kind of lean forward. Yeah, just like that. I'm gonna lower this light even more, since I keep having you get lower and lower. And again, certain shoots, it's beneficial to have an assistant. Normally on a senior shoot, I don't. Because it's just me. A lot of times, I'll have parents with me, or brothers and sisters. I don't necessarily trust them to move the lights, so I always just try and handle it. And that's why you have sandbags and other things to make sure. All right, looking right here. Looking off this way once. Eyes right back here, yep. And now, I'm gonna have you turn so you're facing this way with your body. And just kind of leaning forward, almost looking back in the door there. Eyes right here. Perfect, all right. I think we're good with that. Now we'll move on. All right, so there's two more scenarios. You know, out on the beach using the beauty dish. Here's kind of one of the resulting images with that. So, got lucky and got a bird in there. (chuckles) But yeah. It was just finding this. The sun was out a little bit. It was actually coming from our right, so that's actually acting as an accent light. You can see it along her arm that's extended upwards. Even along her leg. They look like they're lit from both sides. That was the sun just coming in gently from the right side, where our strobe was off to the left with the beauty dish. And I went with the beauty dish there just because I wanted that softer light with what she was wearing and kind of the whole mood. I didn't want the silver umbrella anymore. And then, this one was shot with the 50. You know, I can just tell by the compression. There was a lot of stuff going on in the background as far as people and everything. So, a vertical shot worked better here. Because off to the right in the frame, someone was down there having a picnic or something. And then, the left was a parking lot. And neither of those were too pretty for a photo. So, this worked out here. Again, I said I was shooting about a one stop over ambient. Meaning, if you were just to be there looking at the trees, they were a lot brighter to the eye. Or if I were just to take a properly exposed shot of the scene. But I wanted it to appear darker, so she really popped off of the trees. So, that's why it was set up a little bit that way. Just to let her shine. And have the light be brighter than natural. And then the other shot is of Noah. This was definitely a shot with the 200. You can see the difference, just going back. This is a 50, look at the trees. Versus the compression that happens when you switch to a long lens. So, you know, he appears much closer to the trees. But in reality, it was about the same distance. It's just the difference in lenses. This was, as I said, her shot, it was a whole stop over ambient. This was only about a third of a stop. So, the trees and everything are a lot lighter. The light is subtle. Had we not had the light there, there's a brick wall immediately outside the right side of this frame. So, he was just looking at all darkness. So, had we not had the light, it would be really dark on him. So, that is just a little bit of light that brings it up. This is less about making something surreal, and more polishing up the light that was already there. So, he's looking into that umbrella. It's very subtle. And again, I was just having him walk back and forth and carry his jacket. Just looking for a look that seems natural and not awkward. So, that's why I have people do things a lot of times. And I'm sure there was a lot of shots in here that I just could quickly scroll through. And this was one that just caught my attention. It seems like a flattering, yet authentic look. That worked out. And then, I just toned it a little bit darker in Photoshop. That was the result. So, any questions about that video? Allison Scott had asked a little bit ago, "What is your white balance set at "when you're using strobe combined with ambient? "Can you just talk to that again?" Yeah, generally speaking, I'm all about keeping my white balance at about 5,500 Kelvin. Sometimes I do need to adjust it in RAW just a little bit. Generally speaking, with these situations, in open shade or even sunlight, combining strobe and ambient. My strobe's acting as the main light, and that strobe is balanced at 5,500. Open shade is pretty close, along with sunlight. You might be off by a couple hundred degrees Kelvin either way. But it's gonna be close enough with that strobe, that 5,500 is gonna get you in the ballpark. I do not like to use auto. Because who knows where it's pulling from. You know, it gives you something different every time. I'd rather just have a consistent look at 5,500. And if I need to adjust in RAW, I can make and adjustment for one image from that set, and then, apply it to all the rest. And that'll generally take care of everything. And then, I'm in a little more control by setting it myself and not letting the camera choose it when it's on auto. Right, and I think the question had come in, perhaps when we were actually inside. Okay, yeah, inside that is a good question. One of the things we did when we got there is, there was so many different light sources inside. There was some really warm lights on the wall. There was some like cool LED lights in the ceiling. We turned all of them off. So, that was my way to control the white balance and get it how I wanted. Was, all right, first thing I wanna do is find the light switch and turn all of these off because the only light that I want to hit her is the natural sunlight coming in the window, or my strobe. So, you know, sometimes you can't do that, and you have to mess with it. I know we talked about that earlier of mixing some ambient with that. And occasionally, you can use gels. Or you know, composite two images together in Photoshop. But if there's a way where you can turn off the lights that are causing that issue, do that. And quickly, were you using manual or TTL mode in terms of out on the beach? I used manual for all of those. When I'm getting that far away, I feel like sometimes the camera, when it's trying to see TTL, it doesn't know exactly what I want to happen. So, sometimes I'll use TTL to get that first shot and put the light at the general area I want it to fire. And then, I'll switch back to manual and adjust it. But for this, I had already metered, earlier in the video. So, I set everything to manual. Did my camera setup just like I would in any landscape shot. So, I knew what I wanted the aperture to be. So, all I had to do was meter, and make the light match what the camera told me. Cool, great. One final question for outdoors. "With your seniors, how do you handle outfit changes "for senior models when outdoors on location? "Do you have a portable changing booth or a tent? "Do you use anything like that?" That is something we talk about at the pre image consultation. A lot of times, when I'm at my studio, a lot of the locations aren't that far away. So, we'll just go back to the studio, they can change. Especially if it's hot out, they can refresh, fix makeup, hair, anything like that. Grab a drink of water. So, a lot of times, we'll just go back and change. If we are going to a location that's further away, I generally don't have the seniors ride with me all that often. I'll have them ride in their own car, or with their mom. I'll let them kind of take care of that. If they wanna go back to the car and change, I'll set up the next shot, and just stay away. If they're not comfortable with that, we'll find some place that they can change. It's totally different for every shoot. But at the pre image consult, we do talk about, "Okay, if we do go to this location, "what you comfortable with?" And we kind of go from there. So, it's different from shoot to shoot. But we do address that because I want them to be comfortable.
Class Materials
Bonus Materials
Bonus Materials with Purchase
Ratings and Reviews
pete hopkins
awesome teacher and awesome technique. after soooo many webinars, it's really great to see someone break it down to the bare bones of lighting with exceptional quality results. i can listen to Dan all day. no pretense, no over the top emotional pleas, no drama! did i say awesome!!!! Plus, I'm a huge fan of the B! and B2 systems. Freedom is key. Now I can shoot anywhere, anytime. Thanks Dan.
user-2f7caa
This is by far the best class on senior photography I have found on creativelive. Dan explains the technical aspects in an easy to understand format. He does a great job going through studio shots, outdoor shots, editing and marketing. He's given me some great ideas and inspired me to be more creative. I am going to rewatch the lighting set up for the "hero shot". It's super cool!
Tristanne Endrina
Dan was great. His class was very comprehensive but easy to follow. The slides he used weren't flashy. Instead, they were simple and he went at a good pace. I left feeling like I could really pull off the lighting techniques he taught. I'm excited to put what I learned into my photography. :) Thanks, Dan.
Student Work
Related Classes
Portrait Photography