Lessons
Lesson Info
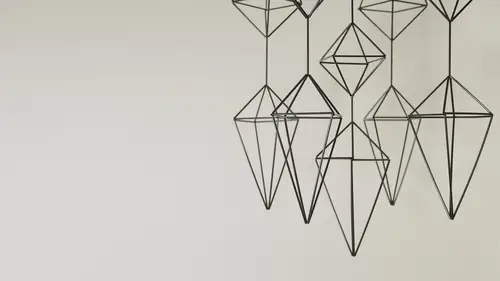
The Basic Cube Form
So we're going to start with a very basic geometric form that comprises the family mobile this isn't dr he drawn it is an eight sided polly he drawn and I have a couple of tips and tricks to simply tie this together it looks a little complex, but honestly, once you practice and get a few of these under your belt, you're going to do great. I I did also want to mention that as part of the bonus material for this course, I've put together a a simple a little diagram that's going to be helpful as you are tying these together you can see you can create them in a variety of sizes. The smaller size is simply the larger straws cut in half, you can cut them to any length you like. I did also mention that you could make these out of full size drinking straws, and this is what they look like. I had mentioned that the corners where it comes together tends to be a little bit more noticeable. Where is when you're holding it up in comparison to the smaller cocktail straw, as you can see it's just a l...
ittle bit more refined? I guess you could say these would make an amazing mobile but just know it's going to be huge once it's all put together, so keep that in mind and I think when you are making one of these mobiles initially, you should just allow yourself to play put it together in any configuration you'd like, but once you start making them with untended space in mind, you'll have a better idea scale. So I want this in the corner of my living room, and I wanted to be three feet tall. Or joe. I wanted to be a foot and a half tall and in the corner of my child's play room, you know, all of those are things to take into consideration. This straw's, the little cocktail stirs when they come from store, they are just assorted colors. And when you're putting together your mobile, you want to kind of think about the color that you want to go with, and I put together a mobile that's multicolored. I'll show you a little bit later in the of course, but for my own sanity, and I think sometimes a little bit taipei, I'd like to sort all of the colors. I get a little pleasure out of that, and I also think that they look kind of great, monochromatic lee. So a couple of ways you could do this if you got just a couple of glasses you could go through and sort your different colors. I happen to have some old boxes with dividers in them, so I, uh watch part of a movie and sorted all those colors into different segments and this is just going to make it a little bit quicker for me during the course of construction s that I don't have to keep sorting through to find the color I want to go with these air incredibly simple to cut we're going to start by making the basic cube form out of the full length straws and so to begin with you need to count out twelve straws so in the even dozen four eight and twelve movies guys aside a little bit and then we're going to take our button and craft thread and for a cube that we're going to create that is this size I tend to sort of wing it a little bit on the length I am working at a table that's about five feet long and what I tend to do is just sort of spread it out for that five feet and then maybe two two and a half feet extra the length of your string is going to change according to the size of the element that you're creating but I just gave it a little snip there and you can see if I were holding a regular piece of thread it would normally be dangling like that it wouldn't necessarily kind of have the strength to stand up like that we're going to begin by threading three of our straw pieces onto the thread and um I really do love working with this threat because it goes through real we easily when I first started making the mobiles I used a standard hand sewing thread and I was tying the end of it to aa bamboo skewer trying to fit that through the straws and it was just a little bit more cumbersome and without needing to use an extra tool I am really happy so I've got this three pieces now strung on too my string and what I'm going to do is tie this into a triangular format one thing you want to keep in mind on one end you wanted tale that's at least two inches long and then you're gonna have a much longer tale on your other side so I'm just going to do a simple not to create a triangle and just because of this is my initial tie um I don't want that toe slipped loose so I'm going to double knot it there you go perfect little triangle now the next thing you're going to want to do is feed on two additional segments of your straw and again as I mentioned the chart that I put together the little graphic with the tying formation for the basic cuba is going to come in handy especially as you just begin to make these it's nice to have a reference laying out in front of you so you can see I've put two additional straws on there I tend to lay it down so that the points of the triangle is facing away from me I've got my little two to three inch tale off to the left hand side and now I've got my two additional segments and what I want to do is I want to tie this end to this corner so there are a couple of tricks that you can employ when you are tying this portion of of the the doctor he drawn together so I'm going to slip my thread underneath the corner that I want to tie to I'm going to kind of hold this flat against my work surface and pull this up so it becomes a nice and snug now I haven't tied anything I just sort of pulled that taught what I'm going to do is I'm going pinch that intersection together between my thumb and my forefinger I'm going to take my long tail and I'm gonna fit it up through that new triangle grab it with my left hand now I'm going to tie this in a not so I'm putting my hand through that little loop and grabbing that piece of string and then pulling it through slowly now when I get down to a loop that's maybe two three inches long I'm gonna place this back down on my work surface I'm going to hold my straw structure stable and I'm going pull this and then slowly pull that thread down towards the corner. Now, this kind of tying technique I came to after a lot of trial and error because it was having difficulty not being able to tie my corners together tightly enough, because if they're too loose, your element is going to look really sloppy and it's not going to look geometric, and you're going tohave pieces falling off. Now, be kind to yourself the first few times you do this, you're tackling a new craft, it's not going to come together perfectly the first time around, the only way you get better at this is with a little bit of practice, so we've tied on to pieces, so now we have a total of five straw pieces. We're going to return to our long tail, and we're going to add on to more of the straw segments, one and an additional one, all right, so we've got this strung up, so now we want this points tied to the upper corner. So again, I'm going to take my end of my thread, I'm going to place it underneath, I'm gonna pull it through so that it makes it nice and taught and creates that intersection, I'm goingto pinch the intersection together between my thumb and my forefinger, going to take the end of my string you know, bring it up through I'm going to hold it in my other hand and then I'm gonna pull that not through sometimes it will get caught on the opposite end and you need to pull it back out again. Totally fine, it's part of the process so again, we're gonna put that up through. We're gonna hold that intersection together, pull it through and pull that nice and tight all rights. So at this point, you basically have three triangles side by side intersecting and we're going to go ahead and add two additional straw segments on their one two. All right, two more segments. We're going to continue the pattern we've been creating. I'm going to connect this end to this corner, so we're going to slip are thread up underneath pinching that intersection thumb and forefinger feeding the end up through grabbing it with my opposite hand, looping my hand through grabbing that end and pulling it through to create a loop about two to three inches. Then again, I'm going to press it down on my work surface and slowly pull that not towards the core make it nice and tight and we've got one more to go, so if we add two more segments on here, we've just about got our basic cube format completed one and two, so again thiss and is going to be tied to this corner slipping up underneath, slipping the end crabbing with my opposite hand, looping my hand through that big loop, grabbing the tail end to create a tinier pressing down on my work surface and then slowly pulling that not towards the corner. So now this is what our formation looks like, and we're almost complete, but there's a couple of steps we need to make in order to create a three dimensional object, you'll notice you've got one remaining straw segments leftover. Go ahead and string that onto your long tail that you've been working with way go! So now what's going to happen is long tail and that short two to three inch tale that you left at the initial beginning. You're going to tie this point to that, so you're to string pieces are going to tie together, and I would probably go ahead and just double knot thiss make sure it's extra secure, and then you can go ahead and trim off those two tail pieces. Now the long tail segment is long enough that we're going to be able to use it for our next step. If a tiny point, you run out of thread, so you cut your piece too short not to worry, simply cut yourself an additional piece. Not the two ends together and continue working because in most cases that little not is going to be concealed somewhere within the interior, one of the straws and you're not even going to see it. So now this is what our formation looks like. You've got sort of this pyramid form on the bottom, and then these two little wing flaps, we're going to take these, too, and we want to tie this point to this point, so comes together to form our cube, so you've got your remaining tail piece. You're gonna loop it through and then just tell yourself a double knots slowly bring those corners together and then once more that's it that's your basic cube form. Now you will notice after you initially tie it that some of your corners are not going to be, they're going to be a little jang ki like some of the pieces are just not going to be all pointed in the same direction and kind of take your thumb behind the corner and just sort of push him out. So all of the straws are in alignment, but that's it you're arctic, he drawn. This is the basic form of your himal ee mobile on our next segment are going to create a variation of this, but once these air compiled in mass it's going to create a beautiful family mobile
Class Materials
Bonus Materials with Purchase
Ratings and Reviews
SunSoBright
I'm not a crafter but watched this out of curiosity and did not even know what a Himmell mobile was. I have to say I've become a Robert Mahar fan. He explains some of the history behind the Himmell mobiles and makes things simple yet goes into details and gives tips that make for a very neat and lovely and fun art piece. Love the idea of making one of these to hang plants! I will keep an eye out for more of Robert Mahar classes as I love his instruction.
Anna Butterfield
I really enjoy Robert Mahar's classes. He's an excellent tutor, very encouraging and always does such fun and interesting projects. My 8yo daughter and I have been working on these Himmeli this afternoon. Will take another couple of goes before Im ready to post the picture. But a very enjoyable class
Student Work
Related Classes
Mixed Media Art