Threading Your Singer
Lesson 1 from: Singer Simple™ Sewing Machine Model 2263 - Fast StartBecky Hanson
Threading Your Singer
Lesson 1 from: Singer Simple™ Sewing Machine Model 2263 - Fast StartBecky Hanson
Lessons
Lesson Info
Threading Your Singer
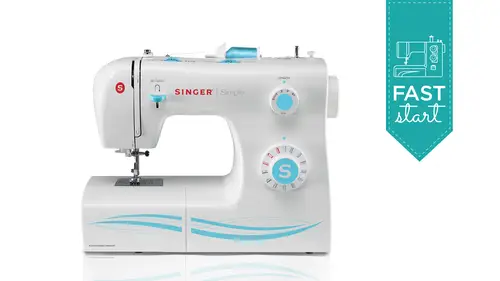
Hello internet and welcome to creative live my name is ken klosterman and I will be your host today this is a becky hanson and we are so excited to have you today how are you doing great thank you great this is one of what will be six over the course of the next three days fast start classes on different singer sewing machines and this morning we are doing the singer simple machine it's model number two to six three correct our most popular models and as we were just talking about we're going to make simple simple I like simple simple becky we're so excited to have you here today you have been educating on the singer machines for thirty years because incredible you are the director of education for singer and are very very experienced with the's tutorials and videos so we couldn't be more excited to have you here and supplied you're right that graft channel and I know we have a ton to get through today everyone so we're going to be taking your questions you can act asked them right the...
re on the live page but for now I'm gonna let you just dive right in and take it away will do bang like we have a lot we want to get through today I'm going to basically take you through the basic things the machine condemn gave you a little tour the machine to start we're going to in the first part of the class, we're going to cover a lot of sewing machine basics, talk about needles, talk about threads in the process of just kind of getting started sewing go through some troubleshooting things may be if you already have this machine and I'm going to show you exactly how to use it. If you are considering purchasing a machine, you're going to find out everything you need to know to determine if this is the right machine for you. So I'm going to start out by just showing you the box, and the reason I want to do that is I would just want to encourage you that when you purchase your machine any any sir, any singer sewing machine we encourage you to hang on to your box if you ever need to transport your machine, if you want to send it for any kind of warranty, your service work, the best place to do that is in something that fits it perfectly. So we encourage youto hang on to that box. The other thing I wanted to show you before we get started is just how the machine looks in general, and what I'd like to do is show you actually what the inside of your machine looks like this is, I always find people find this very interesting that the machines are very kind of lightweight looking on the outside, which we intend because we want them to be portable, but where it really matters is metal, and I know people are often quite concerned about that, so I thought you might be interested in seeing with the inside of your machine looks like so let's, go ahead and get started with taking a look at what comes with your machine. When you take it out of the box, you'll have a little envelope in there, and there is some of these papers in here want to show you what this is? Of course, first and foremost, you have your instruction manual, and I want to encourage you when you take your machine out of the box to really start before you even get started sewing. I think we even say it here in the in the book, but sit down and read through this because you'd be surprised how much information that's really helpful for you is in your machine manual there's also some paperwork that shows you how you can be in touch with singer if you need to get in touch and ask any questions, some warranty information, there's a little dust cover, so if you if you're lucky enough to have a place to so and you can keep your machine out all the time there's a little dust covered that comes in here so you can keep that covered up so on, and it even has a little place for the handle if you need to temporarily move it. But this little just cover just kind of keeps dust out of all the little thread paths and so on, and then you also have this wonderful quick start guide and what this does is it's a very, very clearly illustrated guide for how to thread your wind and in searcher bob in and you turn it over and it's a very easy to follow information on how to thread the top of the machine. So you want to read your manual and review your quick start guide, you might want even keep that handy because you might want to refer to that and there's also in here a little video, quick start guide actually produce this some time ago for this machine it's in three languages and it's basically how to thread the needle howto do the bobbin and changing your presser feet and so that's all included with your machine. So why don't we just go ahead then and get started? So I'll be seated here and I'm going to first part of the machine in over here, on the side of the machine is where my power cord goes just plug that in and then we have the power switch to turn the machine on no, first first thing we need to do is to wind the bob in and so to do that we need to actually get our bob in, and I'm going to slide this this's called your extent removable extension table. The removable extension table actually is a place where you how's your accessories. Sometimes we get calls from folks, they say I didn't get my accessories, but they're actually here in your little extension table. So you want to take a little peek in there? Um, somebody take a bob and I open up the bob and cover here to access where my bobbin is located. This is your bob in case, and you're bob and sits inside the machine. We have transparent bobbins, these air, a bobbin style class fifteen and what I want to show you about that before we even start winding is I want to show tell you a little bit about bobbins, because this is really important for your machine to work properly. You've probably been to this store, maybe a sewing store, or sometimes the drug stores and grocery stores even have bobbins singer bobbins and you'll see all these different styles of bobbins and you think, well, they say singer. Works for my machine but bobbins aren't all the same you want to have exactly the rights you want to use the exactly the same bob and in your sewing machine that the same exact same style that is that comes with it. So if you look a little closer at the's, particularly here, where will say this one is called a class fifteen a class fifteen bob in so you look here right away you can see it, but the top it's his class sixty six don't want that one that's not the right style for your machine. These are more of a kind of a vintage style this class sixty six thes metal ones that's not the right stuff for your machine either, so you don't want that one. We even have a sometimes there are paper bobbins that are pre wound, we don't encourage using those because they don't fit the machine, but they're not the right fit for the machine. You'll notice that the regular bob and that you do you are to use is a little deeper it's gotta fit the bob in case properly so you don't want to use the pre juan bobbins and then here we have three different packages that say fifteen on them so you would think fifteen means fifteen but what we want is this one right here the class fifteen, the transparent bobbin this one says fifteen j but that's actually a different style of bobbing for a different series of machines so we don't want that one and the metal bobbin is for a different machine as well so this is the bob and you want to look for when you're going to go buy some extras or some replacements I know people like to have a lot of bobbins because they fill them with lots of different colors of thread you want class fifteen bobbin ok so let's go ahead and wind a bobbin and to do that we're going to go in our extension table here and we're going to remove our school cover I mean a stealthy thread on the top of the machine with the thread reeling off this way slide that on snugly over to the right and then you're gonna put your school cap on and slide that over to the right so the school isn't twisting and turning by the way before we keep on going let me just show you a couple of things that come in your extension table in your removal extension table here I mean explain what all these things are as we go through the class so let's take all this stuff out of here you yet there are some extra bobbins in here already so there's a few of those you get a buttonhole foot for sewing buttons and we're going to do that in a little bit you get a foot for sewing buttons onto your project so you don't have to do any more hand sewing of buttons that's wonderful in a great time saver this is a feed dawg cover plate and I'm going to use that later so I will explain what that's for when we get to that point this is a smaller school cap and you would use this for whenever you would so with smaller or thinner spools of thread you want your school captain more or less match the size of your school so you get a second school cap there you get an extra set of needles and a little screwdriver this is for I'm going to show you this in just a little bit there's for adjusting your bob in case thie other end is for when you want to take your needle plate off to get inside the machine to do some cleaning and then this piece right here is actually a lint brush but when you pull this apart and turn this around this becomes a seam ripper although we like to call that unsettling so so that is everything that you get with your machine and we're going to use all that stuff through the through the morning here so back to the front of machine we're going to thread wind the bob in and then insert the bobbin so to start we're going to take our thread up at the top and we're gonna there's a little thread guide up here we're going to snap our thread into the thread guide and there's a diagram right up here at the top of the machine it says it shows you to look to different little thread paths one is for winding the bob and and the other is for when you're going to thread the top of the machine when you're going toe actually thread the needle so we're going to follow this one right here where we're going first snap it into this guide and then we're going to put this like kind of like a c shape around this piece right here this piece is called your bob and winding tension disk, so you want to feel your thread tucked into the bobbin winding tension disk you should feel a little bit attention on that, so that feels really good so we're ready to put the end of our thread into the bobbin now when you do this, um you want you don't want to put your threat you're bobbing on here and then just kind of wind it on there and go that's not the way you want to do this that will cause it to not wind properly what you really want to do is make sure first of all, this is your bob and wind er and your bob and wider stop and you want to make sure before you put your bobbing on here that this is actually all the way to the left, it goes to the left and to the right to wind, it goes to the left to release it, and so here's our bob in and what I'm going to do is show you could see the end of my thread it's going to go from the center of the bob and out, we're going to put the end of the thread into this little hole out the top, and this is very clearly illustrated on that little quick start guide that I showed you at the beginning, then you're going to come over here, he got that wrapped around their, um we're going to set this, push it down, and you want to make sure it goes all the way down if it's sticking up a little bit like this it's not gonna wind properly, so make sure it goes all the way down and then you're going to push this to the right to engage it and di clutch the handling, and so now we're going to step on the foot controller, let that go around just momentarily, just a few turns and then you stop, take your foot off the foot controller, and what I'm going to do is use my little scissor to snip this thread and off of here. And then you can continue to wind the bob it will stop when it's full it will stop turning when it when it gets enough thread on it, it will rub up against this bobbing rinder stop but you can if you if you feel like that's enough thread on your bob and for your project, you don't have to fill the bob and you can stop any time so let's say we're happy with that amount of thread we can stop right now and taken take our foot off the foot controller and now to remove the bob and don't you don't want to just pull it straight up off of here you want to push this back to the left and then you're gonna lift this up and use your ah scissor to trim that thread tail and now you've successfully won't your bob in now what we're going to do is we're going to set it into the bob in case and this is what I want to show you how this works really? I'm going to take my time to show you this carefully I might even do it a couple times when you set your bob and in here this is your bob in case here's your bob and you want a layer bobbing in here so that when that sets inside there before you begin threading it, just give a little poll on this tale and make sure that it's turning in a clockwise direction if it's going against the clock if you put it in here the other way and you pull this and it's going against the clock you're not going to have stitches that looked very good it might not even so properly so you want to make sure that that goes in there and it's turning in a clockwise direction and that all looks really good so then we come over here on this side and there's a little slit right here that this thread will just slide into and then we're going to bring it up and around and you should hear a little click when that goes in place and now we can pull our threat and I can feel a little bit of tension on there and that feels really good so let me do that for you one more time and dropped the bob and out of here we're going to drop it in so we're going to pull the thread so is going clockwise we're going to bring it into this little little tiny slipped it's a little hard to see it's quite a little small but it's there and then bring this around and you wantto hear that little clique and then you're going to hold the bobbin case by this little hinged a latch threads gotten a little long there from doing that let me trim it out a little and there's a little hinged latch here you want to hold this so that this arm is pointing straight up when you bring this down to put it inside your machine, this top of this little arm here should be at twelve o'clock and when you kind of jiggle this around to place this in here, sorry, my needle needs to be up. There we go, there we go. It should just you should just feel it kind of settle into place. So let me do that once again. You just bring this in that little arm about twelve o'clock and just set that right in place. You almost kind of feel it set in like it'll settle right into its little place. It's gotta correct spot if you don't have this all the way in and it's sticking out a little bit, your needle could come down and hit the case because it's not all the way in, so make sure that that's in all the way case and now we're ready to thread the top of the machine. So we're going to start again with our thread going into that initial thread guide. But this time we don't need this bob and winding tension disc anymore, that's just for when we wind the bob in, so we're going to come here into this pretension area and before we go any further, what I want to tell you is over here on the back of your machine already had it up, but I want to tell you about this is this back here is called the presser foot lifter and when you get ready to thread the main part of your machine, you want to make sure that the presser foot lifter is up this is probably one of the biggest mistakes folks make when threading their machine they don't know they don't think about it or maybe I think I want to see the needle better so they put it down out of the way but what can happen? What happens when you when you leave the presser foot lifter down when you thread the machine, you're not going to be threading it properly, so what can happen is you can you be bypassing the tension thread won't go in the right places and you'll have a stitch issues so we'll talk about that more in just a minute, so let me just show you correct threating and then we'll talk about, um um the effects that it can have if you do it incorrectly so we step into the top here with snapping it it's kind of like flossing your teeth both of these thread guides when you snap it in and you snap it in here kind like flossing your teeth hold it with two hands I would even keep my fingers on this end of it while I hold this and bring my thread down and then you bring it around the whole thread path here is marked with a little chart and with numbers so it's really easy to follow come down around this little u turn and then we're going to come up and let me just talk up here a talk with about this up here this is your take up lever we want to bring the thread around so it slips into the eye of this little silver piece right here and then you bring it down into the rest of your thread path now before we continue on with the automatic needle threat er and how to thread the needle I want to just go through this one more time because I really want it I want you to see this closely this is probably the number one reason that folks thread their machines wrong let me just pull this out and trim that because it's getting a little long um bring it bring your threat in here snap it in in here like so this to get this to its highest position you want to turn your hand well toward you until you see it rise up into place if this was not in its highest position when you get past this point and you start threading your machine even though you're following all these little arrows and you're doing everything right if that isn't in the highest position it's not going to go in there and then when you go down and you're threading you're doing everything right it's not going to so it's going to almost sound like chunk chunk chunk chunk really loud because it's not pulling it's not creating stitches it's just it has no threat in it so after you've brought your thread into your top area here before you go on you just want to turn that hand well toward you make sure that will take up lever is up there see if you can just see and there's a little eye and you don't have to thread it this way like through the eye it's actually a self threading little take up clever so we're going to snap the thread in here down around that little you turn up from right to left and then as you bring this forward that thread will just naturally slip in there it looks perfect and then we're going to come down and then there's a little thread guy just above the needle you just took the threat behind there it's kind of like talking your hair behind your ear you just kind of talk it behind like that now there's an automatic needle thread her which is a great time saver because you don't have to if you you know, struggle seeing to thread the eye of the needle this's all automatic now so we're going to bring this automatic needle thread we're gonna pull this straight down push it down all the way can we go? Sorry my finger was in the way and what happens here when you bring this down you see this little arm that swings around what's happening when you bring this down and push it all the way down sometimes folks don't push that all the way down. You got that one extra little push there there's a little mechanism that comes around so imagine that like this, like what I'm doing here with my hand is like the eye of your needle. This little mechanism here has like a little hook on it and when you push down on that automatic needle threat or this little hook sort of comes around and comes into the eye of a needle. So when you took your threat in here it pulls it through and it gives you a little loop that then you can grab and pull right through. So let's do that we're going to bring this down and there's a new stage of the thread on the left side of it and then you took the threat up in there and it's going to grabbed out loop and I just pulled out loop through and my needle is threaded we can do that one more time to think, ace, you didn't quite catch that. The threat is getting kind of long money clip that so once again the needle threat or we're going to drop that down. Look the thread to the left of there's, a little peace that extends down here that you took the threat under, then bring this that little pin brings that loop through you just pull your thread through so you no longer have to try to thread the eye of the needle yourself. And then the only thing we have left to do now is to draw the bob and thread up to the top so we can start sewing. I'm gonna turn my hand, we'll always toward me never turned the hand will backwards. It always turns toward you and as you do that you pull on your needle thread a little bit and you'll see the bobbin thread comes up through the hole in the foot like a little loop, and you just grab a hold of that and you put both threads under the presser foot and you're ready to so okay, so I'm gonna put my extended in removable extension table back on the machines so I can have a nice flat surface for sewing. And I'll just give you another just a quick little tour of the rest of the machine here we have this is our kerry handle which makes it very easy to transport the machine and then we have our pattern selector dial this is where we what we turn to choose stitches we've got our stitch length dial. This makes my stitches shorter together further apart our stitch with dia, which makes our stitches narrower or wider. This is our tension wheel on and talk about tension in just a moment and then our reverse lever for sewing stitches in reverse toe lock them okay, so I'm all set on straight stitch and so let's just go ahead and get started sewing and so you put your fabric underneath your press or foot, then lower the presser foot too. So I get my foot controller here where it can reach it and if you want to just kind of hold your thread tales as you start, you don't have to pull on them anything. If you just want to pull them and you start and then the more that you step on the controller is the amount that you saw or the speed that you saw now there's your basic seen what you want to do when you get to the end of a scene has turned the hand well toward you until the needle isn't its highest position. And it just starts to descend. And then you're ready to remove your work from the machine. And you can either cut your thread manually with a scissor. Or you can cut it with the thread guide back here. There's. A little built in thread guide that will let you through the trim. Those tales.