Lessons
Day 1
1Calibrating Your System for Accurate Results
40:07 2Shoot Prep: Workflow & Lighting Setup
17:07 3Shoot: High Key Beauty Portrait
19:13 4Shoot: Hollywood Glamour
17:54 5Student Shoot: Colleen
13:48 6Student Shoot: Andrea
12:27 7Image Review and Q&A
15:46Skin Tone and Black & White Points
27:01 9Image Selection
25:20 10Global Color Correction
21:02 11Retouching Basics
46:12 12Advanced Skin Smoothing Technique
46:36Day 2
13Luminosity vs. Color
14:44 14Shoot: Low Key Dramatic
28:43 15Student Shoot: Ian
11:54 16Student Shoot: Michael
11:20 17Student Shoot: Colleen
03:41 18Shoot: Beauty Light
12:57 19Luminosity Blending in Photoshop
16:07 20Applying Luminosity
12:19 21Color Correction in Lightroom
23:57 22Detailed Retouching
23:55 23Color Space Discussion
19:16 24Darkening and Lightening Skin
21:10 25Spot Treatment
12:20 26Sharpening
29:57 27Compositing
54:51Day 3
28Introduction to Shooting Movement
11:41 29Shoot: Dancer Leaping
10:52 30Students Shooting
44:15 31Shoot: Dancing
14:59 32Student Shoot: Ian and Colleen
08:57 33Shoot: Dancer Portrait
15:49 34Dancer Session Q&A
11:30 35Figure Retouching
10:52 36Liquify Filter
10:16 37Masking and Edges
13:22 38Importing a Background
16:47 39Color Change and Motion Blur
24:45 40Enhancing Color
17:59 41Removing Tattoos and Adding Effects
21:30 42Lee's Photoshop History
21:56 43Final Portrait Edit
19:03Lesson Info
Image Selection
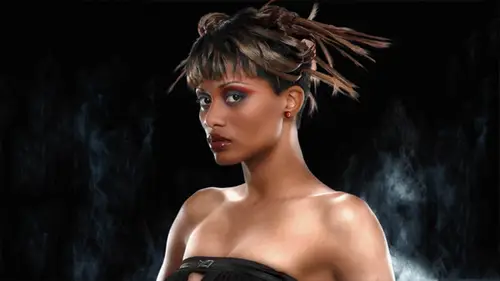
Okay, so so now I'm actually going to go into um into photo shop here so it's escape out of this on we're actually going to go first in the light room because we have to pick our pictures and uh you know, I went through all this I shot this thing and and I didn't shoot a great card so I apologize to the internet audience out there I'm so sorry I didn't show shooting the great card in fact I forgot all about it and so I shot the great card at the end so I took took this picture with the same lights that we shot everything in and this is my my gray reference uh and so what I have to do tio build a ah white balance for all the shots is to go here into the develop module and uh pick my color temperature tool a little eye dropper here and click and that is going so so now if you see over here the numbers it's fifty four point three fifty four point two fifty four point two in light run the numbers always given to you and percentages because light room uses this sort of linear pro photo colo...
r space that it's doing all its internal calculations in so it's sort of like the numbers are more like leiby numbers in the r rgb numbers that were used to so we're looking for a fifty percent gray and this is pretty close but you noticed on now once I click it's within a tenth of a percentage point of being neutral all the way across so now that is my custom white balance and uh so so this now I'm going to use and apply it to I've got it selected here I'm going to select all the pictures that we took because we used the uh really essentially the same strobe certainly for all of the darker shots and I'm just going to play it everything so I select everything here in light room and um I'm just gonna click on sink and really the only thing I need to sink is the white balance so little synchronized that now everything has the same white balance and it should be neutral to the neutral reference which is this is great card but that does not guarantee that we're gonna have good skin color but so what we're going to do now is I'm going to pick some shots and uh actually let's let's uh let's go in and look at some of our other now unfortunately, I'm not sure how these other shots are going to compare to my camera um so what I'll do is I'll build a collection so they get a little mini a lesson in in light room organization, so I'll select these images which are the high key images and I'm going to make a a new collection in this light room library so I click on the crust thing to create a collection and this is going to be my high key collection and I'm gonna include the selected photos. All right, so now I have this collection that has all of those shots in it and I can find, uh, let's see, do we have nobody else shot on the high key? So let's, let's go back and make the the glamour lighting collection here, I think that's all of these and I make another collection here. That's the glamour include the selected photos create there's my glamour collects I guess I'm much better at photography than spelling, but I'll let that go. And now just add these, uh, these two are this are students, uh, pictures and add those into our collection here, the glamour collection, they could just dragged them and dropped them on to that collection. So now all of them, all of those photos would be in here. Okay, and here are monitor looks dark, but let's, let's uh, hard to know whether I am working on a calibrated monitor here. Um let's, uh, let's see, just kind of looking around at my numbers so it looks like the top of the of the frame is pretty dark. I'm seeing fourteen these air again not like the regular rgb levels that we know in love in our no more photo shop their percentages so you kind have to think that you know uh zone one is about thirty percent so we're pretty black down here and then once we get out of that shadow down into this area we're at thirty percent so that's like that's like a zone three so this is not this is a little darker than mid gray uh our skin ideally I'd like to see that well these okay so these percentages seem about right even though the image looks a little on the dark side to me um I think that might be the monitor it's probably the monitor I don't know what it's looks like over the internet so I'm going toe I'm just going to kind of leave it alone and and hope that our internet audience wherever you are out there uh it looks good for you if somebody can chime in and in the chats and let me know if does the image look okay or doesn't look too dark just give me some feedback because it's really hard to tell in this environment here all right all the comments are starting to come in and people are saying it's a wee bit dark it looks a little dark okay all right so I'm gonna what I'll do is I'll just, um will brighten this up just a little bit we could ask the uh get asked the the internet audiences this image now looks okay takes it takes a second for yeah little bit of a delay so it's a little bit of a delay wait because I just want to get everything sort of in the same ballpark so I'm going to work on this first image just did not that this is one that we would choose but I want to play this the same setting to hold the remaining shot they say it looks better looks best they sought lighten up okay uh all right I'm just gonna go just I'm guessing just a terror a tad more and we'll say that that's that's our tones I'm going to apply that to everything here sink again and uh my exposure I'm just applying that everything all right so now we're going now you guys are going to help me we're going to pick some shots that then I'm going to retouch um so way will work here um I don't know I think she's better when she's smiling uh we're trying for something serious here, right? It's it's much nicer uh okay, so let's we'll just say that's a potential and then we're gonna look at it and you guys gonna help me decide so I'll give that like a one star um possibly you guys can yell out well if you like it and I'll give it a star okay yeah and your name yeah, I think this is okay yeah you like that you know yeah yes no, not so much yeah, she was much better opposing than I was because these rods having her do this and I don't think this works as well and this one knows got bad lighting way we fix it it about somewhere in here gets better yeah, I think it's yeah, this is pretty good uh, way like the arms up that she fell out of the frame here normally you know, I wouldn't want to leave that much space above the head maybe we're shooting quickly. Um yeah, I like that that's good quieter that's not a bad expression when you think I like that she was sure we hear hands with being showing up the vein because because you're gonna fix we're going to have to do something with all of these shots for the hands to help and she's she is very vain so that that's a that's a retouching issue that we're going to be exploring um I mean I like this pose way may not ultimately choose it a little scary yes, very yeah was good. Not too bad, huh? Yeah no no ok, what do you think? Pretty happy here I like that one ok, that one's my favorite so far I like that one, you know that that was pretty good, huh? Alright this is where we're kind of doing the james bond thing here just been around so internet the internet vote it looks like it's nine six five five five six thank you for participating let's see um I know I'm going to pick some ones with interesting hair not they're not looking at the expressions so much good okay, now now we're looking at expressions like that raymond from the child was suggesting that you get the model out here to pick one uh yeah always a good idea if your client is the model yeah, you know but sometimes it's not and sometimes they look at different things you know they'll say oh my look that you know so we can't use that one and maybe the best shot you know um I kind of like this this that's kind of cute that's a nice expression ok? So now that I've gone through this process I've kind of starred at least the first round of like what I think is doable uh now I'll put the filters on here so if we put the raid and we're going to see the stars on lee all right, so now now I'll go through again and we're kind of going look at him again and see is there anything in here that really jumps out is better? I'll give it to stars you know that one this one I like that one good now these hair one these are just for the hair so I'm not gonna worry about that something watching uh uh no one wants to back everything is this tour I like the one previous one pre prior to yeah fire this one down yeah it's doing something really nice on looking far side of her face uh ok shadow about this were like this anybody do you think it should be a two okay, so now I just increase the filtering and now I'm left these were the ones that we gave to ok so we can, um anything sort of jump out as being a whole lot better I'd like to see a different crop on that uh on this one that one yeah, I think all of these horizontal they're goingto get cropped toe vertical uh and then this one will crop you know, from the top of some of the top off and okay and then we probably seemed like we didn't uh let's see two one star way didn't pick any of these for twos what do you think it's got a nice expression? I'm I don't know about the hand the ones I like that one no started the this one the blue ones yes ok there's something with the one where her hand is kind of clawing up at her yeah, yeah there's a nice expression there but, you know, this is something like there's. Very little I can do retouching wise other than just removed the whole arm, which is a hell of a retouching job. I wouldn't want to attempt that unless somebody was actually paying me really good money to take that out. So, uh, it looks uncomfortable mean, even though her expression is great, um, it's it's, not dramatically different than this expression way don't have that hand problem in this hand is kind of. I thought it was a good idea at the time and it's bothering me now. So, uh, what do you think about cropping that? Well, it might be able to crop a little bit, and it would be good to show some re touching on that hand. So maybe we'll we'll give that to, and then I wanted to look over. Yeah, this one has that claw hand again like that. What do we like this one? I'm all it was a pretty simple right let's give it to so we got it in our sums choices in there all right now let's look at the uh let's look at the high key ones way have if you were to look at um and these probably again uh I think we need to brighten them up a bit okay that's maybe as bright as I can tolerate it on sinking is that okay started the back this time looks wonder you know what way that first one was probably under exposed just all right let's let's remove that that ok so let's we'll look way we're looking for are ones that the's air thieves were the spinning ones are james bond ones like balance ok so it's got a one year old that's nice that's nice that's nice that so uh again doing our filter I like I like the middle one that one this one I like that one most of all uh all right good enough um so let's see um neither would now we've picked our shots I can uh filter we've got one in here that's two stars and higher and I'll make another collection of our final uh our picks on dh then we'll look at our other shots were filter raided two stars ok and let's put this into picks all right so now these air these are picks we've got our high key one and really the only reason I was shooting. This was to show you how this this is a sort of really fluffy, you know, shadow this light and there's. Not that much. We need to re touch on this to make it look nice. But here, if we really want to glamorize this, we're going to have to work a bit in the re touching to kind of help that out baines on the forehead and all that stuff. And, uh, we are going to have to work these in photo shop to get a good skin color. Um, all right. So, um, let's, let's. See let's work on let's, work on, uh, let's. Open this up first. Since it's gonna be easiest thing to work in a photo shop on, uh, go ahead and add it on dh forty shops six. Yeah, so, yeah, you're flow was like room is mostly just, um, a few little tweaks and the rest, you know, see given photo shop uh depends on what the situation is in that you know in in your photo shoot if you have a controlled photo shoot and it's it's not that bad then I'm going to since I know I'm going to retouch this photo shop anyway I'm more likely do mostly moves and social and in general I tend to treat things that well I don't subscribe to the notion that you should do as much as possible in light room before you open it up in a photo shop uh photo shop just has so much more detailed controls that um you know you're just always gonna be able to do a better job in foshan well lighted great at though is this kind of you know, quick adjusting to make sure everything looks the same, you know, doing the sort of general overview to get it ready for a client approval sort of situation on, you know, batch processing images in that kind of thing that's what it's brilliant for that's what I use it for so detail work I tend not to do so my understanding is it's non destructive when you transfer with a photo shop do you just do all the editing and rock or using adobe camera using straight out of shop everyone exes big bugaboo about is destructive? Is it nondestructive? You know, I only work done destructively um you know a raw file is is only nondestructive in that you have to render it into something before you can do anything with it so we have to create an actual bit matt file we have to create what is essentially going to be a tip for j peg p s defile the raw data is unviable it's unprintable you can't do anything with it so we have to render it so we leave the rodat alone and work on the rendered version ok? Is that destructive? I mean in a certain conceptual sense we've already applied some destructive moved by rendering it out of the raw the realm of raw data into something that's viewable and workable is a bit mapped image at this point if we keep the background layer and do all our adjustments in adjustment layers and all our retouching in layers then it's nondestructive you know but it's, I'm more interested in what makes the image look good then in whether I'm destroying it you know, like a lot of times they don't convert into l a b I do that all the time to make something look better I want they want to move to some move in l a d and they saw you know, every time we convert it's destroying something like, you know, like please, you know, give me a break here we're trying to make pictures
Class Materials
Bonus Materials with Purchase
Ratings and Reviews
Luis
Skin tones correction and portraits editing are new to me. This course provides a set of tools for me to improve my portraiture work. Lee doesn't just show you how things are done, but also the reasons for the corrections. The delivery is a bit dry because the topic is quite technical. You can have a break between lessons, if it becomes too overbearing for you. I highly recommend to take this course, if you are planning to do portraits, head shots, or even senior pictures.