Lessons
Day 1
1Calibrating Your System for Accurate Results
40:07 2Shoot Prep: Workflow & Lighting Setup
17:07 3Shoot: High Key Beauty Portrait
19:13 4Shoot: Hollywood Glamour
17:54 5Student Shoot: Colleen
13:48 6Student Shoot: Andrea
12:27 7Image Review and Q&A
15:46Skin Tone and Black & White Points
27:01 9Image Selection
25:20 10Global Color Correction
21:02 11Retouching Basics
46:12 12Advanced Skin Smoothing Technique
46:36Day 2
13Luminosity vs. Color
14:44 14Shoot: Low Key Dramatic
28:43 15Student Shoot: Ian
11:54 16Student Shoot: Michael
11:20 17Student Shoot: Colleen
03:41 18Shoot: Beauty Light
12:57 19Luminosity Blending in Photoshop
16:07 20Applying Luminosity
12:19 21Color Correction in Lightroom
23:57 22Detailed Retouching
23:55 23Color Space Discussion
19:16 24Darkening and Lightening Skin
21:10 25Spot Treatment
12:20 26Sharpening
29:57 27Compositing
54:51Day 3
28Introduction to Shooting Movement
11:41 29Shoot: Dancer Leaping
10:52 30Students Shooting
44:15 31Shoot: Dancing
14:59 32Student Shoot: Ian and Colleen
08:57 33Shoot: Dancer Portrait
15:49 34Dancer Session Q&A
11:30 35Figure Retouching
10:52 36Liquify Filter
10:16 37Masking and Edges
13:22 38Importing a Background
16:47 39Color Change and Motion Blur
24:45 40Enhancing Color
17:59 41Removing Tattoos and Adding Effects
21:30 42Lee's Photoshop History
21:56 43Final Portrait Edit
19:03Lesson Info
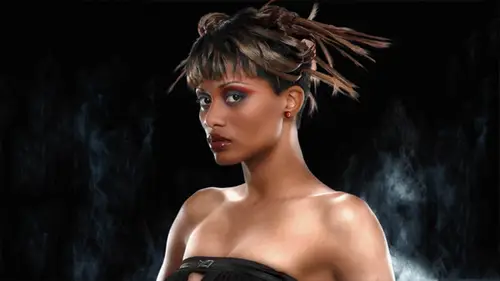
Shoot: High Key Beauty Portrait
We're setting up for our first first lighting situation which is going to be high key so very, very white um and so what I'm what I'm going to do our this is our this is our position for our subject um and this is our nose light reflector so so the subjects here and we sort of angle this to catch the light from the front light which is going to be this big, soft umbrella and so we're still positioning the lights where we don't haven't quite set up yet uh but the idea is that this sort of bounces the front light back and fills up underneath the face so we can fill in the shadows or we're looking and especially in this first situation we're looking for minimal shadows who's gonna fill everywhere uh and we're getting there we have a couple thing then this light here this is our soft box so in the first situation this soft box is going to be aimed at the white seamless because I want that to definitely go white, white, white, white so we're gonna light it and uh well we'll expose to make s...
ure that this goes white and and then the trick really is just to make sure that nothing is to over exposed for our subject in order to get that high key effect it has to be very pale but we don't want toe like push it off the cliff so it's all going to be about media ring and adjusting the exposure appropriately and that means that hopefully ah here's my light meter so because we're using flash I have to use I have to use a flashlight here gentlemen on this troves ok so now we're gonna be synchronizing all right let's see it looks like we're are flashes are working right now. Okay, so that's kind of aimed that towards the seamless seems okay all right so I have to set the meter uh the meter mode to flash and now when we push the test but here I can see what uh stop we're going to do this okay, interesting what do you think I can power up or down? Um yeah lets his power this up it's down pretty low right now let's see what that does okay fired again okay, yeah that's more like it. Okay let's see this what you want back here? Uh well it's, can we get this to aim a little more towards the seamless orders are we kind of stuck? Yeah looking just we just need to bring it down a little bit but get this try and get this no head yes it's it's always something here to ask you a question why dio tuber for going to ask right straight fashion tv from singapore the front light they like to know why an umbrella any specific reason would you prefer beauty dish or soft box well why the umbrella were right now where we're going for a very low contrast sort of fluffy light so no shadows I'm using a big umbrella with a soft white interior that's going to give me the softest like um you could use a soft box you know way have one soft bucks that I'm going to also be using is a hair light in the next lighting setup so right now I'm using the soft box like background which is probably not standard in lighting but that's it's really just for convenience of the change because we're going to change from this sort of high key fluffy no shadows lighting to a more dramatic um kind of hollywood glamour type lice ok good um you know I've happened like a big soft umbrella uh it's just personal preference is no special reason but the larger the source the softer the lights going be so we're using a very large umbrella here that should look really nice so let's see now what we got here okay can we go up just a little bit here so right now I'm changing with more many okay that went down alright that's back where we were all right let's do it again that's better that's that's maybe too much okay we can dial down help about how much has stopped yeah let's dump it and that's better okay and so now where we hear again all right, so my sitting here I'm at eleven five for flash photography you know, shutter speeds not really not really a factor s o I'm I'm at eleven five here I'm gonna shoot it and I saw one sixty and I'm at twenty two here so I'm a little hot on the back of my intention is to really blow it out make sure it goes white white, white um and I'm not lighting the hair because there's a white source essentially that seamless is going to be like a light source and it's going to be right behind her so if I let the hair the white highlights on the hair would blend in with the background would shrink her hand so we want to avoid you know, sort of shrunken head syndrome here yeah, we we have folks who are from a number of different levels in photography could you just explain what high key lighting is? Okay, hi key lighting just means very pale ah very pale image where everything is really light so typically high key lighting was like very little shadows it's very it's going to be filled in and we're gonna move in some my assistant ready for this is it isn't working cameras working here is working now we need those z flats in for our side reflectors um so yeah hi key lighting no shadows very everything is very light and filled with light white background everything white white white pale clothing and we're going for very pale sort of look low key on the other hand so if high key is white loki is black it's dark so we're going to do a low key light set up from the dramatic portrait tomorrow when there and everything is going to be dark you know side lit you know sort of more the kind of nighttime look that would be low key so high key loki perfect thank you okay all right so I'm actually gonna raise this light just now I'm my intention here with these reflectors I'm going to get to these big phone course placed on the sides and my intention here is to get them so that they're reflecting this front light back into the subject so the trick is you play place yourself where the subject's going to be and look at the reflector and you want to angle it until you see the hot spot from the light so right now from my position I can see essentially the hot reflection of this light source and we just get these mirrored to being the same yeah right about there so I'm seeing a kind of you have to be from the perspective of the subject to be able to judge it confirmed that yeah, yeah yeah that's good enough. Okay. And that sort of do the same thing here you know, I'm kind of finds you can actually see this from camera position uh normally in a photo studio I would be having all my additional lights out uh so so the studio would be dark now you know, here we have to light up everything so you can see it online uh it makes it a little more difficult for me to now actually see these certain sorts of hot spots in here because I got all these video lights all around me um but, um we should be pretty good to go here and so I can ask our lovely model you come in wait a minute here way could move the tripod it's just yeah for convenience actually I think I will just hand hold this I'm going to get your tether working and let me do one last minute little test here get ready. Okay, wait. Can I ask you one more quick? Yes. Mr mark wallace is in the chat room. He loves watching watching you work and he'd like to know where he's asking why are using a bear lamp in the umbrella? Why is there no reflector and a couple other people had asked that as well? Well, I'm I'm I'm put that down there I'm I'm putting the light into the deeper into the umbrella and umbrellas sort of acts like a parabolic kind of thing so there's a certain sweet spot er and the idea is that the reflector would throw more light straight into the umbrella I want the light just kind of spread out this particular head is blocking most of the lights some flash heads are not like that so it's a lot of it depends on exactly what kind of light you're using a two moment we're using pro photo lights which are ready really available in rental they're kind of pricey light units on dh this particular head has just enough edge around it to cover the the actual flash tube from the subject so she's being lit only by the umbrella I like having the extra spread on the sides so that it's it's hitting the the whole umbrella and I'm getting a kind of a smoother look out of umbrella rather than a more concentrated look so really I just wanted tio shout out another shut out from mark wallace who says leave aris is one of my heroes I'm tuning tuning in as much as possible to his workshop incredible stuff here I am with my worn out copy of skin, his book and a photo I retouched using these techniques look on facebook folks for that photo of mark wallace with his copy of the book okay, so now I am changing the camera settings to match what we have on the meter and uh hopefully my first shot will look perfectly list so drum roll please here we go let's see if I'm even close because it will be quite an embarrassment if it doesn't look at least offer a decent okay wait there we go okay um so this now represents like the normal exposure for our high key thing I'm going to kind of deliberately overexpose I'm looking at the monitor there um this is exactly what I expected okay? And it's a pretty good starting place let's just see, I wantto I'm going to go up just a little bit I usually go maybe two thirds uh, so I'm gonna open up two thirds and let's see what happens. Okay, yeah very uh this this is about where I want to shoot this and then we can enhance this later in post production to get the right kind of look out of it but I want to deliberately kind of be on the light side. Um so, uh I think we're good and now I'm going to share with you my super secret technique. So you have to have ah sort of an ice breaker technique now she doesn't really need it because she's a pro right and she's going to give me a great looks anyway, but sometimes you're working with people and they're nervous and you need something to kind of break the ice and get them kind of in a playful mood because we want you know, happy looks this is a high key you know bright happy sort of thing so this is this is this super secret technique I call this the james bond technique ok, so this is the way it works you know, in the beginning of every james bond movie you're looking down the gun barrel and james bond sort of walking and he spins and shoots at the camera so what I'm gonna have you do is look at the back wall so sort of like put your hands on your hips and then twist and look at the back okay, I'm going to count to three and when I get to three you have to spin around find the camera okay? All right, so here we go. All right. One two, three okay, good a little faster one to three little faster still and spin at the waist so your whole body yet one two three again one, two, three ok let's let's review usually by this point uh you're subject starts laughing because it's so ridiculous and I was kind of hoping to get james bond music to play in the background of a way didn't we didn't quite get it so uh I'm looking for you know, when you do this technique um you get a little motion in the hair and sometimes sometimes it works and sometimes it doesn't uh I think we're it's a little a little more playful little more fun and what I might be inclined to do later in post production is take bits of hair from one shot and blend them in to fill it out make it look a little more uh a little more interesting or glamorized or you know because some of these shots there's more hair on one side of the face than the other and I may like this shot so I'll have to steal some hair from some other shot kind of blended in so we might have fun with that um so let's shoot just a couple more and then I'm gonna change the light okay so uh yeah duh turn away from me a little bit turn your shoulders so you're kind of aimed away from cameron then yeah I just looked back at me yeah you got to be happy though they're good okay good, good excellent. Okay let's turn the other way let's see what happens when you do that excellent excellent. You lower your chin just a little bit yeah. Very good. Very good. Okay, so we'll do a quick little review all right, I think we got we got enough to work with here so usually I would shoot way more I wouldn't stop here I would shoot way more but we're we're going to move on to the next lighting situation
Class Materials
Bonus Materials with Purchase
Ratings and Reviews
Luis
Skin tones correction and portraits editing are new to me. This course provides a set of tools for me to improve my portraiture work. Lee doesn't just show you how things are done, but also the reasons for the corrections. The delivery is a bit dry because the topic is quite technical. You can have a break between lessons, if it becomes too overbearing for you. I highly recommend to take this course, if you are planning to do portraits, head shots, or even senior pictures.