Lessons
Day 1
1Calibrating Your System for Accurate Results
40:07 2Shoot Prep: Workflow & Lighting Setup
17:07 3Shoot: High Key Beauty Portrait
19:13 4Shoot: Hollywood Glamour
17:54 5Student Shoot: Colleen
13:48 6Student Shoot: Andrea
12:27 7Image Review and Q&A
15:46Skin Tone and Black & White Points
27:01 9Image Selection
25:20 10Global Color Correction
21:02 11Retouching Basics
46:12 12Advanced Skin Smoothing Technique
46:36Day 2
13Luminosity vs. Color
14:44 14Shoot: Low Key Dramatic
28:43 15Student Shoot: Ian
11:54 16Student Shoot: Michael
11:20 17Student Shoot: Colleen
03:41 18Shoot: Beauty Light
12:57 19Luminosity Blending in Photoshop
16:07 20Applying Luminosity
12:19 21Color Correction in Lightroom
23:57 22Detailed Retouching
23:55 23Color Space Discussion
19:16 24Darkening and Lightening Skin
21:10 25Spot Treatment
12:20 26Sharpening
29:57 27Compositing
54:51Day 3
28Introduction to Shooting Movement
11:41 29Shoot: Dancer Leaping
10:52 30Students Shooting
44:15 31Shoot: Dancing
14:59 32Student Shoot: Ian and Colleen
08:57 33Shoot: Dancer Portrait
15:49 34Dancer Session Q&A
11:30 35Figure Retouching
10:52 36Liquify Filter
10:16 37Masking and Edges
13:22 38Importing a Background
16:47 39Color Change and Motion Blur
24:45 40Enhancing Color
17:59 41Removing Tattoos and Adding Effects
21:30 42Lee's Photoshop History
21:56 43Final Portrait Edit
19:03Lesson Info
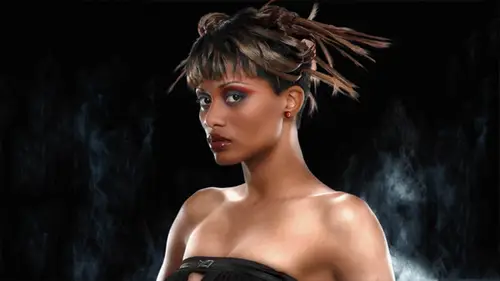
Shoot: Low Key Dramatic
I know we have ah dark skinned model on john is fairly pale here but let's let's just see what happens yeah there you go all right so there's my great card reference so that's what I use for neutralizing the color and uh we should be good to call our model out you know you're all right hey come on out here uh that that's that is quite a piece there all right okay so how you feeling doing amaze e alright excellent excellent. Okay so you know, even though I test these things I really kind of have to look and see and trying to side you know may shift the lights around a little bit but if you could just sort of turn your chest a little bit towards the light and you're going to glance back at me with your eyes don't turn ahead too far back but you just look at me at the camera and uh see today I'm going to be using the tripe out a little bit here I am more or less eye level with the subject that he's a little taller than john so I'm gonna raise the camera up here and uh again normally I wou...
ld be shooting vertically because I subject it's a portrait is more or less you know you should you shoot that ah vertical orientation but because of the way the previews work here in the studio a minute shoot everything horizontally so let's see uh let's see what we get just the first test no, no excited all right, so my goal here is to have a dark side and a light side on the face uh the uh okay, when when the camera shows the in studio monitor it may be a little off from what the actual feed looks like on that's just because of calibration issues and the fact that this monitor has to be on video so what you see from the the full live feed will be a little bit different than what the video camera in the studio picks up but uh here you can see the idea of the hair light is very subtle it's wrapping around his shoulders so you get some separation with his wearing dark clothing and I definitely want that two separate from that black background and I want his hair, which is black two separate from black background so I've got that big soft soft boxes a hair light. You also noticed that the rim light is very soft and kind of wraps around and pat, in fact comes all the way down his shoulder on the left side here. Um so I think I've got my lighting pretty pretty well figured out here and we're going to we're going to shoot a few things, so are you with me ready rock okay, so turn your face into the light just a little bit more okay and give me that look yeah laurie change just a little bit yeah, yeah, yeah, very good. Um put your hands on your hips yeah, I'm gonna back up just a little bit here. Okay? Turn your face a little more into the light and a little more into the late yeah, there you go. All right, so you see as he turns mohr into the into the light mohr of his face gets lit up. Oh, yeah? So these little you've got to watch for these. Thank you, john. Those these little wardrobe malfunctions uh, but also that's about a two second fix and retouching um, ok, so now I, uh we have we have our subject here. Um, dark skin african american male that's him quite a handsome fellow, I must add, uh and to begin with, I requested that he come in dry, right? So normally with darker skin subjects, we actually like to kind of oil him up a little bit in baby oil right on. That helps actually give a little sheen which lightens up the skin so that uh uh it's always a challenge, right? Because when we when we have really dark skin, we don't want it to print so dark um and so we kind of cheat a little bit with pale skin people we want them to print darker so we can see there the texture of their scan and stuff so always powdering people down and yesterday we had our very fair skin a female model who you know we had to keep her dry powder down here it's a little warm and seattle now so you're startinto you know, listen up even as we speak but we're goingto bring our makeup person in to give you a quick little you know, gloss treatment here and then we're going to compare the results so this is a handy little trick and you know baby why was actually good for the skin so uh I'm gonna move over here so so do you feel pampered? Um you could get a little bit just a little bit on those collar bones in the chest it's it's you you can see this actually, uh you know, not not just in the in the camera but I can see that his skin is catching the light better with this little bit of a little bit of sheen you ever question there from the peanut gallery or you have a question? Okay, I've recognized that like I said yesterday the photographing people with darker skin is something that's always been a conspicuous question and then keep hearing different answers on it I don't understand why sometimes I hear that people should overexpose uh when they're photographing people of darker skin you set your lights based on tests and meet oring you haven't made any changes to those lights and every consideration even with the makeup isn't actually doing anything toe overexpose is there the reason why people over exposed well over exposing can make it easier um and you can always dark and after the fact uh in general I try I aim for you know, a good exposure that main mean that I have toe elevate the exposure just a little bit depending on how dark you know the skin is reflected reading because we're doing incident reading so we're reading the light falling on the subject we're not reading the light reflecting off the subject that's a that's a point that I'm trying tio that's one of the reasons why I keep asking this question is because there are some nuances like what you're just talking about they don't seem to be particularly addressed and I'll hear well I will set the lights normally and then I will over exposed a and I don't understand ultimately why that decision is being made ok I think it's a lot of times it's the type of media and you're doing uh the incident meeting as you said is measuring the light that's falling on himself it's light skin or dark skin it's going to be the same exposure lord you want the darker skin to be a little bit darker the light just gonna be a little bit lighter but if you're doing a reflective meter dark skin is going to read make the camera open up and it's going over expose so you want to stop down if you're doing an incident have been reflected reading from your camera okay, so um the danger in over exposing even a dark skin subject the way we're lighting and we've got highlights you know, we have natural highlights from the rim lights coming the hair light and especially from this front light so we're gonna have a natural looking highlight if we overexpose we run the danger of pushing those highlights too hot even though the shadow side of his face and rich color skin is going to come out way could actually lose information in those glistening highlights, right? So right now I'm going to take a few pictures to show the difference um which hopefully will come out on video you never know, but I can certainly see it in person so uh let's see what what it looks like and uh, let me put this in places that goes out, I don't know if you're freezing the display on me here, okay? So and I'm going to go into play and weaken so you can see he has a bit more sheen and so those the the modeling across the face is going to pick up a little more hot spots you could see that the difference between those two it's hard to see here in studio but I can see it yeah, ok, so that's sort of a little trick tio kind of light up, you know, if you notice and, uh portrait's of, like, the black athletes like all those basketball players, and very often they have this sort of sheen, which is very attractive actually. So we're going to continue in this vein because now we have the appropriate, uh, appropriate shine there. Ok, so give me a nice big smile, all right? And, uh, uh, turning a little more towards the light glance at me with your eyes, ok? Very good. Um, I'm going to review my special james bond technique we did from the other day and, well, I don't have any hair to spin around, but we're going to just play around with this just just for laughs. And so you going to get you a little more limbered up? Because I understand that you khun kind of bust a few moves for me here a little bit, but we're going to start with what I call a james bond technique, so as you remember from yesterday, um, we're gonna have you look at the back sort of twisted the waste and look at the background with blacks and yeah from right there just turned and then I count to three it's sort of like james bond in the beginning of the yeah you come in and shoot the camera right so well with your face where they look you're going toe nail that camera with your look ok so here we go just for fun little little loosening up a bit here yeah, here we go one, two, three you've got to be faster than that you got it you got to shoot that guy before against you all right, here we go one two three turn at the waist a little bit get a little more emotion maybe that that necklace will swing a bit one two three okay faster one too three yeah, there you go. There you go. There you go. One two brief very good one two three you know, uh this this approach is sort of just loosen up I mean, he looks great every single picture so we're not have any problems but you know, sometimes your talent needs something to do to get kind of loosened up and this is a good little trick for that so uh and now let's see, we can uh let's let's have you stand breed? Yeah, you are done tall okays can we raise up this hair light a bit way leave before leap oh sorry before you move you and john move the light okay could we just review again quickly what? The lighting setup was the ratios that type of thing right? Okay, thank you so my ratios I'm I'm down about a third to two thirds of the stop on these so they're not as bright as the main light because I don't want I don't want that rim or the uh with hair light to be kind of obvious I want him to be really, really soft um so right now as he stands up we're going to get into trouble where the hair lights going to be too hot because he's now closer to the hairline right? So now we're going to just shift a few things go ahead and could lower it raise the top arm and I think you got a little room there uh, yeah, all I you playing basketball? Yeah. Yeah, course. Okay, no waterfall of, uh all right, well, we're gonna we're gonna do just a little more movement, you know, in a moment here. No. Well, yeah, let's move the chair because we're gonna you're gonna be standing right right in that same spot, okay, any questions that we're getting from way have ah, question from melissa chamberlain from los angeles who's who asked would you do this baby oil trick on all ages like infants and children a lot of people asking about um it depends on how dark the skin is and if you usually babies even african american babies they're a little paler color eso may not need it but you know it depends really if if the skin is dark enough it's always gonna look better if they have just a little bit of a shine on it helps lighten up the complexion and so david from puerto rico begin like the ratios that you just showed us or normal for those what you would normally do for dark skin does it depend on yeah I mean, these ratios are uh more based on uh what I want to have happen in the lighting so I'm using a kind of very dramatic lighting here uh my if I was doing a beauty light where it was lined up directly over the camera um I would probably use a more balanced ratio because the bringing the light around kind of lights more of the face and everything gets lit up mohr right? So I would need toe make those rim lights visible I need to bring them up also to kind of balance it off so right now we're moved up over to the side so he has a definite shadow side to his face and the whole overall look is darker so I don't need as much room light to give that subtle edge um I mean, I'm just really looking to get a good exposure on the subject so you know those ratios can change creatively grateful you know too for the task at hand, whatever we're trying to achieve ok, so we've raised our lights should we should we double check our exposure get kind of an overall so I'm I'm moving the dome out now to get kind of an overall exposure on dh yeah, ok, good. Now I'm going to check our ratios let's see from here okay, okay, that seems a little low now, ok. Yeah, ok let's do this again it's a little better we bring up just to hear I don't actually the hair lights fine. So let's let's go with this let's this is probably close enough. Um all right, so I'm I might my idea here I'm at sixteen really kind of sixteen and a half for my for my main light and I'm at about sixteen and a third on the hair light and I'm down closer to sixteen on my my rim light I'm actually just a little bit under sixteen on that rim, so I think we're going to be okay and okay back way up here so I'm still shooting with that one thirty five and ok, so we're gonna give give you some direction here all right? So um don't move around on the floor right so good kind of in place and uh I want you to do a little locking and popping a little thing and ideally, what I'm looking for is something do some interesting shapes with your hands around your face okay and way have some music uh can we cue some music for I don't know that we can cues because we don't know why I was told that we had some music hopefully they have access to that give you somethingto move to you know let's see what what what's happening now wait just just something just some and I'm gonna raise my camera just a little bit here get stood up ok um can you can hear the music way bringing that up just just a touch way don't know overrun our audio but yeah something like that yeah yeah just just a little thing and I'm gonna go ahead and take a quick test shot here yeah okay good looking good all right so yeah just give me get kind of loosey goosey yeah brandy yeah bring the keep that don't be too wide keep him kind of in here right yeah yeah ok, very good. Give me a little more kind of shoulder yeah, a little yeah kind of yeah there you go there you go yeah, yeah, yeah, yeah okay actually turn your face away from the yeah yeah like yeah like that yeah yeah come back in this way just a hair. Yeah, very good. I keep keep looking at me. All right? Excellent. Okay let's see let's take a look at these way out here with us wait is in the chat room our loving them yeah. Yeah. Okay. So now look at this. This this image is interesting because he's actually turned away from the main line but that rear rim is catching his cheek there in a really nice way and it's really lighting up that shadow side of his face so I actually have kind of what would be a core shout or running through the middle of his face and he's lit from both sides kind of very interesting so as as you work these different angles the lighting is almost designed to allow this flexibility so he can move through all kinds of different positions and stay separated from the background. You look right here and I've got that rym light is lot is lighting the left edge camera left here his right of the left edge of his shirt separating him again from this black background the rim light and the paralyzed is working too softly outline his shoulders and the top of his head so there's nothing even though he's very dark and we're going with a dark shirt against the black background there's nothing that's not separated here in every instance he's he's able to separate from the background. So we got some interesting moves. Very good. Ok, so here now here he's shadows falling on his face. Uh, way might need to use this shot, so we'll probably have to use a little post processing tricks to lighten him up enough to make him look like I hit him with a spotlight or something to really bring his features out. But in most of these he's he's lit well enough that we're not gonna need too much effort to get, uh, get himto come out in post. All right? Let's answer questions first and then I'm going to bring the students out to shoot. Okay, great way. Have a question from fashion tv from singapore said who says before you start shooting, do you study and find the best side for your subjects and set up the lights according to that? Or does it not matter? Um yes. I mean, you know, sometimes you get such a great subject like, like this fellow right here he's like he's good from all angles. Right. Uh, and it's true. Sometimes, you know, people have one side is better than another, uh, usually my own feeling is that each side has something to offer right. So favoring one side or the other is kind of, you know, almost, uh, um it's. Almost arbitrary choice. In some sense. I know some people say they always like from the right side of the always like from the left side and, uh, there's, no point, really, and locking yourself down like that. Uh, if you notice something where somebody definitely has a better side, then you could do it for me. The determining factor is if the subject comes in and says, my left side is my best side, can you, like, shoot that, then? That's. What? I will take that to heart and actually do that to make them happy. Whether it's, true or not, sometimes people get crazy ideas about, you know, I look thinner if I'm turned this way, you know, that kind of thing. So, uh, and yet more we do you would do for sure. Um, that question was for for john, john, john is john has left the house, his back. Here he comes. All right, so cool. Okay, good. So the question was that from dexter jon seemed toe when you work when we're changing the lighting and you are raising that flag that you seem to look into lee's, lens and southern was wondering what you were doing, you know, look into the lens to see if I could see a reflection of that light so if I see the light bouncing in there, I'm worried about flare, so I'm gonna bring that down till the cuts it also when you look in the front of the lens, you see all the lights around us. I don't know if you can get a camera in on this here there's a bunch of reflections now, but they're mostly the video lights if we raise that flag up, you would start seeing the soft box in there too in the soft box is the one I'm paying attention to those video lights are bright enough to be an issue right here for us awesome so yeah, I'm just lookinfor reflections take another question sure surgeon says his lead does lee always start with all the lights on instead of setting the rim first and then adjusting the main light after the rim is correct? Do you have a process? What let you set him well, I usually start with the main light because that's the most important that's going going to key the exposure from the main light so so I set that up first, uh, and then I add the other lights. Now, uh, we had this sort of pre lit today, so I had kind of, you know, rough things in before I moved everything into the set. So it seemed like everything kind of happened all at once. And in fact, most of time, you're kind of setting one light after the other measuring exposure balancing. And then in the end, we do a final check, measuring the light, the ratios on all the otherwise.
Class Materials
Bonus Materials with Purchase
Ratings and Reviews
Luis
Skin tones correction and portraits editing are new to me. This course provides a set of tools for me to improve my portraiture work. Lee doesn't just show you how things are done, but also the reasons for the corrections. The delivery is a bit dry because the topic is quite technical. You can have a break between lessons, if it becomes too overbearing for you. I highly recommend to take this course, if you are planning to do portraits, head shots, or even senior pictures.