Lessons
Day 1
1Calibrating Your System for Accurate Results
40:07 2Shoot Prep: Workflow & Lighting Setup
17:07 3Shoot: High Key Beauty Portrait
19:13 4Shoot: Hollywood Glamour
17:54 5Student Shoot: Colleen
13:48 6Student Shoot: Andrea
12:27 7Image Review and Q&A
15:46Skin Tone and Black & White Points
27:01 9Image Selection
25:20 10Global Color Correction
21:02 11Retouching Basics
46:12 12Advanced Skin Smoothing Technique
46:36Day 2
13Luminosity vs. Color
14:44 14Shoot: Low Key Dramatic
28:43 15Student Shoot: Ian
11:54 16Student Shoot: Michael
11:20 17Student Shoot: Colleen
03:41 18Shoot: Beauty Light
12:57 19Luminosity Blending in Photoshop
16:07 20Applying Luminosity
12:19 21Color Correction in Lightroom
23:57 22Detailed Retouching
23:55 23Color Space Discussion
19:16 24Darkening and Lightening Skin
21:10 25Spot Treatment
12:20 26Sharpening
29:57 27Compositing
54:51Day 3
28Introduction to Shooting Movement
11:41 29Shoot: Dancer Leaping
10:52 30Students Shooting
44:15 31Shoot: Dancing
14:59 32Student Shoot: Ian and Colleen
08:57 33Shoot: Dancer Portrait
15:49 34Dancer Session Q&A
11:30 35Figure Retouching
10:52 36Liquify Filter
10:16 37Masking and Edges
13:22 38Importing a Background
16:47 39Color Change and Motion Blur
24:45 40Enhancing Color
17:59 41Removing Tattoos and Adding Effects
21:30 42Lee's Photoshop History
21:56 43Final Portrait Edit
19:03Lesson Info
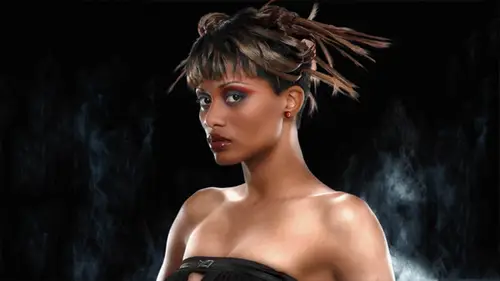
Shoot Prep: Workflow & Lighting Setup
All right, so work flow on the on the on the shoot and after this we're going to go to the shoot um so this is the way I set up I have my camera I don't tell her the camera to the computer uh actually just tether it and this is where we're going to be doing it here I tether it to a tv monitor um regular tv as long as it has either hd my input our regular video input I use the regular video out from the camera a little there's a little plug it's you know kind of video out uh and that's really getting the signal that would ordinarily be on the lcd on the back of camera and I just plug that into a monitor and after every shot movement pops up now the regular video the regular videos like six forty four eight it's a small it's a regular resolution video and it travels down that wire really fast pops up on the screen almost instantaneously we're going to be shooting with hd my here so it's a little bit slower because we're pushing full hd resolution but it's still much faster than tethering...
to the computer so the computer I is separate from the camera I'm I'm just shooting two cards and downloading uh and I can keep shooting and downloading is happening while I'm shooting and then connected to the computers to of hard drives so uh these are my backups the golden rule is three of everything not just one back up you want to have three copies of every shot as you're shooting a cz much as possible obviously not every situation can you do that? But um so the work flows I should took card and that's taken to the computer and then I copy so it's from the computer a copy to the one hard drive from that hard drive a cup the other one so I'm building three copies as I go along then go again you know I'll shoot to the card copy to the hard drive copy of the hard drive at the end of the shoot I can either copy it to another hard drive and give it to the client or since I have you know all these copies I could give him one of the hard drives and they can walk out of the studio with it and be good to go and I still have two copies and if I havent overwritten any of the cards I have a fourth copy on camera cards as well. So the idea is that by keeping the camera separate from the computer there's no never any slow down I don't await to shoot because I've filled up the buffer or the computers slow or having provided the computer crashes and I got a reset up so I like to have it separate which makes sure that there's no interruption while shooting and I could dio the previews from the camera just move the jog well it's just like looking on the lcd but I'm displaying on a big monitor uh and because the computer is separate from the camera I can actually have retouching being done and I'm still shooting right so we can test something out for an art director say or on guy doesn't again doesn't interrupt the photo shoot s o cards are backed up while I'm shooting always important and three copies very very important the cards can be the fourth copy um so I can give them a hard drive away at the end of the shoot um so always the copies are on the external hard drives and separate external hard drives do you want to put two copies on one hard drive because that the hard drive crashes there go both of your copies right so you want to have separate hard drives for everything and like I said the one drive could be given away to the the client at the end of the shoot so there's no waiting for things to be written at the end of the shoot now all of that it sounds like that's kind of hard to manage at the shoot right? I certainly don't do it manually I like this guy's software this is a one man operation makes a product called image ingested pro that's his you're ill and this thing is a one trick pony all it does is in just images from cards but it does everything you could want to do so you know here I'll just sort of it's kind of not the prettiest interface but you just set this up once and then your whole shoots automated and you could just put put the cards in so this is where you would identify the preset for the whole thing and also your source uh your card shows up there um and your destination so you khun preset this in in the software uh so it's making three copies there's a primary which is sort of like the laptop for the computer and then the two backups and it will build a folder structure for you, so I put it inside a folder that is named with this quick field name um and has a date and inside of it as a raw folder with with the name wrong all of that's built for me so I don't have to actually do it manually. Um let's see over here this is the file handling. You can also set up how the files air named and it will run the d n g of software to convert the files to dmg and does that all automatically as well, so I now since we're here the reason I convert my raw files and indian g has nothing to do with, like preserving the, you know, the file or for some reason, I don't trust the camera manufacturers format, it has one function that is is really useful and that it actually verifies the validity of the image file, so we need converted to dmg that works as a verification that you got a good image file and it sort of automatic, so if you if you can convert successfully and it doesn't throw up in error, you've got a good image, and now you can duplicate that. So, you know, you know whether you're getting bad files off of your camera card right away because you don't throw up in error and then you stop shooting to that card. Um, okay appear that's the quick fields where I that that name gets applied to the folder structure and the files names automatically based on the preferences that I set up in this field, and then you can also, uh, put keywords in on, say, every single file. So if you're shooting a wedding, you would put the client's name here, and that's gets embedded into the each image file is as a keyword, or if you're shooting on a location and it's, you know, it's important to all the image be identified for that location these are the key words that would be applied to every single file as you're ingesting it yeah, I'm is why use why are you using this program as opposed to using light room with its ingestion futures primarily because this one makes three copies and light doesn't okay light room only makes you know essentially one copy you've got the copy that goes into leiterman one copy and I have found in my experience that is better to have three just for my for my work flow okay, so yeah that's the primary reason it's it also it's kind of nice because it it runs without any you know it sort of runs automatically so all you have to do is put a card and push go and you can actually have have it's pretty automated so you're not even interacting with it you're not having to like do anything in the interface it just and it ejects the card at the end and you know, so it's everything is much more automated um so I just thought I'd sing the praises that software in case you're interested and we're going toe move to the shoot here momentarily uh so today we're going to do a basic beauty kind of lighting this is the bare bones thing you just for beauty lighting you place the light in line and above the camera so it's just above the karen but it's centered on over the camera so that the subject looking the cameras even the lid on both sides that's your kind of classic beauty late uh we're going toe enhance that with some additional setups here so we're going to soft boxes, a hair light and a reflector card sometimes called the nose light because it's really there just to fill in the shadow that falls under the nose and chin um and it's still the lighting is sort of lined up on axis of the camera so that the are main light will be an umbrella our hair light will be the soft box and the reason I'm using a soft box most of time I see this they say you know they just use a bare head it is a hairline and you get a real spec cleave sparkly kind of too hot, too reflective kind of hair light that way the soft box is going to wrap that that light that highlight into the hair and it's great uh to make sure that's a blond hair looks blond that hair lights kind of critical, you know, if you don't do that then sometimes blond haired gets looking to dark um so uh and we're going to also add some reflectors on the side and here in this position, these reflectors air actually catching the hair light and bouncing it back into the sides to fill the light shadows in if you switch in the other way around uh they would be catching the front light and bouncing it back into the subject and we'll see it on the saddle show you how you can actually look at the reflector and see when it's angled properly and then we're going to do one other lighting thing which is going to add contrast to this basic set up and that's by using flags or shadow you know sort of slight subtract er so we're going to increase the contrast by moving black cards and so instead of filling were actually kind of taking light away to get we're going to use that for more than a kind of classic hollywood glamour type of shot okay uh and now I think it's time for our break so we could get the lighting we're going to transform this whole room into a studio so okay questions yeah couple clarification questions jodi c says I used the instruction in your book skin to make my camera calibrate our make my camera calibration profile but it seems to reduce contrast when I apply it is this because of the part where I zero settings do you still recommend this with room for and with the calibration still be effective without zeroed settings good question actually lied room for in the new c s six camera they changed how the software works and we'll kind of get into a little bit later on. But the new light room in the new camera engine they changed where zero is so it's, not his flat. Now, as it used to be. Uh, I still recommend shooting at zero. You can just reevaluate the same test you already shot. You have to shoot another test. Just open it up in light room for and three set everything to zero and re evaluated it. Actually, now I was finding the previous versions that under zero settings you you tended to be to be underexposed and flatter. Now the new settings zero gives you much closer to a kind of more normal look, and I've found one third to two thirds more dynamic range in the new software. So just the change in software is giving me a more dynamic range in those files is very interesting. So, yeah, I still recommend said, sitting at zero, but now with a new stuff, it's not going to look as flat, but the point, really of saving a camera default is to put your preferences into that default. So once you've done the test and you figured out your dynamic range and all of that stuff and what the best exposure is, there's nothing that's going to stop you from adding too twenty you know what plus twenty five contrast or something like that to make the image look good so that consistently every time you open it up it's already you know it's already corrected great and another question that a bunch of folks had but I'll read it from kobo should be all the tests were doing in the beginning should you do these tests with your cameras meter if that's your main meter a lot of folks don't have the you know like uh yes by all means if you don't have a handle life you're going to have to use your camera meter so it's just a little less convenient to measure the patches precisely so you're what I would what I would suggest is and I think I put this in the book if you're going to use your camera meter just fill move in close enough to fill the frame with the target because the average of the whole target should be pretty close to medium you know um it's not as accurate is using a handheld meter but it should be okay great thank you and photograph her asked how do you feel about using something like an expo disc expeditious interesting I've been asked that a lot I'm not a fan of the expo disc because it's it's essentially measuring the light I know people that swear by it I just would rather instead of moving into the scene and pointing my camera at the light, I want to know what what lights bouncing off the subject. So the expo dis is sort of like turning your dslr camera into a new incident light meter. You know, some people have a lot of success with that. I'm not a big fan of that approach, that's not to say it doesn't work, I just you know, when you question I have a follow up question on that the shooting that you're talking about seems to be primarily something that would be served by a studio kind of approach. I shoot a lot of event photography, so pulling out something like a color checker ends up being a real problem. Yeah, you're only gonna you're only going to use the color checker to calibrate your system once after that, the only thing you, if you can, use a great card if you can't, you're going to have to kind of guess the white balance based on things in the scene. So, you know, for instance, my gray beard here, great white balance reference. If you click on my gray beard, it will neutralize the color perfectly, but, you know, you would look for things like that to do your neutral, and if you can't then you've got a guest. So very specifically, in doing a wedding where I might be dealing with daylight, tungsten, fluorescent, all within an hour, and it might be switching up on a regular basis. Can you speak to that? Uh, well, if you've done your test and you know that you've got a plus two thirds on tongue stone, you can either quickly set that on your camera or just while your meter and go move the knob. Two ticks. Plus, you know, instead of trying to end, which means basically that you're going toe. Get good with manual meeting. I'd recommend that instead of relying on all full auto, get would get good with manual reading. Yeah.
Class Materials
Bonus Materials with Purchase
Ratings and Reviews
Luis
Skin tones correction and portraits editing are new to me. This course provides a set of tools for me to improve my portraiture work. Lee doesn't just show you how things are done, but also the reasons for the corrections. The delivery is a bit dry because the topic is quite technical. You can have a break between lessons, if it becomes too overbearing for you. I highly recommend to take this course, if you are planning to do portraits, head shots, or even senior pictures.