Lessons
Class Introduction
15:31 2Photo Basics
06:08 3Camera Controls - Top Deck: Mode Dial Part 1
15:46 4Camera Controls- Top Deck: Mode Dial Part 2
13:00 5Top Deck: Custom Settings and Focus Mode
13:17 6Backside: Electronic Viewfinder
07:52 7Backside: AF/MF
05:24 8Backside: Function Button: Top Row
20:58Backside: Function Button: Bottom Row
08:08 10Backside: Control Wheel
10:12 11Left, Right, Bottom & Front Sides
09:58 12Sony Lenses
10:11 13Menu Overview
03:47 14Camera Settings 1: Pages 1-3
14:00 15Camera Settings 1: Pages 4-6
17:29 16Camera Settings 1: Pages 7-9
07:22 17Camera Settings 1: Pages 10-14
21:50 18Camera Settings 2: Pages 1-4
16:02 19Camera Settings 2: Pages 5-9
14:50 20Wireless Settings
06:24 21Application Menu
18:46 22Playback Menu
03:35 23Setup Menu
22:27 24Camera Operation
10:53Lesson Info
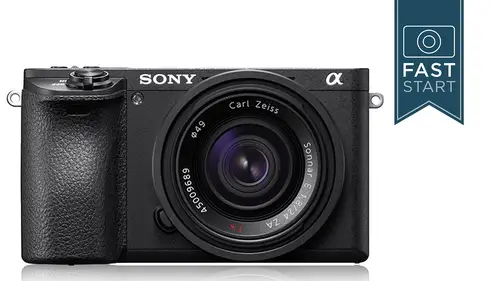
Left, Right, Bottom & Front Sides
Time to work our way around to the left side of the camera. We've got our speaker, so when you play back movies that's where the sound is coming from. Then we have a door, when we open the door we have access to three different ports. The Multi-Micro USB port is how you can plug this camera in to download images off the card. It comes with this AC charging adapter, so it is how you charge the battery in the camera. The camera does not come with what would be known as a travel charger. They are available, we'll talk about them in a moment here. But it's how you charge the batteries, it's also how you could connect up the RM-VPR1 remote control. It sells for around $50, so if you want to do nighttime photography, Bulb photography, any time you want to trigger the camera without touching the camera, you might wanna look at that remote control. The self-timer is a good option if you don't wanna use the remote control. There's a little charge light to let you know when the camera is chargin...
g and when it is finished, or if there is a problem with it. The HDMI jack is sending the video signal out of the camera so that you could connect the camera up to a TV or some other recording device. And so if you wanna record 4K video on an external device this is where you would hook it up. And then we have our microphone jack, so if you wanna hook up external microphones, there's ones available from Sony, there's ones available from other other manufacturers. You're gonna plug that in through the standard 3.5 millimeter stereo jack there. Over on the right side of the camera there's your NFC option for those of you with smartphones, tablets, and other devices that have a near-field communication. In order to get the connection you just bring the two items really close together, and they will automatically be able to communicate so that you can download images wirelessly off the camera onto a tablet or phone if you have that. In your external device you will need to turn that on in the wireless menu system. We'll talk more about that when we talk about wireless connection of this camera. We have our movie record. We've been talking a little bit about that as the day goes through that. If you don't like that button recording movies 'cause it is in a little bit of an awkward position and some people accidentally hit it when they just grip the camera, you can turn it off, or you can have it be a button that controls something else in the camera. And so, if you wanna adjust the movie settings there's gonna be a lot of different movie settings that we're gonna get to in the menu section of the camera. Over under the bottom side of the camera you'll have your serial number, you can record that for insurance purposes. It has the standard tripod socket for all the sorts of accessories. There is a little access lamp there that lets you know when the camera is recording to the memory cards. Don't take the battery out or the memory card out when that is on. There is a little tiny door that can open that allows a cord to come out of the battery compartment if you are using one of the AC adapters. The ACPW20 is a way that you can power the camera continuously so the battery never dies. If you were doing a long nighttime exposure and you were within power range of an extension cable, you could power the camera continuously. This is gonna sell for a little under a hundred bucks. Not too many people use this, but it's potentially needed in a studio or a scientific environment. Next we have our battery door, which is where our battery and our memory card is gonna be located. There's a little battery release lever, the standard NP-FW50 battery, a pretty common battery from Sony, it's being used in a lot of their cameras. The BC-VW1 external battery charger, I find is a very handy device. Now that actually comes supplied with some of the more expensive Sony cameras. It is available and sold separately if you do wanna pick one up yourself. Those are available if you don't like to charge the battery in the camera 'cause it is faster with this external travel charger, and if you are trying to shoot with the camera and charge its battery, you can't do that at the same time with the USB charging system that it comes with. The memory card Slot will use the Secure SD memory cards it also is legacy bound and allows you to use the older Sony Memory Sticks that not too many people are using these days, but it is available if you still have those and want to make use of them. Let's talk a little bit about the memory cards in the camera. It uses the SD card system, which now also has the HC and the XC versions for the larger capacity cards. The speed of the card for the average photographer is not a big deal. If you shoot a lot of sports this will affect how fast the images can be downloaded from the buffer to the memory card, and so you might wanna look for a faster card if you do a lot of fast-action shooting. If you shoot a lot of video, you wanna pay attention to the minimum speed on the card. And so for shooting video, the recommendations from Sony, if you're gonna shoot standard HD video you wanna have a Class 10 or faster card, which means 10 megabytes per second or faster. If you wanna shoot 4K video, they recommend the UHS Speed three cards or faster, which are storing 30 megabytes per second on a continual basis. And that's kind of a different need than the maximum speed. But for your average photographer out there, the speed of the cards are not gonna matter too much, it's only people who are kinda pushing the limits of what the cards do. As far as downloading the cards and information off the cards onto your computer, yes, you can connect it up via that USB connection. It's not the fastest connection in the world, and so most photographers find it better to use a card reader or just use the card slot on their computer if they happen to have it. Talking about the cards and so forth, one of the things that you wanna do, is you wanna format the cards on a regular basis. Now this deletes all the information on the cards, but Sony uses a system that is notably different than pretty much everyone else out there, and so at anytime you are taking a card and moving it to or from a Sony camera and anything else, you're gonna wanna format before you use it in your Sony camera. So when you buy new cards, if you buy a used card from a friend at work, or anytime you're putting something new into this camera, you probably are gonna want to format those cards. Now that does delete all of the old information, including photos, files, file directories, and anything else that might be on that card. Sony has its own proprietary structure of where it stores the stills and the videos, and I'm gonna talk more about that in the menu section of this class so that you know where all that information is, and so, something I would recommend doing on a regular basis. It also lengthens the life span of how long those cards are gonna have, because it just cleans off all that old junk data that might cause a communication problem with the camera, so try to format on a regular basis. Just make sure that you have downloaded and backed up your images, because they are gone when you format them on the card. Onto the front of the camera. We have a couple of stereo microphones up here for getting slightly better sound. For mounting your lenses you wanna pay attention to the white index mount, that's where you get things lined up properly. We can get a view of our sensor in here, 24.3 megapixel sensor, it's a CMOS sensor, 1.5 crop factor compared to a full-frame camera. The CPU contacts are connecting up with the information on the lens for focusing and aperture information. Lens release and the alignment pin, when you are getting your camera mounted up, you wanna listen for that little click. I know it seems like everybody who gets a camera for the first time is very hesitant about mounting the lens on their camera. It's not that big a deal, folks. We have a little example here, and so I'm going to press in on the lens release button down here. Give the camera lens a little turn. You just want to pay attention to the white mark here and the white mark up here. You don't wanna leave the lens off the camera too long 'cause dust can get on the sensor here. We have our contacts down here, which are gonna communicate with the lens, and so we're gonna mount up the white dot, match it up to the white dot on the camera, give it a little twist, listen for the click, and when you got the click you know you've mounted it on there properly. Over inside the grip of the camera is where the Wi-Fi control is. I don't know why it's important, but that's where it is. We also have a little tiny remote sensor here, so Sony makes a little infrared remote, which is kinda like your standard TV remote, has a limited range, good for 10 or 20 feet, doesn't work real well under bright sunlight, but it is available and a way of controlling some of the features of the camera. There is an AF illuminator on the front of the camera that will turn on under low light conditions, and will also come on during a self-timer to let you know when the camera is going to be shooting. Now this can be distracting to your subjects, or you just don't want that extra lights coming on, and if you don't like that, you can turn that off permanently in the menu system. Just something I kinda recommend, I like being discreet about shooting. It has a very limited range as far as the AF illuminator, if something is, say, three, four, five feet, a couple meters in front of you, it might help out, but once it's beyond a couple of meters it's not going to be powerful enough.
Class Materials
Bonus Materials with Purchase
Ratings and Reviews
Nichola Johnson
GREAT CLASS. I HAVE JUST ENTERED THE 'MANUAL' CAMERA MODE AND ACQUIRED THE SONY A6500...THIS CLASS TOTALLY HELPED WITH THE CAMERA BASICS. I WILL DEFINITELY TAKE MORE. JOHN GREENGO IS FABULOUS. CLEAR AND EASY TO FOLLOW.
a Creativelive Student
I've owned the A6000 since it came out and still learned a TON from John's A6500 class. I will definitely be getting his original A6000 class. I'm SO glad he's doing Sony cameras now. Thanks John G. - You are a truly great teacher!
Lee Kneisz
I bought the a6000 course a while back and when I upgraded to the a6500 this was a no-brainer. I love how comprehensive the coverage is and it was a great refresher on previous features. If you're a newbie to the Sony a6500 this is a must!
Student Work
Related Classes
Camera Guides