Lesson Info
19. How to Use the CamRanger for HDR Portraits
Lessons
Class Introduction
06:48 2Develop your Artistic Vision
20:22 3Learn Strobe Basics
19:21 4Which Strobe Is Best For You?
17:36 5Strobe Questions Answered
15:33 6Balance Strobes with Ambient Light
14:27 7The Sunny 16 Rule
16:12 8Choose the Right Modifier for Strobes
28:02On Location Shoot: Overpower Sunlight with Strobes
24:01 10Create Shallow Depth of Field Using Strobes Outdoors
23:49 11On Location Shoot: Portrait in the Shade with ND Filter
21:19 12On Location Shoot: Portrait with Sun on the Shoulder with ND Filter
17:48 13On Location Shoot: Portrait Using Strobes & Wide Angle Lens
14:41 14Shoot: Use Strobes with Props
17:07 15Shoot: Shooting into Sun with Strobes
22:27 16Shoot: Increase Strobe Power while Shooting in Sunlight
10:46 17Understand 32 Bit Depth
20:03 18HDR Bit Depth with Strobes
16:36 19How to Use the CamRanger for HDR Portraits
33:35 20On Location Shoot: Setting Up the Lights in Boxing Gym
13:55 21On Location Shoot: 3 Light Edge Portrait with Strobes
21:45 22On Location Shoot: Portrait Using Top Light with Strobes
18:10 23On Location Shoot: Create a Dramatic Portrait with Strobes
19:26 24Strobes & Textured Background for Character Portraits
09:44 25Shoot: Set-up the Gear for Portrait
16:07 26Shoot: One Strobe Portrait with Gray Backdrop
26:30 27Shoot: One Strobe Portrait with Textured Background
13:32 28Shoot: Using HDR for One Strobe Portrait
08:55 29Setting up Post Production Workflow
16:02 30Photoshop® Workflow: HDR Boxing Gym Portrait Shoot
14:35 31Photoshop® Workflow: HDR Portrait with Stitching
37:51Lesson Info
How to Use the CamRanger for HDR Portraits
So we know this, we're now going to go through and explain, we know that we typically bracket shutter speed when we do an HDR, okay. Oh, let's back up for a second. Now, why would I not use aperture, F-stop, as my variable to bracket. Depth of field. So now, Photoshop's gonna go, uh-oh, uh-oh, uh-oh, or Photomatix, or whatever, and a lot of those programs actually don't give you the option. If you bracket, which I don't think you can bracket F-stops, only shutter speeds, right? But let's say you did bracket F-stops, Photomatix would say, red light, red light, red light, you cannot do this, all right. It wouldn't give you the option to do it. So, let's just put it this way. Generally, in HDR, we capture using shutter speed as our variable to change the exposure, okay, that's the typical HDR. So, because the strobe is so fast, we have to find another variable, and that is ISO. So here I have Don, and again, I'm sorry I have to crop these images, because I have to put type on the bottom, ...
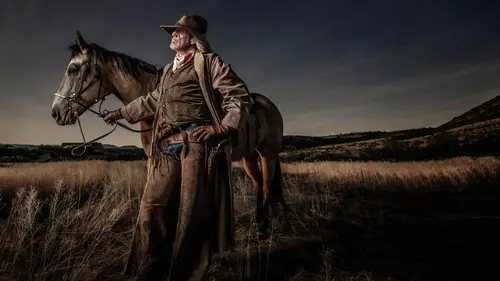
but if you look at this image, it's on my website, Canon used it when they launched their new Pro 1000 printer, and Canon also has this hanging at their Learning Experience Center in California, as I walked in, there it was on the wall. It was pretty amazing. But I bracketed my ISO of good old Don, here, and the detail is phenomenal, freakin' unbelievable. And all the engines, the motors, back in the background, there's no way one capture would've done this image justice. And so, but I did it by using the CamRanger, bracket also. So I do it in the studio too, we're gonna do that this afternoon, I'm gonna show you how to do that with a portrait, and also my videos that I did on Friday, a week ago Friday, of the boxer, Rod, we'll show you how I'm doing HDR in the field, too. But it gives me all this information. So here's the CamRanger. It is a device that hooks up to your camera. So let me take this off, so you can see it here. And I'm gonna set it up, and I'm gonna show you how I use it. Okay. So here it is. That's the CamRanger. I actually glued a little hot shoe on here. Well actually, you need one lower vice, but if you want, you can it right up on top here. But usually have my seat for my camera on here, so I just let it hang. So, um, this creates a Wi-Fi signal, and I'm gonna turn it on, so there's a little button right here, I turn it on. And there's the lights coming up here. And so, I have, now I had in my 5D Mark III had a little different, this is a new USB 3 port, and so what I'm gonna do is, I put this on here, and here's the little bag that I stick it in here, and I zip it up like this, and then I have a little hook here. And I happen to have the really right stuff, ball head tripod, which you don't have to have, but I have an L bracket grip, or mount here, which allows me to rotate my camera, horizontal, vertical, and look how the camera stays straight over the top of my tripod. So it gives it a little more stability. And I use this all for my stitching, getting my nodal point, and all that stuff, right. But what I'm gonna show you right now is, I mount it right here, this is my little way of doing it. Just kind of going here like this, and I mount it. You could mount it, you could probably mount it down here. You can get longer cables, too, if you want. But anyways, it goes in the port right here, right in here. And CamRanger has these cords that are in an L position, that way I can still use my plate here. And it comes right down here. And so, what I'm gonna do is, well, let me do this, let me show you some slides, which are, and then I'm gonna bring it on a computer. So this is kind of a quick little showing you a screen capture. So, you have all these controls. I'm not gonna go to all the CamRanger stuff, but you have the ability to go change your shutter speed, your F-stop, your ISO, your metering points, your color temperature, daylight, whatever. You can all do this from, I don't have my iPhone, they took it away from me because they don't trust me with it. But I can use my iPhone, my iPad, which I use my iPad a lot, or my computer, and this is just off the computer. I just captured it, and so you can see that I've got all these controls here, live view. There's some ways I can share it, so I can actually do a shoot, I use the iPad all the time with clients, and you can also, I teach with it all the time, I can set it up so that I have the main controls, and then you guys could all have the share app, which now this signal goes to your iPhones, and your iPads. There's a limit, about 50, or somewhere around there, and so I can have a couple clients viewing what I'm shooting while I'm shooting it. So it's just not one device you can hook it up to. So it's really kind of a fun thing. I can go live view, I can focus, I can do a whole bunch of things, right, in the camera. So let's take a look here. There's the live view button, I hit that, and I can view right through here. And like I said, I could be sitting, let's say I'm at Lake Tahoe, and it's a little chilly, my car's parked maybe 50 yards away. I can get in my car, as long as someone doesn't steal my camera, I can sit there and go ooh, and you warm up, and be looking at what my camera's seeing, 50 yards, I think it goes about 100 yards, somewhere around there. But I can focus, I can do all sorts of things. So there's the HDR button right up there, and so I remember when I first turned the CamRanger on, I went, "HDR," and then I looked at it, and it said shutter speed, which is, ah, you know, standard, and then I went and I saw ISO. And that's where I went, wait a minute, I can bracket my strobes. Now, I don't know why I never done them before that, but, so you set it to your ISO, I usually start at 50, I have my camera set to low ISO, and then I go my range from there. Number of shots, three. And then usually one stop for a portrait, and then you hit start, and it'll give you your sequence. Now, you can delay it a little bit, but for right now, I think it's about one second between each click, which is about right for recycling of the strobes and everything. And I'll set up for you, there's Rod, we'll show you these pre-shoots later. Actually, let's go from here to over here. So I'm gonna set it up for you right now. I've got it turned on, when it turns on, oh, by the way, let me show you, I might as well do this, because you can change the battery by just popping it open here. And there's the battery, and I've got a couple extra batteries right here. So a battery will typically, normal use, should last you all day, I think about 6 to 7 hours. But, when you're shooting a client shoot, extra batteries. And then you forget to turn it off, so a lot of times, I'm leaving a photo shoot, driving down the road, I pull my iPhone out, and it says CamRanger is hooked up, on Wi-Fi, and it's in the back, right, I left it on. So I'm always leaving it on, so I have an extra battery. And then, so it's on, and it takes about 30 seconds, takes about 30 seconds to, um, get it to sort of talk. And then once it, because you just turn it on, don't expect it to show up, your Wi-Fi, takes about 30 seconds. So let's go over here, we're gonna go to my computer. And I'm gonna show you how I set it up, so the first thing I wanna do is I wanna go to my Wi-Fi, and there it is, CamRanger, my last three letters on my code, or the code that's on the back of, which is right here, there's my code, and if you type that in on, well, on the master app, it doesn't like two devices in master mode. Now the share app, you can take that and you can share it, I can share it with you. So, I was teaching an event, I gave everybody my code, and someone downloaded, or had the master app, which I'm gonna show you in a minute, and then all of a sudden, all hell broke loose. I couldn't get it to work, I didn't know what was going on. It's 'cause somebody, so I actually had to go and look at everybody's device to make sure, and sure enough, one person had the wrong, they didn't have the share app on. So that happened to me once. So here it is, CamRanger. So now I am now Wi-Fi connected. So let's go over here to my app, CamRanger. Oh, I gotta turn my camera on, whoops. See, too many sequences here, so let's turn the camera on, and then it said there was no connection, because my camera wasn't on, so now let's see what happens here. It should come up. And start session. And here we are. So I'm just gonna capture one image here. I'm just gonna capture one, let's just see what it looks like. Whoops. There it goes, so that's one image. It should pop up on the top there. And here you guys are. Now, you want your JPG output, so I have RAW and JPG. You want your JPG to be a fairly small JPG. Not super, super, like the largest one, because it's gotta download it, right. You can actually download RAW on here too, there's a whole bunch of parameters that you can do when it comes to choosing what you want it to download, and share it straight to Facebook, or whatever you want. So let's go over here. So we got live view here, so let's hit live view. So, wave. Okay, and I'm overexposed a little bit, so let's go over here, and go to F8, and see what happens. That's a little bit better. And I can focus, so I'm gonna focus right on Cliff here. There goes Cliff, you're focused. This will also do stacking focus. So I can say, gimme 10 focus points, from the beginning of the flower, to the end of the flower. And br-r-r-r, it'll go all the way through. So you can set all this fun stuff, so I can focus live view. Let's take live view off, and let's go back over to HDR. And here's where I change to ISO. We wanna start at 50. We got three clicks, and we want, let's go with one stop increments. And let's change this to 5.6, 'cause I think I tested this earlier, so here we go. Come on. And we got everything set up, did I go, live view is off. Let me just make sure we're still connected, there we are. So that's gonna be way overexposed, I think, maybe not. All right, so let's go back and hit manual mode. And of course, right live, all of a sudden, in front of everyone. (laughing) What is going on here? So, I told the CamRanger people that I was doing this today, and they're probably watching me, going, "You're doing the wrong thing, Joel." "That's the one, Joel." There we go, there's my problem. Oh, you know what it is? Let's go over here, and make sure that my preferences tell me, I want shadows as my beginning, that's what we have, okay. So let's go back here, we want number of shots, or no, that's F-stops, here we go, there we go. And we say go, there it goes. Second one, third one, so that's my three sequence. So, thank you Cliff. See, there's always something, I need someone to stand over me, right? So there's my darker one, one stop darker. There's my normal, and there's my over. Okay, so you'll watch me do this, I'm gonna be doing this, I'm gonna be doing this during the demo of my, what is it, behind the scenes. And I'll do it also when we do live over here with our portraits. So, question. Yes, so, is the initial delay, is that before it starts, or is that the delay between each shot? That's the delay between each shot. Okay, cool. So, what I normally do, and you'll watch me, I'll say, okay, I'm gonna count to three, and I'm gonna start the sequence, so I got my boxer, and I go ready, one, two, three, click. And then it fires right away, then it delays, second one, delay, third one. So there is a delay, but you want a somewhat delay, because, now my strobes recycle pretty quickly, but if they're on full, full, full power, they'll take a second plus to recycle. So, the folks at CamRanger set it up so that it's about, I think, a second between each click. Originally, I think what they had it about two seconds, and then I, the good thing about CamRanger, the folks, Dave, he does the programming, Melissa, his wife, she's kind of the one that you'll see, the face of CamRanger. And they said, "Oh, we never thought about that, "let's do it," they actually fixed it, they'll change it, they changed it for me. And there's a lot of things that people email in and say, "I wish the CamRanger did this," and they've gotten, they've worked things into the program to do that. So the updates happen quite a bit, so I always go and make sure I'm updated. But, we got another question. Do you ever notice that, because of the delay, you have a registration or ghosting issue? Okay, good question. You think that's important? Yeah, so here's the beautiful thing about Photoshop is that Photoshop will register it for you. So just like when you go and, you ask it to do it, okay, you say, please register it, you know. I'll show you that later, when we do the shots. If you're like this, probably not gonna register it. But if there's a little bit of movement like that, it'll register it, and so, so I've done this, I've done this shot where I did it in demo at the West Coast School. I had a guy out in an outdoor environment, we shot three light setup, we did the bracketed sequence, and what happened was he really moved. It just happened, but he really moved. So here's what I did, that was the older version of Photoshop, 'cause I'm gonna show you, there's a new way they do it now, in RAW, with a DNG output. Photoshop, I said register his face, and it registered his face perfectly, but then the background was a little bit whacked, because it recognizes the eyes, the nose, the lips, and everything, it registers it. So what I did was I ran it through twice. I ran the first one through, registered the face, the second one I said, do not register, and then I just took the two layers, and painted one out, and it worked perfectly, and then everything was registered. But since then, I've been doing the new way, I've never had a problem, but if you do get a chance, where it's like, it's registering the face, but now it doesn't register the background very cleanly, you just do it two times. So, that's a good question, and I usually explain that, but Photoshop will do the magic, and that's the beauty of where we're at today. Adobe is trying to keep up with these needs that we have, in terms of little things, you know, registration and all that. So, but that's a great question. Any more, you got probably tons. So, Joel, and thanks for everyone for your questions online. I think, definitely, that concept of subjects moving was a big question. A big question, yeah. As you're bracketing, and so maybe we can talk a little bit more about how you're using this with strobes in particular, because I know we're gonna see that in action, the kind of tying the CamRanger back to why it's important to use that with strobes. Okay, so let me walk through this a little bit with you, and this is sort of like yesterday, when we started out the whole program, I said to you, photography is a creative process, really. It's a technical world, but we really have to have the creative process. That's our goal, is to get images that rock, and people go, oh my gosh, thank you, that's amazing, I love that picture, I wanna put it on my wall, I wanna purchase it, or a client wants to hire you. So people ask me all the time, why would you go to all this work? I mean, is it really worth it? And so there's times when all this work is not worth it, meaning you can't do this for every scenario, right? And there's certain scenarios that if you set, even if you set your strobes up, it kills the whole thing, right? Street photography, or whatever it is. I mean, there's natural things that happen, and moments that happen, you can't use a strobe, right? So why even bring out your strobes? Well, you bring out your strobes when you want to be able to fulfill your vision as an artist, and you say, okay, I'm gonna now strobe it, gives you more options, and you do some cool stuff, and you build drama. So this is an extension, the HDR is an extension of options that I have in my tool belt. It's an extension, I don't use it all the time, can't use it all the time, and for example, Don, the guy with the big beard, with all the motor engines in the background, those outboard motors, that scenario allowed me to shoot HDR. And I nailed it, at least I think I did. You know, Canon thinks I did. I mean, I got this great shot, and people go, wow, look at all the detail in there, that's incredible, right. And so the shot that I have, that I start out with, the guy, the cowboy with the horse. I can't use HDR. (laughs) That horse is moving too much, you know? Now, if he was standing there by himself, he could. So, there's times I can't use the technique, it just won't work. And now, in this scenario, I'm gonna lose some shadow detail in areas, I even wanna pull the shadow detail out, I couldn't. But I'm using the technique of strobing with the overpower on the sun to get that sky really dark. So I'm already pushing the limit of fulfilling my vision with strobes, and now HDR just extends that. Gives me another option that if I really want to get shadow detail, and highlight detail, and whatever, it's there for me to do it, and then I end up with a 32 bit file. So is it worth it? Well, you remember when I told you that if I have my assistant, and then I got a model, and I got a makeup artist, and we go out in the desert, and I look off, and there's some rocks 100 yards away, and I'm willing to go that 100 yards with all my gear, but I'm not willing to go 200 yards, it's too far. My tongue will be dragging in the dirt. Some people will look at this and go, there's no way I will do this, this is way too much work for me, it's too much, I'm not gonna do it, that's fine. I'm giving you an option, and if you have a client, architectural client, or a client that has a scenario for you, and they say, this is a tricky scenario, lots of highlights, if one capture's not gonna do it, you now have an option to go do. And say, you bet, I can nail this, I can get detail, all the shadows, and the highlights, and it'll rock, and you'll get this incredible transition in the values of all your tones, and then all of a sudden you look like a rock star. So this is giving you an option, in your tool belt, to hopefully fulfill your vision as an artist, or as for a client scenario. And so you can't use it for everything. I like to use it any time I can use it, I try to use it. But I can't use it for everything. So I hope that helps to understand. And there's limits, you got your subject has to sort of go, you know? So if your subject is a really animated subject, you would probably never use this. But if you can get a guy with a nice long beard, sitting in a bunch of outboard motors, with a nice beautiful cross light, and you can say, just stay still, here we go, click, click, click, it works. And I can nail that shot, and be confident that it's gonna go huge print on my wall, and I'm gonna have my tongue hanging on the ground, but not dragging in the dirt. Let's see, a couple questions about the CamRanger itself. From Laura Sita, does the CamRanger only work with a camera that has Wi-Fi. No, okay, so let's go back to that. I probably should've started out with this, because you know when you teach, you miss things, right? And thank you for the question, because number one, the CamRanger right now only works with Nikon and Canon. I've talked to Melissa and Dave at CamRanger, and they're trying to go and add other cameras, I think Pentax, they were working on that for a while, or something. Sony I think is their other, probably their next step, who knows? But the problem is that they have to go basically program, the programming behind this is not easy, right? And so, and Canon and Nikon, they keep adding new models. So poor Dave's gotta go and do the back end, and reprogram it all to work, and he's pretty busy. They've done a phenomenal job with what they've got, I don't know how many employees now, but it was just the husband and wife team, and it just grew from there. But yeah, right now, it's limited to Canon and Nikon, as far as I know, so you can go on their website, CamRanger.com, and you can find out exactly what cameras they support. But, yeah, so that's one thing. This creates the hot spot, the Wi-Fi. Your camera, some cameras have Wi-Fi built in. That doesn't matter, this creates it. And so, and the cost is I think around $275, somewhere around there. They run specials, and I think when I bought it, it was around $300, and it dropped a little bit. But one of the things that I forgot to mention, that I saw when I was in Dubai, teaching, and I was in the world's largest mall. And I was walking along, and here's this photographer set up, just happen to walk past him, and he's got this camera set up, and he has his iPad, and he got the whole thing, and he's walking over to it, and he's moving something, click, and then he looks at it. He's not even looking at the camera, he walks around the whole room. You can move a chair, click, okay, you can move it, do this, you can stage the whole room, and never actually go back to your camera and look at it. And so it's a really good tool for architectural shooters. My son actually shoots architectural stuff, and he did that with a client, the client just freaked out, they'd never seen it before. So, that's really, speeds up the process. You can also strobe, when you do multiple strobing. So let's say I take a cactus, and I wanna strobe, you know, I can actually go and hit the button, strobe, strobe, strobe, strobe, and watch what I'm doing as I'm walking around, never even going back to the camera. So there's some fun things it'll do. A lot of creative options for night photography, whatever. But we are limited right now to Canon and Nikon. Well Joel, we do have people in the chat rooms who are shouting out for the Sony and the Panasonic, so there you go, CamRanger, they want it. Yes, poor Dave's not gonna wanna hear that. In any case, just to clarify for people, Justin Alice Johnson, so, is saying, I can do this in my camera manually, but the CamRanger. Speeds it up. Automates that. Speeds it up. Yes, so, for a portrait with strobes, manual takes too long. You'll be like, ISO, ISO, change, it would take too much. But for a Harley, or a still life, if you're going to do a cactus, strobing a cactus in the desert or something, and you wanna try HDR, doing it manually is fine. It's when it comes to portraits. Okay, great. And, one more, do you still have to stay below, does sync speed have anything to do with ISO bracketing? Yes. You still have to stay, yeah, your strobes all work the same. So, you know, you're not changing anything. Your variables, your ISO, so you set your strobes up that match just the regular way you'd capture a 14 bit capture, or a single capture, and now you're just going, I'm giving you now a darker and then a lighter one, that's it. So yeah, all the variables apply, just like we talked about yesterday. So, um, you know. Same variables. Same variables. Alright, but we do have one more. Would you ever do more than three shots, like you were showing us, in terms of the ISO bracketing? Are there any scenarios where you would do that? Not with a portrait. Three is probably enough. I thought about that, but, the only I would do is I would extend the range, so instead of in one stop each way, I'd do two stops each way, which is normally what I do for a landscape, or an architectural shoot, or whatever, I do a two stop under, normal, two stop over. But I would never do five. It's too many clicks. But for other types of photography, without strobes, HDR bracketing, landscapes, things like that, you could do more than three. Absolutely. Yeah, and that goes back to your, so let's finish it off with this. How did I learn this stuff? I grabbed it. I purchased it first, but someone twisted my arm to purchase it, 'cause I didn't know what it was, but I purchased it, then I started playing with it. All of a sudden things came out that I never thought of. And I tested it, and I play with it, test it, try things, play with, test. You see where I'm going? You gotta go grab this stuff, folks. You can't have, okay, so, I have this saying that, 'cause I get a lot of emails, and unfortunately it's probably the hardest thing that I have to do is every day I have all these emails, influx of emails, people asking questions, and when I teach class, I always say there's no such thing as a stupid question. Well, I've heard a few, but no, just kidding. I say there's no such thing as a stupid question, but there are lazy questions. Meaning that people want me to solve every single thing for them. But I don't know everything, and I'm just like you. I'm not a genius, so I gotta go out and practice, and play, and try this, and do this, and then you guys come along, and you go, you know what, I got the camera to do all these things. I'm like, I never thought of that. How'd you figure that out? Well, just playing around with it, came with an idea. So, that's your job, is take where I've given you, and go and take it further from there, or try and play. And so, don't expect someone to answer every single question for you, right? You have to go out and play, and you will discover things I would never discover. Because I have a limited capacity up there, and I miss things all the time. But you go, I want this to do this, right? Your application's gonna be different than my application is, so therefore you come up with something that's really cool. So don't just expect someone to solve all the problems for you, go out and play. And that goes with anything. Strobes, you know, people say, what about this? And I go, you know what, why don't you go out and try it? And do an experiment? Grab a subject, and experiment. I remember bringing my, I purchased a beauty dish. And I kept hearing beauty dish, beauty dish, and so I purchase this beauty dish, Paul C. Buff, and I brought it home, and I had my kids, you know, there were four boys, they're kinda stacked, and so I had to recruit one of my boys, bribe him, "I'll give you a soda, a candy bar," whatever it was, to get them to sit in front of me, 'cause they always go, "Dad, please, are you done yet?" And so I get the beauty dish out, and I set it up, and I take a picture, and I go, what? I went, it didn't work, I go and put the beauty dish on a hook for two years. It was on a hook in my garage for two years. And then I saw someone that did a beauty dish, and I thought, I'm gonna try and pull it out again, and I still didn't know what a beauty dish did until I started playing with it. Even when I saw someone work behind the scenes, and it looked like it was kind of a cool thing, but it wasn't until I worked out all the problems with that beauty dish, and figured out where to put it, that I figured, I go, ah, that's what a beauty dish does. That's where, and I never used an overhead light, see, I was always a side light guy. So, my point is this, is that even though you can watch me shoot, until you grab a beauty dish and go out and play, you're not gonna understand what it really does. So don't expect someone to solve everything for you. So, uh, and I do kind of lay in bed sometimes thinking, okay, I got a problem here, how do I solve that? And I'll go work through it, and I'll stumble through it, and whatever. I hope you do the same thing. That you go, "I wanna solve this problem." And you guys figure it out. So that's the beauty of it all. Don't expect all the answers to be, now, my boys had a problem, they couldn't pass, their car wouldn't pass emissions. My son, Nathan, had this little Volvo, wouldn't pass emissions. And so my son, Aaron, said, we ran it past the dean at the time, and we had Wi-Fi in my studio, and we were right on Green Street, and Aaron says, "Pull it around." And I'm like, what? So my son pulls the Volvo in front of the studio, and my son takes his laptop out there, sets it on the front, and I see the both of them, I'm looking out, working on my computer, looking out, and they're out there, with the computer. What they did is they looked up on YouTube how to get your Volvo to pass emissions, and they're in there, and next thing, they pull a few wires, and do a few things, he takes off, he passes emissions, they come back, and they put it all back together, and it runs perfect, right? But it's all on YouTube, right? There's a lot of information you can find, and what I hate more than anything is when someone emails me, and I gotta go on YouTube, or the Internet, to find a solution, and then go and type it back out for them. It's like, why don't they just type it in? Type it in Google, you'll figure it out, right? So there's a lot of solutions like that. And that's the beauty of the world we live in today. So much information being passed around. But don't rely on everyone to solve everything for you.
Class Materials
Free Download
Bonus Materials with Purchase
Ratings and Reviews
Christopher Langford
I love Joel, even though I'm not a big fan of his style. He's a great teacher, really down to earth, and best of all, humble. He's a true professional and knows the business. Even if you're a seasoned photographer, I believe you will pick up some great tips throughout this course. What I enjoyed most from this course was learning Joel's thought processes and how he takes on challenges.
Dana Niemeier
After seeing Joel at Shutterfest 2016, I am a fan. He is intense, but that is inspiring. I especially like the segment using ND filters as I live in Florida where bright sun can be an issue! His teaching method sets the student at ease. You see him make mistakes and then figure them out! Makes us believe there is HOPE for us in the learning process! I also bought his commercial photography class as an add on. Great to see him work and think on his feet. Thanks CreativeLive for giving artists this platform that reaches out to artists around the globe.
Gilbert Wu
I did enjoy the class despite not being used to the American product placement culture. The British say “the proof is in the pudding”, Joel’s pictures are fantastic and create drama. He has the eye. I like his very down to earth approach which is far better than many youtube photographic charlatans. Apart from the techniques he shared, one very important thing I learned from this class is “Be an artist and not a technician”. If you want to learn from people who can take better pictures and more confident and experienced in his/her work than you, Joel is one of those people.
Student Work
Related Classes
Lighting