Shoot: Backdrops with Gradient & Draping Effects
Lesson 17 from: Studio Lighting - The Power of ControlTony Corbell
Shoot: Backdrops with Gradient & Draping Effects
Lesson 17 from: Studio Lighting - The Power of ControlTony Corbell
Lesson Info
17. Shoot: Backdrops with Gradient & Draping Effects
Lessons
Day 1
1Course Overview & Lighting Examples
22:53 2Mono Lights & Pack Lights
29:32 3Light Controls & Shaping
30:36 4Beauty Dishes, Soft Boxes & Reflectors
18:09 5Live Demos with Lighting Tools
31:41 6Tools of Light Q & A
13:59 7Shoot: Mixing Strobe with Ambient Light
41:49Shoot: Painting with Light
26:01 9Shoot: 4 Applications of Light
33:34 10Shoot: Using 7 Foot Silver Umbrella
17:52 11Shoot: Group Portrait
14:18Day 2
12Shadows, Highlights & Light Metering
39:04 13Shoot: Size Relative to Distance
35:17 14Shoot: Variations of Modifiers Part 1
40:43 15Shoot: Variations of Modifiers Part 2
27:41 16Shoot: Lighting Backdrops - Modeling Lights & Gels
38:24 17Shoot: Backdrops with Gradient & Draping Effects
19:16 18Shoot: White & Steel Door Backdrop Effects
23:37 19Shoot: Lighting Effects on Vintage Items
30:12 20Shoot: Lighting on Commercial Product
42:48Day 3
21Shoot: Sitting Casual Portrait
29:48 22Shoot: Classical, Traditional Portrait
27:44 23Shoot: Broad, Short & Profile Lighting
19:32 24Shoot: Full Length One Light Fashion
22:19 25Shoot: Two Light Fashion
15:53 26Lightroom: Retouching
18:27 27Shoot: One Light Appearing as Four
36:18 28Shoot: Two Light Profile Portrait
34:48 29Shoot: Classical Glamour
37:13 30Shoot: 40's Hollywood Glamour
21:54Lesson Info
Shoot: Backdrops with Gradient & Draping Effects
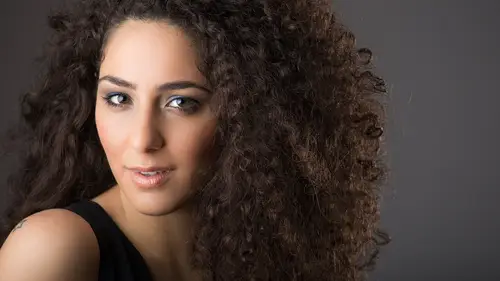
Go ahead and turn it just a little bit more to your right, right about there, let's shoot that and you can see it's going to go across there and start falling off and what I'm trying to accomplish this fire that off here, so what you'll see is yeah, it's going to be a plus in front of me about a plus two in the upper left corner and it'll fall down to probably about a minus I don't know minus one or two down the lower right hand corner. Yes, so we so we've killed our history and on the upper left because we didn't weaken gotta tell this we could not get down, but you get the idea so the radiation is works pretty well and you can also do it this way. Go ahead and turn it flatter to the background more, more, more, more, more keep going keep going, keep going right right about there so now let's, let's do it that way, brit and watch what's the fall off now so I come back here, I'm going to see right there. I'm going to have a little bit of a radiant from the right, but you're going to se...
e the gray pickup peek in on the lower right corner because the color is not reaching that area, okay? Now, here's, what we've done so far, we're talking about single colors now think about mixing colors so you start mixing colors, you can get some pretty fun things happening, you've got to be a little bit careful because when the colors aren't focused and they aren't on black, they're not they're not hitting something that's not contaminated. Sometimes the colors will mix together into a michael deng ugly, messed up mess, but as long as as long as that bag drop appears as black first, and I get very concentrated separate bursts, I got great different colors and tell me along the same lines you, gino and the free minor, both wondering what the best color background is to play with gel coloring doesn't work, but on a white one black one I know this one is kind of a model gray as long as it's not as long as it doesn't have color doesn't matter white here's the thing about the white with a white background it's really difficult to make it go black before you begin, but when you do make a white background go black, it reproduces the color so much quicker and easier and with less power, yeah, hold a black behind there, and we'll see. I want to shoot this with with a black back there and see what happens so you can see that so that we get some of the density is so I don't know that it from that angle it's going to show a lot, but we it might let me try one who is him in a language with a little bit here we go. In fact, I was in my moving and just cropped out your own little bit, john good. So you're going to start to see a little bit of the models shape of the wrinkles of the of the family, but it's kind of a cool look, but you can see how it starts to pick up the totality of that color really easily. Um, yeah. So the thing is so much of this is just getting an intestine and playing. You know, you can create a whole sample book for your clients of just testing colors that you condemn, present your clients and show him some of the things that air their possible just a follow up. Can you clarify for pink color peller? What you mean by making the background black go black when it's white? Yeah, yeah, so so a white piece of paper will go black if you don't put light on it, okay, so this is this is the first observation in this environment today in the studio with all these lights on, I can't make this why will go black, but I can when I'm not with all of this and the idea is set your main life and your accent light up in such a way that they do not touch that background paper that white paper or that white wall it has to appear in your first test shot it has to appear is black d max? Does anybody know what I mean by d max there, d max and eamon de max is the maximum density of black you can get and that was a term that was a little leftover term from film days d max means it's black no density if I can make that white piece of paper appear as d max as black all man. Then when I turned colorado, I get color that is just stunningly beautiful, but to do that it's hard to do in a small studio it's impossible with an umbrella it's possible with this it's even better if I have the grid for this or if I've got a small soft box and ingrid for that, all of it gets better, but as long and think about what is a white piece of paper look like in a closet with no light on its black right, so find a way to make that white wall are that white backdrop go black and then when you introduce color, the color comes back so easy, it's great it's really great! We're going to do a shot in the next session where we're going to introduce we're going to do something sort of like that where I'm going to be on the the white brick wall and I'm going to make that goes dark as I could get away with, uh and then I'm gonna introduce color and I'm going to reflect that into a piece of black plexiglass so it's going to get kind of funky, awesome, very excited to see that, but but you can do it have you that's the old trick? How do you make a white piece of paper go black don't belive, you know, with enough light you can make a black piece of paper go white and I can certainly make a white piece of paper go black. So now when when you make the black piece of paper go white, I don't want to be in the room with that thing fires off, you know, no more children, you know? But I think things get newt, but seriously, there is all about control I mean it's all about just paying attention and thinking that through now I want to do back here is john I want to pull off that reflect her head ok and let's put let's put that red back up but I want to put the red and I just want to lay the red now we've we've purposely left the modeling light off back here on this light so that like this lights not hot anymore so now this line is cool now I'm gonna lay this gel right over the flax tube and write a little modeling land but it's not gonna burn because it's off so the marlin light is off but the flash to they're still gonna fire so if we could if we could pull it over and take down all four corners that then we will get no no dog years on it and then the idea here is I'm gonna try to create a burst behind her of like just a just a quick rapid fall off first now here's an interesting thing about working with light on the background the closer my light sources to the backdrop the more rapid the fall off the more record the transition okay so if I want to really tight burst that's brightened and just falls off the dark then I want that that light really close to the back drop but if I pull it away a little bit then the burst is a little more big radiant so now pulling back for enough they're not evenly eliminate the background again so it depends on my exact placement of that head as to where that thing's gonna fall off so we'll look at we're gonna look at a couple of different options here and you'll see what I'm talking about it's pretty it's a pretty neat look interesting thing about these jails you can get yourself in a little bit of trouble with gels on backgrounds because while they don't look like it the little ears that stick out sometimes you'll build an incident angle to that and that's just enough of a highlight to bounce into that turn and come right into your lands and give you a little flair it's like where did that flare come from? Came from a gel and you might not notice no that at first so if you don't have gone to help you out okay so here's all under john I want put that baby right up against the background put like right up in there go ahead move come on this way a little bit more right there never have stepped up their you know your way again one of the other tricks for us for your for your reader there for your watcher for your viewer to help keep that and make that background that white background go black the further you can move your client and your light source your main line further away from the background the better and if you can't get your wife to go completely blackballed and put a gray up in the great you can get to go completely black if you're only going to buy one background and you're going to try to do this kind of a technique then get a great get a medium grade because it's easy to make it go black and it's easy like and it's easy to make it go light with enough light on it okay you know everyone here five six point eight to eight point four five six point eight is seven one right okay folks thirty seven one yet how much is that one back one is for oh how far out is it for all that how far over is it for a for a while that's two eight and a half oh great here's what we're going to do we have can we I hate to do this real quick but can we get a shorter light stand really fast or way have one that's not sure if we have a short wait a minute will work will we'll deal with this just like it is that I just want to get this is low as I can when the hide a little go down about eight inches and I could hold it let's just get I just want to put it behind her and try to have her hide the light oh there you go. Yeah perfect sorry. Sorry don't you hate it when your when your instructor start changing things and getting new crazy ideas way go great okay so now we'll put her back in place and we'll get this thing right behind her and I'll position for you okay so move it over over there you go and now just go straight back to the background like within four inches of the background there you go there you go there you go now you're cooking my dear let's move you that way just that much right there perfect perfect perfect nobody moves nobody moves nobody moves thereby ready ho this is good what what was our main reading here? Seven one yeah ok, here we go here we go you're gonna love this burst I'm just telling you so you see the little along a little hard on her face all right, let me let me re shoot that yes and then close up that gap on that side down there you go just need more tape and I'm gonna close you up just a little bit right here. You know let me let him do that so what's happening there is some white light is slipping out of that ridge, that little dog here and so that does happen so you just need to kind of watch for that kind of stuff all this stuff that we're doing here trying to go through a pretty rapid fire these are all little techniques that I would spend a pretty good amount of time to make sure we get him really exactly right so when we're sitting with the client so let's try that again that's great right there don't move good, good good good that's pretty fun that's pretty fun you're gonna like it I'm telling you the trick here is and I mean laura remain light a little bit the trick here is as as usual the trick is to make sure that what you're seeing what you're getting is predictable results you're getting what it is that you want and you're not being stuck getting something that you didn't have an idea about bring your head around this way a little bit more yep right there great in your eyes right in here good good kids perfect right there that's going to be a nice I like this one a lot this is our keeper probably right here and I think your eyes look a little better a little more fresh. Uh what do you think? I mean this is kind of a fun thing to do right from a background that's pretty normal in neutral that gives us a lot of options and then of course that that burst effect the closer you move it the more fall if it becomes and then you start backing it up and then it becomes less of a burst yeah question would you be able to use the same technique without the gel to just create kind of a neutral than yet you want try sure let's try it shall we just pull that off and you're gonna have to power that what what powers that light on now it's at two we can go down one more stop okay you're going to take it down one more and then I'll go up on this side that's how we'll compensate you go down when I go up one so that will get us back to neutral so then I'll close down one here he went down one there right so five closed down one here there we go so let's try this again here we go here we go this should be a nice burst nice effect a nice face nice girl beautiful burst here we go think same density but a different after get the idea thanks lack of the time for how silly is that statement you've got to think like a photographer ok, so for me these kind of these kind of controls working working with that like that in these bursting things I do a lot of that stuff I do that a lot in the studio I don't love this look so I kind of I kind of go out of my way to find reasons to do that um so what I'd like to try next let's do this let's let me do one more thing on this background and then we're going to swap and bring out the steel door um let's do this let me move this so you can see what I'm doing movies to that side so one of the things that identified a while back is I really like a draping effect to my backgrounds I like almost almost being on stage it's almost draping a curtain effect and so what? I kind of figured out a pretty easy way to do that at first off I want didn't know how to do it and I finally figured out if you grab your background you know you're like two thirds down and just start rolling it up kind of like this you see what's happening look right across there you see what's happening you get the idea so you can start creating this draping effect now and the drinking effect depending it's goingto greatly depend on what you do it I'm going to somebody hold this because under ideal situation I'd have another I'd have some more slack up on top so I'll just get you hold that for me it's not gonna clinton very well but under an ideal situation if you think about this remember how size of your life source the relative to its distance has all to do with the edge of your shadows and the softness of the highlights okay, great so if I want those shadows toby hardage I need this I need a pretty hard day's light if I need him to be a soft I need a pretty big light so what I think I'll do here is let's let's grab it let's try making him starting here so let's try you gotta you gotta do the rules go into the role action let's see let me pull this light out of the way and I'm gonna bring this guy over and will like this from the top corner down what are you yeah as you roll you gotta pull up from the bottom yeah kind of like like that you just hold it right it's like that you got that yeah ok so now I'm gonna take this guy I want to bring him down and this is one of those instances because once I get this in place I don't want to keep taking this thing up and down is wasting your vice time so I'm going to go and put that it too all right now and then I'll adjust everything to match this easy way to do that and tell me just confirmation for uh what's the m design in the chat room what size is the backdrop and that is a white house press him it's ten wide by eight highest ten by eight they don't make any that are long enough to do big long fooling sweeps they're all ten by eight or six foot by verticals so the ten wide for me this works really great and what I've done at home is I've got they also make floors they make these really great photographic floors and there's tons of designs of floors and they're made out a mouse pad material so they're rubber and spongy and you can walk on them and they last forever so what I'll do is I'll but up a floor up against the bottom of a background a backdrop and then I'll put trim bactrim from lows our heart there they're real cheap and I've got two clamps on either side this clamp it to the bottom of the background so looks like I'm in a room design I'm on I'm in a room set it's really pretty great so I'm just going to spin this around and you can see that draping effect and the more I move this closer to john the more the shadows are going to be more pronounced because they're going to be falling down more well, I see what I'm doing dumb but I'm about to have a wreck yeah I love it come down there we go okay yeah, great. Okay, so well I need to turn off the light you guys almost let me screw this up and it's going to be tony zero again you guys around let me do it all right let me get a little bit there we go. There we go, beauty. Back up just a little bit so I can see that. Good one. Good, good, good, good turn your head of tiny but this'll in your eyes at me. Great right there. Beauty, beauty, beauty. I don't know if it's something that you like. I don't know if it's something that you want to do. What I do know is that it gives you more options and you put a red gel in there in that box and all of a sudden I got I've got a red velvet curtain, you know? And you can really make it come to life. I think that's a little bit darker than I would want it, so I would probably work on this a little bit and get more light on it. Um, yeah, I would do that. I don't take the time to do it now, but you can get the idea by down and down my main light one stop and then open up one stop the background will get broader by one side it's just going to save me from having to get up there and powered up. Don't waste the time doing that, but you guys get the idea I think my my job today is throws many ideas as you as I can instead of getting one idea and just keep working until it's perfected. And I don't want to voice everybody's time with that let's. Just keep going with ideas. But I hope this is the kind of stuff that people are hoping that they get from this.
Class Materials
Bonus Materials with Purchase
Ratings and Reviews
AJ Photography Ireland
Watching this Course from Ireland live, and at my leisure having purchased the course, I cannot praise Tony Corbell enough. I felt I was right there in the Classroom with him and gained so, so much from stunning course. He really does explain the techniques he uses so well and is one of the greatest Educators that I have seen in photography. Worth every Euro ( Dollar ) !.. Thank you Creative Live and Keep up the good work ! Andy Jay www.ajphotography.ie Cork Ireland.
Martin
I learned a lot from Tony´s class. Very experienced, talented, smart tips and funny comments. Generous on sharing his knowledge. I am passionate about learning portraiture since about a year or two, had bought a couple of flashlights, stands, modifiers and now the most difficult part, to have my wife and kids be patient and let me practice with them. John Cornicello did an excellent job helping with the lights and bringing his own comments too. They both did an excellent match. This is a class I will watch again from time to time. This is the second course I watch from Tony and about the 15th course I watched from Creative.
a Creativelive Student
This is just a tremendous class. I love Mr. Corbell's teaching style and appreciate his levity. Most of all, I value the expertise he brings to the subject matter. After watching the entire class, I have been able to make adjustments to my lighting that I love and feel like I have a better idea of what I am looking for with my lights. This is a terrific value at any price.
Student Work
Related Classes
Lighting