Lesson Info
22. 5 Two Light Set-Ups: 1 & 2
Lessons
Day 1
1Studio Essentials: Shutter Speed
15:50 2Studio Essentials: Flash Exposure
22:26 3Studio Essentials: White Balance
21:15 4Light Principles: Inverse Square Law
26:46 5Lighting Patterns
15:29 6Shoot: Demo Lighting Patterns
28:06 7Quality of Light and Modifiers
09:59Shoot: Choosing a Modifier - Diffusion and Grid
13:40 9Shoot: Choosing a Modifier - Umbrellas
31:01 10Shoot: Choosing a Modifier - Softboxes
21:08 11Shoot: Choosing a Modifier - Extra Stuff
28:10 1210 One Light Set-ups: 1 and 2
17:07 1310 One Light Set-ups: 3 to 5
18:16 1410 One Light Set-ups: 6 to 10
15:57 15One Light Set-ups: Pop Quiz
21:21Day 2
16FAQ for Purchasing Studio Light Part 1
31:00 17FAQ for Purchasing Studio Light Part 2
25:36 18FAQ for Purchasing Studio Light Part 3
43:53 1910 Two Light Set-Ups: 1 and 2
24:29 2010 Two Light Set-Ups: 3 to 6
25:24 2110 Two Light Set-Ups: 7 to 10
22:30 225 Two Light Set-Ups: 1 & 2
13:27 235 Two Light Set-Ups: 3 to 5
33:37 245 Basic Three Light Set-Ups: 1 & 2
21:05 255 Basic Three Light Set-Ups: 3 to 5
25:52 265 Intermediate Three Light Set-Ups: 1 to 3
17:14 275 Intermediate Three Light Set-Ups: 4 & 5
12:58 2810 Common Lighting Mistakes
16:46Day 3
29Solving 12 Common Problems of Studio Lighting: 1
39:29 30Solving 12 Common Problems of Studio Lighting: 2 to 6
37:25 31Solving 12 Common Problems of Studio Lighting: 7
15:50 32Solving 12 Common Problems of Studio Lighting: 8
25:51 33Solving 12 Common Problems of Studio Lighting: 9
16:19 34Solving 12 Common Problems of Studio Lighting: 10 to 12
26:11 35Portrait Lighting: 1, 2, and 3 Lights
14:51 36Beauty Lighting: 1, 2, and 3 Lights
18:06 37Lighting Groups: 1, 2, and 3 Lights
15:53 38Lighting for Drama: 1, 2, and 3 Lights
24:19 39Your First Studio Lighting
38:46Lesson Info
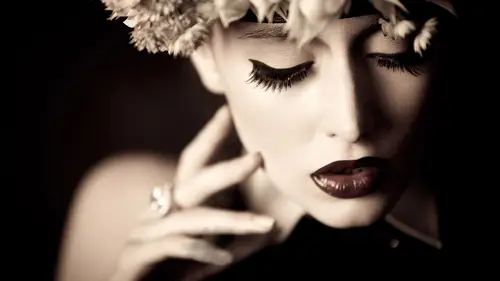
5 Two Light Set-Ups: 1 & 2
I'm going to show you some two lights that upset wouldn't be typical portrait setups, there would be ones that are a little bit more unusual, or maybe they'd have a specialty use or maybe it needs a special modifier, so we're going to start off with using to strip lights, all right? And I'm gonna bring my model out, and we're going to start with these strip lights from back forty five degree angle. So we're creating two room lights on our subject here. Those strip lights. A lot of people weren't sure in the last segment, so besides, this is I'm on the one by four. Yeah, there, maybe fourteen. Fourteen by forty eight, and sure, approximately. I always hear about that in my studio. I have I have a one by four to one by force that I use, and it looks similar ish. Loses a little wider. Um, yeah. So can I bring you forward? All right. So let's, let's, talk this out. So we have two grim lines, one for the back, forty five degree on either side. And we are going to turn on the modeling light ...
so I can see kind of what's going on and judge it now, obviously, if I photographed her street on like this, there is no main, like there's no light on her face it's just to room lights okay here's one way it could work and I have shot this if you go to the web site when the other photography dot com and you or you goto facebook whatever there's a fuller called body beautiful and in that folder there's a picture of a model that's just she's facing straight on towards camera but she's got a ton of curve and it's a fine art nude but you don't see anything because it's just the outlines which is what I could do here so for example, I'm gonna have to stand up on these if you had your subjects like this, you could make it all posing but the face straight on towards the camera will look like a blob so you have to at least be sure to see their profile so you can use this for a straight on shot of a subject but you want to get the outline of their face illuminated so I'm going to turn you to the side actually like that yet and like your head that way. So yes, these lights or contaminated but you can see that I'll have illumination on her face the outlines her body and then it's just about getting the pot's right and we're gonna give it a try for meeting as well I'll put you on approximate meter duty just right now and I'll switch it up okay? So I'm on one hundred when there's someone twenty five said we put one hundred perfect thank you folks for the stern awfully great three point six alright, I'll give it a try here because this quick test you that you can guess in other words, I say that lovingly I can also test it to see if I want to be that wide open but I don't really want it that way don't join those before yeah let's try this not too shabby so instead of shooting all the way open like the meter suggested I closed on a little bit of it five six all right, so this lighting in and of itself the to room lights from a back forty five it's interesting but it's only interesting if you pose correctly so for example let's try get me put your front anyway up turn your shoulders towards me a little bit great put your hand on your hip perfect and then look your head that way okay? All I'm trying to do their arch your back a little bit and the chess board and I'm trying to give myself curves and if you take my imposing one on one class that I have here, you kind of get to see what I'm doing but giving myself some definition some curves so that she's not a straight blob and I my saying for women if you contended bended if you concur bit curve it so here's an example okay and then can you bring your front left arm down yeah just loose right there perfect and into your chest towards me a tiny bit great great ok something like this so this is not a boudoir shots or find our new shop but it could be or it could be a low key maternity shot these of course if we're paying attention to outlines if you have a pregnant mother turned to the side and it's all about shaped and that's a great image and low key and look really beautiful in black and white notice we do have these back strip lights a little bit higher then before it is a tiny bit higher because we are using that to illuminate her face and so if it is a little bit lower than her face will have kind of bottom light and so you could even make these on even if you wanted you could make this room light higher to cast light downward on her face and you could make that one lower if you wanted fooling it doesn't matter so with the set up it two stoplights approximately back forty five and then posing to fit my last little saying about this is where she standing makes the difference the distance to those strip lights because she takes take separate in between them ok, right there, perfect. All right, so if I do the same thing, watch how the light wraps around her face more and gives a broader, like it's starting to wrap around her body, whereas if I bring her way up, which a little less, uh, chest I can't quite see without through the modern like it's, just this one, it might just be a tiny, tiny room like perfect, so all it will do is carve out her profile, and that when this would probably be how I would photograph maybe a dancer or something like that, because it's, just like I traced their outline so distance makes a huge difference, which you need to be aware of if you're in a small space, because perhaps in a small space, you don't have that much distance, so might need to put those strip lights close to the background as possible. All right, perfect. So in our next set of we are going to keep the same two lights, but we are going to bring them around front, and so we're going to use to strip lights from a front angle, and we call this sideways clamshell light, and you want both lights at equal power and at equal distance and equal everything for this particular set up, and what I can dio is I can put these lights really close together so the cameras over here will be able to see that that they're less than a foot apart where I could go a foot apart if I wanted and this is going to give me really really flat light but it's very very glowing as well and basically the reason that you might use this is because it does kind of funky catch lights in the eyes you get two strips of light on either side of the people which looks kind of cool so it's a way to get flat light glowing light and it's like a clam shell like we had before but flipped on its side so you get that same kind of glow this would not be something that I would probably do for somebody that perhaps has around her face it's just flattening everything out klim show you could do around her face but then you would still leave some shadows to give them some help to shape them and I'll give this a try I have a feeling that this light will be too low because as I said before you want the lights higher than your subjects facing right now there are about equal so I might get a little bottom line but we'll test it might work out okay and can I get a meter reading on that one perfect thank you and we'll figure out a pro ultimately what this exposure should be perfect right around where was perfect okay so let's give it a test here and some tricks for this is if you are using a wider lens you won't be able to shoot through these two lights because what happens is they have a wider field of view and therefore the edges of the strip lights will actually show up in your photo so what I'm going to do is that we need a little longer lens a little closer okay that's still looks cool I think I might raise it up a little bit but it's still had an interesting effect to it to me it's a slightly bottom let so going to raise it maybe a foot and a half two feet and a half maybe there okay okay it's close and they will be it'll look fine all right so let me try that one more time I raise it up just a little bit so it could have that downward angle some shadows underneath her doll okay if somebody will zoom into the catch lights for me as you can see what it looks like once it pops up so she and it's like that kind of streaks in the eyes traditionally and portrait photography this is not what you would look for but it doesn't matter if it looks cool and that's kind of my my rule of thumb if it looks good then it's right on but if you back back out it does have that kind of glowing really soft light from every direction so this would be good for somebody where you're trying to eliminate wrinkles really is quite flattering light on her you look very pretty ok, so that is to ship leads from the front what you want to keep in mind is you want them to be equal power equal distant from her because it's not uneven distance one light will be brighter for than the other and you want them pretty close together if you have them two or three feet apart what will happen is you'll get a light here a light here and then shadow down the middle of her face and then it's not flattering anymore a question a couple of people including kobe troy have been talking about the street fights being one stop brighter in the middle of the then on the edges and could you talk a little bit about that and if you were trying to get it fully even can you is there a way to compensate for that? All right, let me pop this down real quick see if this one has okay so generally would ends up happening is because the strip like in a super deep ok really it's only what is this you know like a foot and a half two feet to see in depth from the front of the light the light doesn't have time to spread out so what will happen? And you will see this? Maybe on some, your strip light is, you'll get a nice, bright hot spot in the middle, really bright area, and then it's kind of late, but it fades out to shadow and so that's, because you don't have much depth and that the lake doesn't have time to spread out. However, we've helped ourselves out here, because if you look at this, it is dimmer at the bottom and top, but it has a pretty broad area of highlight, and the reason is because we've used our inner baffle diffusion panel. I know this sounds awful for the britain, the microphone, come try to be aware that way you're not used to that. So what this does is it spreads it out, it hits that diffusion, it spreads the light out more, and then it has a little bit more time to spread out again before it hits the second diffusion there's, some west comics and inter diffuser, winning with a silver dot in the middle, so that dot reflects light back and them's down the center to try even adele. Yeah, even the even the octo box that we have over there, I had the rapid box sister that I set up, that is a perfect example, so it's not just this your place that suffered from this a lot of lights what'll happen is they will have a bright spot in the middle. So what westcott has done for a couple, including that, like, is it it's like a silver dish like a little it's, like a little plate that they put in the center? And the idea is just cut out a little bit of that light will try to even it out so some of that it hits the center, it spreads out, it wraps around so it's not like there's a dead spot in the center the way that it's bill it'll still wrap around so some eye one hundred does west, I have this trip like that does that there's iraq was forty eight it's an older one and they also have the other another one that's asymmetrical where the lights in the top and emphasizes the difference so that the light falls off from the top to the bottom. And I think I have seen that when they kind of like that. Yeah, I've never used that before. So like I learned something cool, perfect. Anything else? No that's great thing I'm perfect so let's, go on. This was number two this next one with the sideways clamshell with the two strips you could do this also with two soft boxes but chances are most people have to equal size strip lights and not two equal sides. Soft boxes, because why would you necessarily need to soft boxes of the same size?
Class Materials
bonus material with purchase
Ratings and Reviews
BolesMA
If you're on the fence about this class I can easily answer your concerns. BUY IT. Lindsay provides top notch professional education while keeping things interesting. Her words are precise and direct. I actually felt GOOD just watching and learning. I mean, like someone surprised me with a cupcake kinda GOOD. After the class I could immediately see improvements in my photography. The best part is that I learned enough to see the wrong in my setups. Knowing what's wrong is just as important as knowing what's right. She is funny, easy going, energetic and filled with knowledge. I would also highly recommend her Posing 101 class as a must have addition to this course. I feel like I have learned more than I could possibly use. I will be going through this course over and over again just to make sure it all sinks in. There's THAT MUCH she offers that you will always learn more with each time you watch. I hope this helps someone make the decision to up their game. That is exactly what it did for me.
Jason Ashley
I loved this course! Lindsay spent so much time with explaining each set-up in-depth that anyone picking up a camera could understand how to accomplish their lighting goals. This course covered so many unique (but, most likely to come across scenarios) and how one would approach the challenge and how to successfully accomplish with incredible results, not average-sub-standard or basic results, but above entry-level standards, high-level, money-generating lighting expertise! ZERO laziness in her explanations to the point where she is constantly refining her course in the middle of the 3 days. Her passion gleams throughout each days lessons with so much energy. You know she really wants her students both in-person and through the screen to be successful in whatever type of lighting they choose to dabble in. I am so happy, I have bookmarked, and i'm so happy and fortunate to have this course to reference for hopefully –everrrr. Thanks!
Beatrice Palma
Hi, I am Beatrice from Italy. I think this class is superb. I finally understood what are the guide lines to follow, I tried for years but never found such a good explanation. Lindsay is a wonderful teacher, she explains in a simple way, she shares a lot of knowledge and she shows in practice what are the results of every single choice. Thank you so much, it was really amazing and super interesting!!!!
Student Work
Related Classes
Lighting