Lesson Info
36. Beauty Lighting: 1, 2, and 3 Lights
Lessons
Day 1
1Studio Essentials: Shutter Speed
15:50 2Studio Essentials: Flash Exposure
22:26 3Studio Essentials: White Balance
21:15 4Light Principles: Inverse Square Law
26:46 5Lighting Patterns
15:29 6Shoot: Demo Lighting Patterns
28:06 7Quality of Light and Modifiers
09:59Shoot: Choosing a Modifier - Diffusion and Grid
13:40 9Shoot: Choosing a Modifier - Umbrellas
31:01 10Shoot: Choosing a Modifier - Softboxes
21:08 11Shoot: Choosing a Modifier - Extra Stuff
28:10 1210 One Light Set-ups: 1 and 2
17:07 1310 One Light Set-ups: 3 to 5
18:16 1410 One Light Set-ups: 6 to 10
15:57 15One Light Set-ups: Pop Quiz
21:21Day 2
16FAQ for Purchasing Studio Light Part 1
31:00 17FAQ for Purchasing Studio Light Part 2
25:36 18FAQ for Purchasing Studio Light Part 3
43:53 1910 Two Light Set-Ups: 1 and 2
24:29 2010 Two Light Set-Ups: 3 to 6
25:24 2110 Two Light Set-Ups: 7 to 10
22:30 225 Two Light Set-Ups: 1 & 2
13:27 235 Two Light Set-Ups: 3 to 5
33:37 245 Basic Three Light Set-Ups: 1 & 2
21:05 255 Basic Three Light Set-Ups: 3 to 5
25:52 265 Intermediate Three Light Set-Ups: 1 to 3
17:14 275 Intermediate Three Light Set-Ups: 4 & 5
12:58 2810 Common Lighting Mistakes
16:46Day 3
29Solving 12 Common Problems of Studio Lighting: 1
39:29 30Solving 12 Common Problems of Studio Lighting: 2 to 6
37:25 31Solving 12 Common Problems of Studio Lighting: 7
15:50 32Solving 12 Common Problems of Studio Lighting: 8
25:51 33Solving 12 Common Problems of Studio Lighting: 9
16:19 34Solving 12 Common Problems of Studio Lighting: 10 to 12
26:11 35Portrait Lighting: 1, 2, and 3 Lights
14:51 36Beauty Lighting: 1, 2, and 3 Lights
18:06 37Lighting Groups: 1, 2, and 3 Lights
15:53 38Lighting for Drama: 1, 2, and 3 Lights
24:19 39Your First Studio Lighting
38:46Lesson Info
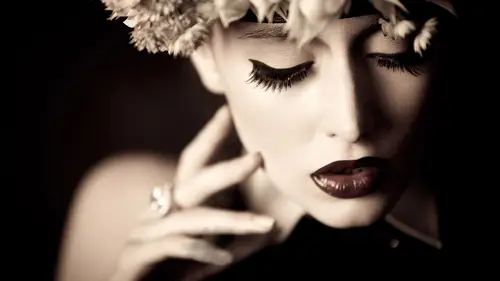
Beauty Lighting: 1, 2, and 3 Lights
We're going to talk about if you do ah lot of beauty shots a lot of head shots you're going to want a beauty dish and a b dish is going to give me a little bit more crisp shadows than a soft box gives me a little bit more control and generally I would use this and this is going to be a beauty light section maybe for photographing a woman but you can also photographs a man using the sliding sit ups along waiting for her I'll just show the difference we'll take one shot like this and this is actually going to be on ah background that's not lit so everybody who's watching these back strobes are not firing I'm just not moving them because it's convenient not to for this segment and you perfect all right so for beauty dish perfect I want to keep it nice and close to two four feet especially for a nice tight head shot and typically for a girl maybe I would have it flat lit to the front for him. However I'm going to move the light off to the sign to give me a little bit of rembrandt and raise...
this late up higher than I normally would I'm can you wrangle that down because I know I can do this thank you so I'm going to raise that let up even higher for a guy I circles with your face perfect see how we're asking that question you want the center of the bt dish right at his face so I'm going to bring that around to the side to get rembrandt I'm going to have you hold this and for a guy I might even raise it up a little bit more I want a lot of shadow all right so how does that look it's still roughly at your face ok perfect so let's take a meter reading five point six is ru four point six perfect so even though clamshell lighting can be more for women I would like to modify this to be a little bit more dramatic for a guy and so if you look you don't see the catch like it's not like flat and glowing an area I've moved it off to the side a little bit and now the catch like that's predominant is actually the catch late in the bottom if I do not want so much light on the background I can feather this away or hold a black sea flat or a black piece of foam core so it doesn't quite hit the background so should be a little bit darker just a tiny bit ok so this wasn't actually intended for you so have you step out whenever you thank you for being my lovely standing okay so the core of beauty like if I have one light is going to be a beauty dish as centered as I can get it perfect. Lovely lady beat it as centered is possible which is called paramount lighting. I want it to be high enough up in order to shape her face I want to show her cheekbones if it's too flat there's not too much shape if it's too high their shadows in her eyes that looks perfect so I'm going to give it a try without the reflector first. Great. Yeah let's, give it chart. Well, let me let me test this and we'll do a shot at the end. Look bajor to me. Great. Okay, perfect. You will more so this looks nice, but if I really want that glow that you like from beauty lighting, we add a reflector underneath and if you want her to use her hands, which sometimes you would, then you need someone else to hold the reflector. Or you would get a reflector stand or last delight trife lecter or john cornyn cello or what I'll do to sometimes it's the stand it has put a clamp here and then we'll put ah, clamp on the reflector and then she can use your hands and it rests on her waist that's another creative way to do it well, yeah, it kind of his balance perfect great when you add a reflector it catches all this light from the beauty dish so it's going to give you a really much more bright exposure she might need to close down a little bit the closer I bring the reflector underneath her chin the brighter it gets the lower that I put it the less builder is silver gives the sparkle white gives you a subtle phil so let me just do one more and had straight towards me for one good great and one more would team up and if I think that's too much phil let's switch to white just so you can see the difference one with silver one was white it will be much more subtle phil on this one perfect so you'll be able to see there's more contrast with silver watch the highlights on her neck and on her chin what is just a little bit softer more shadows are visible so that is beauty lighting with one light I would choose a beauty dish above and a silver reflector below that is called clamshell light we're going to switch to two life we have the beauty dish above a silver reflector below and I'm going to put a soft box behind her so this is how I can give myself a pure white background even when I don't have multiple lights to light that back on and the other thing I like about it is the light it acts differently than just letting a white background it pours over her shoulders. It wraps around your hair, it's much more of a glowing effect, so we're going to put the soft bucks right behind her and the distance is actually right up against her. The more I want the lights around, the further I put that soft box right up against her head and the less that I want that lights up, I have her step away from the soft box and the highlights get smaller and smaller. I can do this with multiple tutu modifiers like I could use the soft box instead of a beauty dish, but for beauty, I like the extra contrast to emphasize buns and jawline. So you look perfect and the only thing I would have you do is can you pull that hair on your your left side off a little bit more? And the reason I'm doing this is just I want you to see the light wrapping around the job. If her hair is down, you won't be able to see it as much. Also with blonde hair with this backlight, it can potentially get overexposed. Overexpose is a little bit relative in this. This situation depends on what looks good, and I want to make sure that more or less that the head behind her is not over her shoulder. The center off that light I want a little bit behind her back and so if it lowers a little bit great if not it's ok that's fine, but perfect because if it's over her shoulder the center of the light soft boxes they have hot spots even if you added effusion in the center to spread it out it's still going to have that great a great spot in the middle so I want that you could be just a little bit lower and I can already see this nice glowing highlight on her jaw I'm not using my main line at this point I'm just using the backlight and so I'm going to be able to see what that backlight is actually doing and what it's doing is giving me glow from behind really heavenly and this nice highlight on her job is you have a problem with the hair kind of getting blown out here this would not be a lighting setup you would go for you wouldn't said just light a white background or you pull her hair back street and then you don't have that problem so you kind of have to make a decision hair like mine would be much more objectionable for a set up like this because it would start to piece apart darker hair with lots of girls so I like that look that looks good let me add in my beauty dish next great beautiful. And this looks great even without any reflector below giving her a nice shape on her jaw line. Really beautiful definition. If I want that highlight on that side of the face her right hand side of the face to show up more, I create a little bit more shadow and I could pull the light off to the side a tiny bit more. That tiny bit more shadow will emphasize the highlight from the background. Okay, but then forgive this that beauty. Look, I can add a reflector from below. Let's do white. You could do a white or silver one has more filling the other let's. Just try a soft fill of white. Perfect. Great. I'm going to close down like a third of a stop. Nothing serious. Just a little bit darker. Beautiful, great light on her jaw. Nice. And now your hair looks like it glowing from every direction. S so that is beauty lighting with two lights. Now I'm gonna switch to beauty lighting with three lights and we're going to do a high key and a low key version are so beaut lighting would be beauty dish with a silver dish below. So we're gonna actually stack the lights will have a clamshell created by two lights and then barn doors separating her jaw line. So the reason if that I would do this is I want maybe a little bit more drama to that light and it doesn't have to be rembrandt could be loop so I'm going to set this up. This looks good. Give her a little bit of shadow that side of her face. I'll take this ok and let's test it out so far, those barn doors didn't close them down to just be ah hairline on her doll. I think that looks nice she's got some separation from the background it kind of pops out the hair it's a nice hair light, and then what I can do is I use the beauty dish to sculpt her face and I could use a reflector to fill in the shadows, but sometimes and we talked about this, sometimes it gives you less control like it's just you can kind of fill it in, but if you take a grid or a silver reflector, you could pop just a little bit of light in the shadows and control the direction and the quality of flight. You could put a soft box underneath if you wanted a softer, broader field. Or maybe you wanted a strip light across to give you that long, narrow highlight could do that, so we're going to just pop a silver dish and what I need to be aware of his the number one way to mess this up is to have your bottom line too bright, because then it looks like there's a light from below. It's kind of the monster lighting makes your face look wider. Highlights underneath her chin underneath her nose and said, you just want to pop of light. Perfect. All right, take a look. That looks pretty good. I might take a half step closer to see how it conceptually fill in the shadows and you might holding up just a little bit higher. Quick. Great. And I have a new pump it up just a little bit just so you can see the difference and turn your head straight towards me. Good. Perfect. So I can give myself a little bit more shadow on that side of her face. The barn doors carve out her doll line and the silver reflective dish below pops awaiting your eyes. You can go even more dramatic if you wanted to. We could bring this light off further to the side as well. There's not a right or wrong answers just more or less shadow and perfect get that looks great. Something I did want to notice. Their note is wash out when you're using those barn doors when people have hair like this. Because what'll happen is the barn doors can shoot through the hair and then create funny highlights on the face which I find distracting it starts to get that way here with the hair in the ear so you just want to be aware of it and so that's why I turn off my main light when I start setting the barn door so I can see exactly exactly what it's doing. Can you put your head back one more time? That's okay, I'm just going to show you guys I moved the hair and look ahead back this way and so I can actually see in this example just all I want you to look at the highlight on the side of her face between the two, you know, and one it was the hair into turned away so just like an inch or two of distance makes a big difference with barn doors just want to be careful on that. So those are lower key example I like this one that we just did shot on black. The reason I like a shot in black is it's a little bit more shadow it's a little brighter highlight it's a little bit more contrast then I would go for for high key so here would be my my high key you want just gonna point the's barn doors back at the background, okay and I am going to beauty boxer we're going to go for, like, really glowing and flat light, so to get that I need to bring the beauty dish as far in front and center as possible, I'm going to do that first and foremost nice and flat light here which looks beautiful and because of how this stand is built, I can actually get paramount light because I don't have to shoot path this stand because it elevates it out to the side just a little bit so she's this's when good okay said is shooting a little bit over her head so you want to put it down just a little bit. I can lower it just a little the great about their alright, perfect. So the next part of this is this will probably look fine as is but it's not the really glowing in high key look that I'm going for. Let me get a quick test here see how that background looks to have a white background but the light on her faith I wanted to be totally flat, very glowing. So I'm going to box her in. Can I have one more reflector? Always right there. Okay, perfect. All right, so how this works beauty box and boxing her in one reflector on either side to make a v if you have foam core all you have to do is pull the piece of foam court half have you bring even close was closest possible touching in the middle it's going to catch light from all directions and it's going to make the picture brighter so I might have to close down good let me take a prety only take one more a third of a stop closed down perfect and so it will give me completely like flat creamy even like which is really good for people that have heavier wrinkles or have some blemishes because eliminates shadows not as good for somebody that has a really round face because you're not using any shadows to help them out so that was beauty lighting with one two or three lights three lights high key and low key so let's see if there are any questions on that well this question had come in and know we've addressed I lighters from keith do ever use I lighters excellent question okay so what an I a lighter is big silver scoop of a reflector currently it's being produced by westcott and what it does is it acts like and it's not a stand acts like clamshell like all the time and it collects late from every direction it's silver and it's sparkly and it makes really cool like a half moon shape catch lights in the eyes it has a very distinctive look it is very very blowing it looks nice but I think it has limited use you get that one look from it because it's just silver I can't switch it silver and white I can't change the angles but if you like that look go look it up look up I later you'll see exactly what the look is then it looks great it would not be my go to before I just buy reflector said by reflectors first before I bought a highlighter very tight head shots would the lighting change radically if you wanted to get say half length with her sitting like that also question okay, so if we were going to get half length to a little bit wider two things I would watch out for is I would need a boom arm so that I could shoot and have a little bit more room to work with get this out of the way a tiny bit the other thing is is if you want that dress to sparkle it will fall to shadow more so I'm gonna turn you two you're right just a little bit perfect I'm gonna have you yeah, that was good. Okay, put your hand back up on your hip I was going to scooter up more a little bit lower real song perfect great and then put that hand out cheering me your backhand great! I was giving myself a little bit of separation okay, so let me show you, first of all, let me lighten it up just a little bit more, ok? So, here's, what you're seeing the difference is I think this is a knife light, like I think that is nicely, it does fall to shadow a little bit more down here, but it's, minimal, what I do have to pay attention to is how we set up the lights for the background right now are just more for head shot. If I were going to get more mid length, I'd probably switch over the umbrellas or pull the lights back so it's a little bit more spread because I noticed it gets darker on the white background down here and I don't want a photo shop the other part. If you were trying to get that flat boxed in light, you would have to use bigger white pieces of foam core that would perhaps meet down here and I do it all the time, but I'm usually using my v flats real close to catch is much light impossible, whereas I can't do it with just the small reflectors anymore because they're too far away.
Class Materials
bonus material with purchase
Ratings and Reviews
BolesMA
If you're on the fence about this class I can easily answer your concerns. BUY IT. Lindsay provides top notch professional education while keeping things interesting. Her words are precise and direct. I actually felt GOOD just watching and learning. I mean, like someone surprised me with a cupcake kinda GOOD. After the class I could immediately see improvements in my photography. The best part is that I learned enough to see the wrong in my setups. Knowing what's wrong is just as important as knowing what's right. She is funny, easy going, energetic and filled with knowledge. I would also highly recommend her Posing 101 class as a must have addition to this course. I feel like I have learned more than I could possibly use. I will be going through this course over and over again just to make sure it all sinks in. There's THAT MUCH she offers that you will always learn more with each time you watch. I hope this helps someone make the decision to up their game. That is exactly what it did for me.
Jason Ashley
I loved this course! Lindsay spent so much time with explaining each set-up in-depth that anyone picking up a camera could understand how to accomplish their lighting goals. This course covered so many unique (but, most likely to come across scenarios) and how one would approach the challenge and how to successfully accomplish with incredible results, not average-sub-standard or basic results, but above entry-level standards, high-level, money-generating lighting expertise! ZERO laziness in her explanations to the point where she is constantly refining her course in the middle of the 3 days. Her passion gleams throughout each days lessons with so much energy. You know she really wants her students both in-person and through the screen to be successful in whatever type of lighting they choose to dabble in. I am so happy, I have bookmarked, and i'm so happy and fortunate to have this course to reference for hopefully –everrrr. Thanks!
Beatrice Palma
Hi, I am Beatrice from Italy. I think this class is superb. I finally understood what are the guide lines to follow, I tried for years but never found such a good explanation. Lindsay is a wonderful teacher, she explains in a simple way, she shares a lot of knowledge and she shows in practice what are the results of every single choice. Thank you so much, it was really amazing and super interesting!!!!
Student Work
Related Classes
Lighting